I was just informed that the indexer is done and the last piece of the book is at the printers. I think this has to count as being "officially" done, although it won't feel real until I have a copy in my hand.
By the way, the final cover was a grapefruit, and it looks good and matches well with the other books in the series that will be coming out, which all have different kinds of citrus fruits. Again, please don't ask me why we have citrus fruits, I don't know any more than I know why O'Reilly has woodcuts on theirs. It looks good, and that's all that matters.
Friday, October 31, 2008
Updated SQLitePersistence
As I think I mentioned earlier, Marcel Molina is doing some great work adding Ruby ActiveRecord style associations and also refactoring some of my code to make it much cleaner and neater.
Today, I did a little surgery of my own, albeit minor outpatient surgery. I added a bunch of methods to the database instance manager to allow greater control over database configuration, allowing you to specify such things as the autovacuum level, cache size, and the like.
Even if you don't have an interest in using SQLitePersistentObjects, if you use SQLite for either iPhone or Mac/Cocoa applications, it's probably worth your time to take a look at the SQLiteInstanceManager class in the project. It stands on its own and can be used without the rest of the package and it makes managing your database a heck of a lot easier. Just drop it into your project, grab a reference to the sharedManager, and start working with it - no need to create or open the database, or specify a file location or anything.
And, when you realize how nice it is not to have to write code to do any of that, maybe you'll become interested in checking out the rest of SQLitePersistentObjects.
Note: Anybody out there who has successfully used SQLitePersistentObjects for a delivered application, please let me know, and also let me know of any problems you encountered along the way.
Thursday, October 30, 2008
Some More Open Source
This time, it's not me offloading my old source code on you, though. It's an iPhone app by Jonathan George called Packlog, which is a client for updating 37Signal's BackPack Journal.
You can find the source code (released under the very lenient MIT license) right here.
Thanks, Jonathan!
You can find the source code (released under the very lenient MIT license) right here.
Thanks, Jonathan!
SplashID Password
 SplashData on announced the release of SplashID 4.5, an update to its secure information manager for the iPhone. A free update for registered users, SplashID costs $9.99 and is available for download from the App Store.
SplashID helps you store user names, passwords and account numbers on your iPhone. The data is encrypted to prevent prying eyes from seeing it, and it's designed to work concurrently with SplashID for Mac OS X or Windows, a desktop software application (the desktop app costs an additional $19.95).
New to the 4.5 release is up to twice as fast loading times for users with large numbers of records; an enhanced user interface with simplified navigation; improved search and lookup functions; landscape view support; number pad login; a new browser window; and updated Mac and PC software. SplashID requires iPhone 2.0 software or later.
Reference:
http://www.splashdata.com/
iPhone Firmware 2.2: Rate The Application Before You Delete It
 Apple has changed the way of rating applications of iPhone and iPod touch. Earlier, if you had to write a review at iPhone App Store to rate applications, now there is another way coming.
 - Public Transit Times and Walking Directions
- Location Sharing
http://www.iphonehellas.gr/3308/iphone-v22-beta-2-please-rate-app-before-deleting/
store-ratings/
Wednesday, October 29, 2008
Speaking of Wil Shipley
Since I mentioned Wil Shipley, I thought I'd post a link to his excellent C4 presentation. Here it is. If you're an indie developer, and didn't go to C4, watch this video.
500%
I didn't run the press release yesterday, but apparently other bloggers took the bait. Basically, this company called "oDesk" (which I had never heard of before receiving their press release) claims that the demand for iPhone Developers is up 500% in six months.
Of course, this is based on "internal data" with a sampling size that is admittedly too small to be valid. Besides, six months ago, the SDK wasn't even stable and you couldn't distribute apps yet. It was the era of first-wavers, and with the exception of a few large companies that Apple got on board with them, most of the first-wavers were individuals and small Mac development shops.
Now with huge App Store success stories running rampant and general consensus being that the App Store is a runaway success (albeit with few hiccups along the way), of course everyone wants in! There's gold in them thar hills! It's no longer risky to jump into the fray. Those of us who saw the opportunity for what it is from the start and jumped in with both feet (in my case, turning my back on a client-base I had been developing for almost a decade in the process) got a head start because we took a chance. We trusted our judgment and jumped.
Now, all this press release really says is that some johnny-com-lately company has realized we were right and wants to cash-in on that missed opportunity. And though the numbers look good on the surface (or would if they were statistically valid), crap like this actually sucks for our platform. This is the kind of things that college and high-school students read and say "Oh, I want to be an iPhone developer". And, of course, most of them don't want to be an iPhone developer because they love tinkering or programming or problem solving. They want to be an iPhone developer because they envision themselves making big bucks with little effort, spending their days sitting in hot tubs with playmates, driving expensive cars, and otherwise living the high life.
(Just for the record, that is not the life of any iPhone developer I know, except maybe Wil Shipley, but I only know him by reputation.)
It's like those Microsoft Certified Training programs with the radio ads that promise to take somebody who doesn't know jack shit about computers and in six weeks turn them into a "certified" guru who can handle any job that needs to be handled.All this shit floods the market with people who don't know their ass from a hole in the ground. It drives up rates in the short term and causes them to crash in the long run, and it makes it miserably hard for companies to find developers who knows what they're doing unless they happen to already have somebody who's technically knowledgeable about the SDK who can weed out the chaff.
I guess it's inevitable. Success attracts. And, in the long run, it's probably good for the platform, but there's going to be some rough times ahead as a result. I wish success only attracted the right people and for the right reasons.
Better Template
Hello again.
I'm in desperate need of a better template for this blog - one that has good support for code snippets and preferably uses flexible width rather than just floating in the middle of the screen when the viewer has a large monitor (and these days, what developer doesn't?).
My searches for blogspot/blogger templates mostly brings up templates that have different visual elements, fonts, and colors, but the same basic layout as the default templates. If anyone knows of a good template, I'd really appreciate a heads up. I don't mind tweaking the code, but I don't have time write one from scratch. My Web-Fu is rusty and weak.
I've got a couple of more full-fledged tutorial I'm interested in doing, but it's just too painful with this template.
Thanks
Tuesday, October 28, 2008
CGAffineTransform 1.1 - A little more
I mentioned "shear" in the last article, but I didn't show you how to use transformations to shear a view. When you "shear" a rectangle, you turn it into a parallelogram. Apple doesn't provide a function to do this, but you can do so much with transformation matrices beyond what they've given you functions to do. Here is an example of one. The "shear" matrices look like this:
X Shear
Y Shear
So... we can make our own CGAffineTransformShear() functions. Here we go, fasten your seatbelts:
CGAffineTransformMakeShear.h
CGAffineTransformMakeShear.m
Now, we can shear a view, even one we create in Interface Builder:
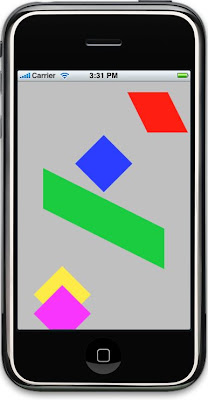
The red and the green parallelograms in the screenshot to the left are just UIViews with a shear transform applied, using the functions above.
Have fun!
Oh, and if you want it - here's the revised Xcode project from the last article using shear.
X Shear
|  1   0    0 |
|SHx   1    0 |
|  0   0    1 |
Y Shear
|  1 ShY    0 |
|  0   1    0 |
|  0   0    1 |
So... we can make our own CGAffineTransformShear() functions. Here we go, fasten your seatbelts:
CGAffineTransformMakeShear.h
#import <UIKit/UIKit.h>
#import <CoreGraphics/CoreGraphics.h>

CGAffineTransform CGAffineTransformMakeXShear(CGFloat proportion);
CGAffineTransform CGAffineTransformXShear(CGAffineTransform src, CGFloat proportion);
CGAffineTransform CGAffineTransformMakeYShear(CGFloat proportion);
CGAffineTransform CGAffineTransformYShear(CGAffineTransform src, CGFloat proportion);
CGAffineTransformMakeShear.m
#import "CGAffineTransformShear.h"
CGAffineTransform CGAffineTransformMakeXShear(CGFloat proportion)
{
 return CGAffineTransformMake(1.0, 0.0, proportion, 1.0, 0.0, 0.0);
}
CGAffineTransform CGAffineTransformXShear(CGAffineTransform src, CGFloat proportion)
{
 return CGAffineTransformConcat(src, CGAffineTransformMakeXShear(proportion));
}
CGAffineTransform CGAffineTransformMakeYShear(CGFloat proportion)
{
 return CGAffineTransformMake(1.0, proportion, 0.0, 1.0, 0.0, 0.0);

}
CGAffineTransform CGAffineTransformYShear(CGAffineTransform src, CGFloat proportion)
{
 return CGAffineTransformConcat(src, CGAffineTransformMakeYShear(proportion));
}

Now, we can shear a view, even one we create in Interface Builder:
The red and the green parallelograms in the screenshot to the left are just UIViews with a shear transform applied, using the functions above.
Have fun!
Oh, and if you want it - here's the revised Xcode project from the last article using shear.
seadanya dulu..
Restore with Filecustom Prepare AppTSB.
(2G,3G under Windows)
A. Requirement:
1. iPhone PWNer (Fw 114, 2.xx).
2. File Restore Custome Fw 2.1
* di DVD, atau dl di snipr.com/2cust21 (iphone 2G)
3. QuickMipWin.zip, snipr.com/4All.
* Windows perlu .Net Framework 3, Free download dari Microsoft.
4. iTunes 8 (terhubung ke internet).
5. File Restore iPhone Fw 21.
2G: snipr.com/2Gip21. 3G: snipr.com/3Gip21.
B. Restore Fw 21 w/ file custome.
Backup data2 di iPhone (Sync).
1. Arahkan iPhone ke mode Recovery.
dalam keadaan tidak terhubung ke Usb, tahan bersama-sama tombol Home dan Reset
iPhone akan Off dan otomatis Reboot (restart), begitu iPhone menyala..langsung lepas Reset
tetap tahan tahan Home. sampai muncul dilayar logo iTunes dan konektor Usb.
2. Hubungkan ke Usb, iTunes mengenali status iPhone dalam 'Recovery mode', OK'in notifikasi iTunes.
3. Tahan tombol 'Shift' pada keyboard, sambil menahan 'Shift'..klik 'Restore' di iTunes.
4. Pada dialog yg terbuka, arahkan ke FileCustom Fw 21..lalu klik open.
5. Proses Restore.
6. Usai Reboot yg kedua kali, Dismiss Edit home screen, Autolock set ke Never, hubungkan ke Wifi atau set APN network.
7. Tunggu instalasi file2 payload.
* bila memakai file restore 'iki' custome TUNGGU minimal 30 menit. kurang dari itu ada kemungkinan instalasi 240 file payload ada yg corrupt.
8. Run Cydia, update file2 Essential.
9. Reboot. usai Reboot semua aplikasi payload baru muncul di springboard.
C. Install MobileInstallation dan iCommander.
1. Extract QuickMipWin.zip ke Desktop
2. Run QuickPwn.exe..Device Detection.
3. Browse For Firmware> Pilih File Restore iPhone fw 21 yg sesuai (A5, 2G atau 3G)..Next
4. Select Settings:
2G: Pilih Replace Boot Logos, kosongkan 3 pilihan yg lain (Cydia, Installer, Unlock phone)
3G: Pilih Replace Boot Logos, kosongkan 2 pilihan yg lain (Cydia, Installer).
5. Ikuti order Quickpwn.
6. Usai Reboot jalankan Cydia, update file2 yg ditawarkan.
* Update satu persatu..untuk menghindari kegagalan update bila ada salah satu repo bermasalah.
7. Sync ke iTunes.
8. Beli 1 atau 2 buah aplikasi (Free maupun berbayar) dari iTunes Store,
* Bila aplikasi jalan dgn baik, lanjutkan ke step berikut.
9. Run iCommander atau koneksi via SSH (winscp, SSHviaUSB atau Putty), set file Permissions MobileInstallation (MI) ke 0775 (nol tujuh-tujuh-lima), Reboot.
* letak MI ada di /System/Library/PrivateFrameworks/MobileInstallation.framework/
10. Klik file2 ipaTSB, file instalasi aplikasi tsb akan disimpan dalam library iTunes, dan akan diinstal ke iPhone saat melakukan Sync berikutnya.
11.Sampun.
Demystifying CGAffineTransform
One of the most common questions I get about iPhone programming is about how to rotate or scale or make various other changes to a view. I'm not talking about hardcore Core Animation kind of stuff, just simple, "How do I place a label at 45°" kind of questions. The expectation is that there should be a property called "angle" or "scale" that can be set, or that you should be able to hold down the option key in Interface Builder to rotate it there.
With Leopard, Apple gave us Core Animation,and it is very cool, but in order to achieve all that coolness, they had to add some concepts that make it not always intuitive. (BTW: If you do want to know more about Core Animation, I've been reading Bill Dudney's Core Animation for Mac OS X and the iPhone and it's very good).
Any change to a view's position, scale, or rotation can now be stored in a property of the view called transform. It's a CGAffineTransform struct, and it's a bit cryptic if you've never worked with transformation matrices before.
A transformation matrix nothing more than a two-dimensional array of numbers. Okay, perhaps I shouldn't say "just", as transformation matrices are quite powerful. They can store complex changes to the position and shape of an object, including rotating, scaling, moving, and skewing (or shearing) the view as it's drawn. This adds a little bit of programmer complexity if you want to do anything more than the absolute basics, but it opens up a world of possibilities.
So, what does this data structure look like? This:
yeah, it doesn't look like a matrix, does it? It is; it'sit is a 3x3 matrix, it's just that certain values in the matrix are constant, they can't change, so they're not represented by a variable. Here's what the matrix would look like drawn out in human-friendly form:
These 9 numbers are used to store the rotation, scale, and position of an object using something called Matrix Multiplication.
So, if a view has a transform, how does Core Graphics figure out how and where to draw it?
Basically, it figures out where it would draw each point (x,y) without the transformation, and then does the following math to figure out the new, transformed point:
And that works? Yep, it does, amazingly enough. If you're interested in the math behind it all, there are many good sources. Just google "Matrix Transformation" to find some. If you're going to be doing complex transformations, it's a good idea to have a basic understanding of the underlying maths, but for basic usage, you can get away without it.
The reason you can get away without understanding the intricacies of the math is because Apple has provided us with a number of functions to retrieve standard matrices and to standard transformations. In order to use any of these transformations, you will need to include the CoreGraphics framework in your project, and include the CoreGraphics header file:
All views (and layers, but we're not talking about layers today) start out with their transform property set to the Identity Matrix. This matrix represents the object without any changes. It hasn't been rotated, scaled, sheared, or translated (moved). For a view that has the identity matrix for the transform property will be drawn based solely on the size and origin in the bounds property.
Any time you want to reset a view or layer to its original, untransformed state, you simply set its transform to the Identity Transformation using the constant value CGAffineTransformIdentity like so:
Translation is just a fancy way of saying "moving". You can, of course, accomplish a move by changing the origin value of the view's frame property (which moves the view in relation to its superview), but since we can't use the frame property along with other transformations, the translate transformation is an important one. If you want to translate a view, you use a Core Graphics function called CGAffineTransformTranslate(). This method takes three paramters. The first is an existing CGAffineTransform value that the translation will be applied to. To translate a view from its current position, you would pass the view's transform property here. To translate the view from its original position, you would pass in CGAffineTransformIdentity. Here is an example that would move the view five points to the right and ten points down.
Matrix multiplication is cumulative, so if you translate by five pixels, then translate again by five pixels in the same direction, you get a translation of ten pixels, assuming that there were no other transformations in between the two calls.
The next most common translation, and the first one we're discussing that can't be done without transformations, is rotation, which is handled by the function called CGAffineTransormRotate(). This function takes two parameters, the first being the existing transformation matrix, and the second being the angle of rotation expressed in radians.
Radians? Who the heck thinks in radians? There's a convenience conversion macro in Core Graphics for Mac OS X called degreesToRadian(), but right now, it's inexplicably absent from Core Graphics for iPhone. It's an easy enough conversion, though - just add this line of code to your header file:
then you can rotate a view like this:
The final of the basic transformation is the scale transformation, which allows you to resize your view without touching its bounds property. To scale a view to double its original size, we use CGAffineTransformScale(), like so:
Here are a few things that you should make note of as you start working with transformations.
When you are scaling or rotating, the object will get scaled or rotated from the center of the object. In Core Animation, you can set an Anchor Point that will change that behavior, but if you are not using Core Animation and don't want to deal with layers, then in order to scale or rotate from, for example, you would have to also have to manually do translation transformations to reposition the view after the scale or rotation. Which brings another thing to mind:
When you apply success transformations, the order matter. Rotating and then translating will give you a different result then translating and then rotating. This can bite you if you're not careful.
As I said earlier, you can always get back to the starting point by setting the view's transform to the Identity Matrix. But, what if you just want to back out one transformation. Say, you rotated, then scaled, then translated, and you just want to "untranslate" it. This can be useful if, for example, you want to do complex animations, such as having a view move one way, and then return to its original position. There is another transformation to look at called the Inverse transformation. The inverse of a transformation is the translation that will negate that translation when applied after it. You can get the inverse transformation for any CGAffineTransform by using the function CGAffineTransformInvert(), like so:
The value of inverse in the code above is the same as creating a translation of (-5.0, -5.0), but you don't have to know what the transformation is to get the inverse using this method.
Okay, we've only scratched the surface of what is a very complex part of the iPhone, but I hope this helps make the concept of "transforms" and "transformations" more approachable and will help some people make more sense of the documentation. As always, if you have questions, feel free to ping me via e-mail or IM, or send a tweet my way. I use the same username every where, which is jeff underscore lamarche, except for gmail, where I'm jeff dot lamarche.
Here's a sample Xcode project that shows how to use some transformations on views created in Interface Builder.
With Leopard, Apple gave us Core Animation,and it is very cool, but in order to achieve all that coolness, they had to add some concepts that make it not always intuitive. (BTW: If you do want to know more about Core Animation, I've been reading Bill Dudney's Core Animation for Mac OS X and the iPhone and it's very good).
Any change to a view's position, scale, or rotation can now be stored in a property of the view called transform. It's a CGAffineTransform struct, and it's a bit cryptic if you've never worked with transformation matrices before.
A transformation matrix nothing more than a two-dimensional array of numbers. Okay, perhaps I shouldn't say "just", as transformation matrices are quite powerful. They can store complex changes to the position and shape of an object, including rotating, scaling, moving, and skewing (or shearing) the view as it's drawn. This adds a little bit of programmer complexity if you want to do anything more than the absolute basics, but it opens up a world of possibilities.
The CGAffineTransform Data Structure
So, what does this data structure look like? This:
struct CGAffineTransform {
   CGFloat a;
   CGFloat b;
   CGFloat c;
   CGFloat d;
   CGFloat tx;
   CGFloat ty;
};
yeah, it doesn't look like a matrix, does it? It is; it'sit is a 3x3 matrix, it's just that certain values in the matrix are constant, they can't change, so they're not represented by a variable. Here's what the matrix would look like drawn out in human-friendly form:
  |  a   b   0  |
  |  c   d   0  |
  | tx  ty   1  |
These 9 numbers are used to store the rotation, scale, and position of an object using something called Matrix Multiplication.
Note: By the way, this exact same process is used to transform shapes in three-dimensional graphics. The matrices used for 3D are 4X4 instead of 3x3 to capture the additional z dimension.
So, if a view has a transform, how does Core Graphics figure out how and where to draw it?
Basically, it figures out where it would draw each point (x,y) without the transformation, and then does the following math to figure out the new, transformed point:
new x position = old x position * a + old y position * c + tx
new y position = old x position*b + old y position * d + ty
And that works? Yep, it does, amazingly enough. If you're interested in the math behind it all, there are many good sources. Just google "Matrix Transformation" to find some. If you're going to be doing complex transformations, it's a good idea to have a basic understanding of the underlying maths, but for basic usage, you can get away without it.
The Basic Transformations
The reason you can get away without understanding the intricacies of the math is because Apple has provided us with a number of functions to retrieve standard matrices and to standard transformations. In order to use any of these transformations, you will need to include the CoreGraphics framework in your project, and include the CoreGraphics header file:
#import <CoreGraphics/CoreGraphics.h>
The Identity Transformation
All views (and layers, but we're not talking about layers today) start out with their transform property set to the Identity Matrix. This matrix represents the object without any changes. It hasn't been rotated, scaled, sheared, or translated (moved). For a view that has the identity matrix for the transform property will be drawn based solely on the size and origin in the bounds property.
Note: Views have both a frame (coordinates in superview's coordinate system) and bounds (coordinates in own coordinate system) property, but if you transform a view, you should not use or rely on the frame property anymore. If you are using transformations, work with the bounds property only, not the frame property, as transformations are applied to the bounds, but aren't necessarily reflected accurately in frame
Any time you want to reset a view or layer to its original, untransformed state, you simply set its transform to the Identity Transformation using the constant value CGAffineTransformIdentity like so:
theView.transform = CGAffineTransformIdentity;
The Translate Transformation
Translation is just a fancy way of saying "moving". You can, of course, accomplish a move by changing the origin value of the view's frame property (which moves the view in relation to its superview), but since we can't use the frame property along with other transformations, the translate transformation is an important one. If you want to translate a view, you use a Core Graphics function called CGAffineTransformTranslate(). This method takes three paramters. The first is an existing CGAffineTransform value that the translation will be applied to. To translate a view from its current position, you would pass the view's transform property here. To translate the view from its original position, you would pass in CGAffineTransformIdentity. Here is an example that would move the view five points to the right and ten points down.
theView.transform = CGAffineTransformTranslate(theView.transform, 5.0, 10.0);
Note: "points" or "units" generally mean pixels, but as we're moving to resolution independence and starting to support the third dimension, it's no longer correct to say it's always and forever true that one point is one pixel. But, it usually is
Matrix multiplication is cumulative, so if you translate by five pixels, then translate again by five pixels in the same direction, you get a translation of ten pixels, assuming that there were no other transformations in between the two calls.
The Rotation Transformation
The next most common translation, and the first one we're discussing that can't be done without transformations, is rotation, which is handled by the function called CGAffineTransormRotate(). This function takes two parameters, the first being the existing transformation matrix, and the second being the angle of rotation expressed in radians.
Radians? Who the heck thinks in radians? There's a convenience conversion macro in Core Graphics for Mac OS X called degreesToRadian(), but right now, it's inexplicably absent from Core Graphics for iPhone. It's an easy enough conversion, though - just add this line of code to your header file:
#define degreesToRadians(x) (M_PI * x / 180.0)
then you can rotate a view like this:
theView.transform = CGAffineTransformRotate(theView.transform, degreesToRadians(45));
The Scale Transformation
The final of the basic transformation is the scale transformation, which allows you to resize your view without touching its bounds property. To scale a view to double its original size, we use CGAffineTransformScale(), like so:
theView.transform = CGAffineTransformScale(theView.transform, 2.0, 2.0);
Note: If you are transforming the Identity Matrix, you can use the "Make" version of these functions which do not take a CGAffineTransform as a parameter, and just assume the Identity Matrix. So, for example, calling:theView.transform = CGAffineTransformTranslate(CGAffineTransformIdentity, 2.0, 2.0);
You could calltheView.transform = CGAffineTransformMakeTranslation(2.0, 2.0);
Those two lines of code are functionally identical.
Some Things to Be Aware Of
Here are a few things that you should make note of as you start working with transformations.
The Center of the World
When you are scaling or rotating, the object will get scaled or rotated from the center of the object. In Core Animation, you can set an Anchor Point that will change that behavior, but if you are not using Core Animation and don't want to deal with layers, then in order to scale or rotate from, for example, you would have to also have to manually do translation transformations to reposition the view after the scale or rotation. Which brings another thing to mind:
Order Matters
When you apply success transformations, the order matter. Rotating and then translating will give you a different result then translating and then rotating. This can bite you if you're not careful.
Stepping Back
As I said earlier, you can always get back to the starting point by setting the view's transform to the Identity Matrix. But, what if you just want to back out one transformation. Say, you rotated, then scaled, then translated, and you just want to "untranslate" it. This can be useful if, for example, you want to do complex animations, such as having a view move one way, and then return to its original position. There is another transformation to look at called the Inverse transformation. The inverse of a transformation is the translation that will negate that translation when applied after it. You can get the inverse transformation for any CGAffineTransform by using the function CGAffineTransformInvert(), like so:
CGAffineTransform inverse = CGAffineTransformInvert(CGAffineTransformMakeTranslation(5.0, 5.0));
The value of inverse in the code above is the same as creating a translation of (-5.0, -5.0), but you don't have to know what the transformation is to get the inverse using this method.
Conclusion
Okay, we've only scratched the surface of what is a very complex part of the iPhone, but I hope this helps make the concept of "transforms" and "transformations" more approachable and will help some people make more sense of the documentation. As always, if you have questions, feel free to ping me via e-mail or IM, or send a tweet my way. I use the same username every where, which is jeff underscore lamarche, except for gmail, where I'm jeff dot lamarche.
Here's a sample Xcode project that shows how to use some transformations on views created in Interface Builder.
I'm Flattered, I Think...
I received my first Press Release today. I think I should be flattered that somebody thought enough of my little patch of space on the intertubes to feel like sending me a Press Release would be of any value.
I'm not sure what to do with it, to be honest. I have no interest in being a shill, especially not for free, but not even for pay. If I wanted to be a sell-out, I'd still be an attorney. Press Releases (and this one isn't an exception) generally have a low signal-to-noise ratio and are filled with obnoxious puffery designed to bathe one particular company's products or services in a glowing, heavenly light. Reading most Press Releases just makes me cringe. I hate marketing-speak, and I especially hate when there's so much of it that I can't even discern the point they're trying to make.
On the other hand, if something would be of value to the few people who come here, I would like to pass the information on. I just can't bring myself to post formulaic press releases and am honestly not motivated enough to figure out what the hell the real message is, if there even is one.
For any Marketing-type folks who happen across this: If you want me to share information for your, I'll be happy to spread the word if it's relevant to the topics I cover. Send me the meat of the message in plain English, forget about the hyperbole and puffery, and get to the point. If it's something related to the iPhone SDK, I'll almost certainly blog it, but don't treat me as an extension of your PR department, especially if you're not going to have the decency to offer me a bribe.
(I'm just kidding about the bribe, of course.)
WSDL2ObjC
Hey, look! Another SOAP posting.
A reader with the Google name of EasyShout very kindly pointed me to a project on Google Code called WSDL2ObjC, and I'm quite appreciative. Although I'm not a huge fan of code generation in general, I welcome any solid, usable solution to the iPhone's lack of SOAP support, and this looks to be pretty good. Besides, code generation has a long history in the world of SOAP; we wouldn't want to be the only language without a good tool for generating stubs from WSDLs, would we?
So, if you're still looking for a good SOAP solution, check this one out. If and when I can find some free time, I'm going to try it out myself, and if I do, I'll post my findings.
Google Earth for Apple iPhone and iPod touch
 Google released Google Earth for Apple iPhone and iPod touch.
 Monday, October 27, 2008
SIMable Announces iPhone 3G Unlocking Chip
 UK based 24/7 Mobile Solutions announced a new version of its unlocking chip SIMable. SIMable unlocks any SIM card to which it is attached, allowing it to fully function even in locked handsets such as the iPhone 3G. This allows the iPhone 3G to be used with any network in any country.
SIMable is installed by cutting a small hole in a SIM card with the accompanying free cutter, aligning the SIMable chip with the SIM card and then inserting both into the iPhone 3G handset. The chip can later be removed and reused on another SIM card, which returns the handset to its locked state.
24/7 Mobile Solutions claims that the iPhone 3G’s warranty isn’t voided by SIMable as it doesn’t alter the handset in any way. SIMable costs 16.99£ (28$), can be ordered online and comes with a money back guarantee.
Reference:
http://www.simable.com/
Saturday, October 25, 2008
Table View Multi-Row Edit Mode

If you've played around at all with UITableView's "Edit Mode", you've probably been disappointed that it doesn't support the ability to select and then delete multiple rows in the table, the way that you can do in Apple's Mail application. It was one of the most welcome improvements made in the 2.0 iPhone OS, and I was a bit bummed when I discovered that the ability to do that was not being added to UITableView with the 2.0 release.
Personally, I'd like to see the functionality in more table-based iPhone apps, so I threw together a little sample iPhone project that shows how to do it. You can find the project Right Here.
I'm not going to walk through the entire projects, as most of it is standard application-building, but I wanted to point out the general approach I used. I do not know if this is exactly how Mail does it, and I'm certainly not sure this is the best way to do it, but it does work. The only aspect of the Mail implementation I didn't get is changing the background color of the selected rows in edit mode. I tried it, but was getting some weird behavior where the last-selected row was turning back to white, but when another row was added to the selection, then it would return to the correct color. At some point, I'll dive in and try and figure out what was wrong with that code, but for the time being, this should work pretty well for you and at least give you an idea of how the process can work.
In my controller class, I defined a few constants and macros:
#define kCellImageViewTag           1000
#define kCellLabelTag               1001

#define kLabelIndentedRect          CGRectMake(40.0, 12.0, 275.0, 20.0)
#define kLabelRect                  CGRectMake(15.0, 12.0, 275.0, 20.0)
The first two will be used later to retrieve the correct subviews of the table view cell. The bottom two define the possible positions of the row's text. If we're in edit mode, the text is going to be moved over a little bit (which will be animated). By defining the two rects here, we can shift the text over easily by simply assigning the new value to the label's frame property.
In my controller, I have two mutable arrays. One will hold the display values, the other will be used to hold which rows are selected when we're in edit mode. I also define a BOOL that will identify when we're in edit mode. I don't call it edit mode because I don't want to risk a name conflict or confusion with Apple's code.
 NSMutableArray *countries;
 NSMutableArray *selectedArray;
 BOOL inPseudoEditMode;
I also have two UIImage pointers that contain the checked and unchecked image. This is a little klugey - the unchecked is just a circle, so I probably should have just used CoreGraphics to draw the circle, but this was easier.
 UIImage *selectedImage;
 UIImage *unselectedImage;
I created a method that will create the selectedArray, populating it with NSNumber objects that hold a NO value for every row. This lets me easily reset the selection after a delete.
- (void)populateSelectedArray
{
 NSMutableArray *array = [[NSMutableArray alloc] initWithCapacity:[countries count]];
 for (int i=0; i < [countries count]; i++)
   [array addObject:[NSNumber numberWithBool:NO]];
  self.selectedArray = array;
  [array release];
}
This method gets called in viewDidLoad, and also every time we delete rows. The viewDidLoad method also loads an array with strings pulled from a text file and loads the two UIImages.
There's an IBAction method to toggle edit mode. This gets called when the user presses the "Delete" button in the Nav Bar. It changes the value of inPsuedoEditMode and also hides or unhides the toolbar at the bottom, which has the "Delete" button that causes selected rows to get deleted.
-(IBAction)togglePseudoEditMode
{
 self.inPseudoEditMode = !inPseudoEditMode;
 toolbar.hidden = !inPseudoEditMode;

 [self.tableView reloadData];
}
Most of the work here is in the tableView:cellForRowAtIndexPath: method. Here is where we have to look at whether we're in edit mode, and if we are in edit mode, look at which rows are selected.
- (UITableViewCell *)tableView:(UITableView *)tableView cellForRowAtIndexPath:(NSIndexPath *)indexPath
{
 static NSString *EditCellIdentifier = @" editcell";


 UITableViewCell *cell = [tableView dequeueReusableCellWithIdentifier:EditCellIdentifier];
 if (cell == nil) {
  cell = [[[UITableViewCell alloc] initWithFrame:CGRectZero reuseIdentifier:EditCellIdentifier] autorelease];


  UILabel *label = [[UILabel alloc] initWithFrame:kLabelRect];
  label.tag = kCellLabelTag;
  [cell.contentView addSubview:label];
  [label release];

  UIImageView *imageView = [[UIImageView alloc] initWithImage:unselectedImage];
  imageView.frame = CGRectMake(5.0, 10.0, 23.0, 23.0);
  [cell.contentView addSubview:imageView];
  imageView.hidden = !inPseudoEditMode;
  imageView.tag = kCellImageViewTag;
  [imageView release];

 }

 [UIView beginAnimations:@"cell shift" context:nil];

 UILabel *label = (UILabel *)[cell.contentView viewWithTag:kCellLabelTag];
 label.text = [countries objectAtIndex:[indexPath row]];
 label.frame = (inPseudoEditMode) ? kLabelIndentedRect : kLabelRect;

 UIImageView *imageView = (UIImageView *)[cell.contentView viewWithTag:kCellImageViewTag];
 NSNumber *selected = [selectedArray objectAtIndex:[indexPath row]];
 imageView.image = ([selected boolValue]) ? selectedImage : unselectedImage;
 imageView.hidden = !inPseudoEditMode;
 [UIView commitAnimations];

 return cell;
}
Notice a few things
- we manually create subviews to the table view cell's content view, and we assign them tags. The tags allow us to retrieve the correct subview when we get dequeued cell instead of creating a new one.
- We call beginAnimations:forContext: and commitAnimations: around our changes so that the changes get animated for us. That's all we have to do to make turning edit mode on and off animated
When a row is touched, and we are in edit mode, we have to set the corresponding row in the selection array to YES if it's currently NO and vice versa.
- (void)tableView:(UITableView *)tableView didSelectRowAtIndexPath:(NSIndexPath *)indexPath
{
 [self.tableView deselectRowAtIndexPath:indexPath animated:YES];
 if (inPseudoEditMode)
 {
  BOOL selected = [[selectedArray objectAtIndex:[indexPath row]] boolValue];
  [selectedArray replaceObjectAtIndex:[indexPath row] withObject:[NSNumber numberWithBool:!selected]];
  [self.tableView reloadData];
 }
}
There's one more method that's key to this process, which is another action method that gets called when the Delete button in the toolbar gets pressed. Because this toolbar is only shown when we're in edit mode, we don't have to check that, we just do the delete. Because you can't delete objects from a collection while enumerating over them, this method is a little more complex than you might expect.
-(IBAction)doDelete
{
 NSMutableArray *rowsToBeDeleted = [[NSMutableArray alloc] init];
 NSMutableArray *indexPaths = [[NSMutableArray alloc] init];
 int index = 0;
 for (NSNumber *rowSelected in selectedArray)
 {
  if ([rowSelected boolValue])
  {

   [rowsToBeDeleted addObject:[countries objectAtIndex:index]];
   NSUInteger pathSource[2] = {0, index};
   NSIndexPath *path = [NSIndexPath indexPathWithIndexes:pathSource length:2];
   [indexPaths addObject:path];
  }
  index++;
 }

 for (id value in rowsToBeDeleted)
 {
  [countries removeObject:value];
 }

 [self.tableView deleteRowsAtIndexPaths:indexPaths withRowAnimation:UITableViewRowAnimationFade];

 [indexPaths release];
 [rowsToBeDeleted release];
 inPseudoEditMode = NO;
 [self populateSelectedArray];
 [self.tableView reloadData];
}
Anyway, I hope this is helpful to some people. If you have any questions, put them in the comments, or drop me an e-mail.
Friday, October 24, 2008
Captain Obvious Strikes Again
In the Xcode editor pane (the part of the window where your source code is displayed), you can option-double-click any term to search for it in the Documentation Browser. You can also command-double-click any term to open up its definition in the public header files.
That is all.
That is all.
It's Beta, but it Shows they are listening...
New, official Dev Discussion Forums hosted by Apple.
Seems pretty cool so far, volume is low but increasing rapidly. C'mon over and join the discussions. Haven't seen much of a presence by "official" Apple folks yet, but still a good place to take a swim.
Combine this with the NDA drop and it tells me that people at Apple are listening to what Developers are saying. They might not always respond as fast as we'd like, but they do respond. Yay, Apple.
SOAP Web Services Redux
I should have posted a follow-up long before now, so my apologies. Some of my earliest postings here were on accessing Web Services from the iPhone. At the time I wrote that posting, I had not yet been accepted into the iPhone developer program, and wasn't aware that CoreServices.framework existed in the simulator, but not on the device.
I got accepted into the program and discovered the problem just before WWDC, and spent a good part of that conference trying to corner somebody from Apple about it. I was not able to get anyone who was even aware of the discrepancy, let alone somebody who could tell me whether the framework was intentionally left off of the device or if it would ever be brought over. The best I got was a very non-committal, off-the-record statement that WebServicesCore probably "wasn't long for the world". It hasn't been updated for a few years, and probably won't be. REST is the way of the future, why bother with SOAP, seems to be the feeling.
Of course, there is a huge installed base of SOAP web services which, I would argue, is a good enough reason to update and expand WebServicesCore. More importantly, many of the people coming to the iPhone are coming from .NET, which has extremely robust support for SOAP web services. I would argue that not having a good SOAP client in Cocoa Touch or Foundation makes our platform look bad.
Anyway, if you do need to access SOAP web services from the iPhone, you're stuck rolling your own or looking for a third-party SOAP library. There is an excellent thread over at iPhoneDevSDK. Right now, that's the best source of information I have to offer anybody about SOAP web services.
Now, if you're interested in RESTful web services, Apple has an article on that. In fact, they have an article that I co-wrote.
Haunted Halloween App For Your iPhone
 Hauntingsounds.com launched a new iPhone app Haunted Halloween. New application provides you with high quality spooky sounds and allows you to loop and overlay them to create the perfect Halloween soundtrack.
Thursday, October 23, 2008
Crimson FX Open Sourced
http://code.google.com/p/crimsonfx/
This project contains the source code for a Mac OS X digital video effects editor. Primarily designed to allow key-framed animation of laser and lightsaber effects, I had started to expand it into a more general-purpose effects editor.
The interface is horrible, could use quite a bit of help. I stopped working on this when Quicktime 7 came out and broke the compression code I was using. I lost momentum then, and never picked it back up. It still compiles, and it should work if the compression code is bypassed.
This was done pre-Core Image, so some of the code that takes advantage of hardware acceleration is probably a bit outdated. I also rolled my own convolution filter for applying blurs and other effects, but that code should really be converted to using Core Image.
I don't have any plans to start active development on this one again, but if there's anyone who wants to take it over, I'm happy to give you administrator status on the project.
Another Open Source Project
http://code.google.com/p/anaglyphmaker/
This project's a little more frivolous, probably won't be too much interest in it, but the code works, and somebody out there might have need of code that creates red/blue stereograms from two source images. This Mac OS X program makes those 3D images that you need the red/blue glasses to view.
It might be kind of neat to make a dual-iPhone version of this, where you put two iPhones next to each other, takes one picture from each, and then stitches them into a single stereo image aka an anaglyph. Don't think that can be fully automated with the official SDK, though.
Scroll Views
I've been realizing over the last couple of days that we missed covering something in the book that we should have: UIScrollView. Now that I've spent a few days fighting them, I must admit that I'm glad I missed it. These things are complex and not as well documented as they should be. I've got my app working with hit testing inside of a scroll view, and without jaggies, but my performance isn't good. Here's the thing:
UIScrollView ALWAYS starts at a zoom of 1.0. You can't change this. If you do, it will just cause it to act funny the first time the user touches the screen (please, if I'm wrong on this, correct me). But, if you zoom in on a view, it gets all pixelated and blocky unless you change your content view's (and/or subview's) backing layer to a CATiledLayer. Doing that kills performance on my first generation iPhone. I haven't tested it yet on my second generation iPod Touch, but I suspect it will only be a little bit better.
But, here's the thing. If I change the size so that I start zoomed in... so that the content view is the size of the zoomed view and don't use CATiledLayer, it works beautifully, scrolls fast, no skips, etc. But, I don't want the user to have to start zoomed way in. The program won't be intuitive if I do that.
A related problem is that I can't get the double-tap zoom and unzoom working. In an old edition of the iPhone Programming guide, there was sample code that supposedly showed how to do that, but I've tried it, and many, many variants of it, and never have gotten it to work right. There might be a reason why that code sample is no longer in the programming guide.
Anybody out there gotten this working?
Cocoa Barcodes
The Cocoa Barcodes project (formerly Barcode Generator) is now available at:
http://code.google.com/p/cocoabarcodes/
Cocoa Barcodes is a set of classes (and a test application) for generating two-dimensional barcodes. It supports many of the more common one-dimensional linear barcodes in use today, allows you to export a barcode as a TIFF, EPS, or PDF image, to copy the barcode image to the pasteboard, or to drag it to any other application that accepts standard OS X PDF data from the pasteboard, including TextEdit?. You can also print barcodes directly to any supported printer. Please note that you may not be able to create readable barcodes at all bar widths allowed by a specification. For example, Code 3 of 9 allows a bar width of as small as 7.5 mils, but I haven't had much luck going smaller than 13 mils on ink jet printers.
You have a fair amount of control over the final appearance of the barcode, including the bar width (in 1/10 mil increments), bar height, font size, and captioning. The following barcode types are supported:
Cocoa Barcodes is based on Barcode Generator, an open source Mac program which began its life as a test scaffold for a set of Cocoa classes I was writing. I did not initially intend to release it as a standalone program, but by the time I was done testing the code, it had the lion's share of the features available on other OS X barcode programs at the time so I decided to release it.
I intend to add iPhone support at some point, but currently, drawing the barcodes is accomplished using categories on NSView and NSImage, neither of which are available on the iPhone.
http://code.google.com/p/cocoabarcodes/
Cocoa Barcodes is a set of classes (and a test application) for generating two-dimensional barcodes. It supports many of the more common one-dimensional linear barcodes in use today, allows you to export a barcode as a TIFF, EPS, or PDF image, to copy the barcode image to the pasteboard, or to drag it to any other application that accepts standard OS X PDF data from the pasteboard, including TextEdit?. You can also print barcodes directly to any supported printer. Please note that you may not be able to create readable barcodes at all bar widths allowed by a specification. For example, Code 3 of 9 allows a bar width of as small as 7.5 mils, but I haven't had much luck going smaller than 13 mils on ink jet printers.
You have a fair amount of control over the final appearance of the barcode, including the bar width (in 1/10 mil increments), bar height, font size, and captioning. The following barcode types are supported:
- Code 3 of 9
- Extended Code 3 of 9
- Code 128
- Interleaved 2 of 5
- Industrial 2 of 5
- Codabar
- PostNet
- Modified Plessey
- Modified Plessey (hexadecimal)
- UPC-A
- UPC-E
- EAN-13
- EAN-8
- Royal Mail Barcode (also known as RM4SCC or CBC)
- Planet Barcode
- Japan Post Barcode
Cocoa Barcodes is based on Barcode Generator, an open source Mac program which began its life as a test scaffold for a set of Cocoa classes I was writing. I did not initially intend to release it as a standalone program, but by the time I was done testing the code, it had the lion's share of the features available on other OS X barcode programs at the time so I decided to release it.
I intend to add iPhone support at some point, but currently, drawing the barcodes is accomplished using categories on NSView and NSImage, neither of which are available on the iPhone.
Old is New
Sitting on my hard drive, I've got several Cocoa projects I've written over the years. For most of these, the source code used to be available on the web, but I stopped maintaining the site that hosted them. I'm going to go through those and see which ones may still have practical applications or have code that could be useful for the iPhone and start checking them into Google Code. I periodically raid those projects for code for iPhone projects, so I'm pretty sure there are diamonds left in the mine, so to speak. Well, cubic zirconia, at least.
First up is a set of Cocoa classes for generating bar codes. The code supports almost all two-dimensional barcode symbologies, and is fairly well-tested and stable, having been used in a couple of commercial and in-house applications. I'm not sure if there'd be much value in it, but it shouldn't take much to get it running on the iPhone if anyone needs it. I wonder if you can scan the iPhone's screen with a barcode reader? There might be some cool applications if you can... Does anyone have a barcode scanner and iPhone handy who can test that??
Currently, the code uses categories on NSView and NSImage to do the drawing. It shouldn't take too much effort to make a UIView and UIImage category to do the same thing. The NSBezierPath calls will have to be changed to use CG calls, but I can't imagine it being more than an hour's work (famous last words).
I'll post when I get the Barcode Generator source code uploaded, hopefully will be later today.
App Store Reaches 200 Million Downloads Mark
 Apple has announced that Apple iPhone and iPod Touch users have downloaded more than 200 million items from the Apple App Store just over 100 days since it opened on July 11.
 Apple app Store is a marketplace which hosts third party applications for the iPod Touch and the iPhone.
Apple has not revealed on how much revenue is generated from the Apple App Store. Sources say that the company was selling USD 1 million worth apps per day during the month of August.
The App Store is currently available in 62 countries and has over 5,500 apps available for immediate purchase.
References:
http://www.macrumors.com/iphone/2008/10/22/app-store-reaches-200-million-downloads/
Wednesday, October 22, 2008
You Shouldn't, but You Will...
Class-Dump is an essential tool in the Cocoa Programmer's arsenal. It will read a compiled Objective-C binary and print out the header files for all classes used in that file. Depending on the settings used to compile, it may not have the correct variable names, but it will have the correct method signatures, even those that are not declared in the public headers.
Now, for the iPhone, we can't use Class-Dump, because it doesn't recognize binaries compiled for the ARM6 processor. Additionally, we shouldn't use it, because it means we're poking around in private stuff that could get our Application banned from the App Store.
But, for the curious, I thought I'd point out that you can actually use Class-Dump on iPhone frameworks; you just have to run it on the framework that's in the SDK for the simulator rather than the device. The iPhone simulator is NOT an emulator.. it's not running ARM6 byte codes, it's running X86 byte codes (except for those naughty people who installed the SDK on a PPC Mac).
So, want to see the headers from the UIKit in all their glory?
But, shhhh.... You didn't learn it from me.
Now, for the iPhone, we can't use Class-Dump, because it doesn't recognize binaries compiled for the ARM6 processor. Additionally, we shouldn't use it, because it means we're poking around in private stuff that could get our Application banned from the App Store.
But, for the curious, I thought I'd point out that you can actually use Class-Dump on iPhone frameworks; you just have to run it on the framework that's in the SDK for the simulator rather than the device. The iPhone simulator is NOT an emulator.. it's not running ARM6 byte codes, it's running X86 byte codes (except for those naughty people who installed the SDK on a PPC Mac).
So, want to see the headers from the UIKit in all their glory?
cd /Developer/Platforms/iPhoneSimulator.platform/Developer/SDKs/iPhoneSimulator2.1.sdk/System/Library/Frameworks/UIKit.framework
class-dump UIKit > ~/Desktop/UIKit.txt
But, shhhh.... You didn't learn it from me.
Getting the contents of a UIView as a UIImage
In Cocoa, it's really easy to take the contents of an NSView and convert them to an NSImage using dataWithPDFInsideRect:. I needed to do the same task on the iPhone, so immediately looked for a comparable method. I didn't find one.
Thankfully, Google came to the rescue. Josh Goebel shows how to do it right here.
Thankfully, Google came to the rescue. Josh Goebel shows how to do it right here.
Note: To use this in your project, you'll have to link to the QuartzCore framework and also #import <QuartzCore/QuartzCore.h>
Shuffling Arrays
Ever want to randomize an array of items? It's a task that, for some reason, I've had to do a lot in recent programs. So, I wrote a handy category on NSArray to handle the task.
NSArray-Shuffle.h
NSArray-Shuffle.m
NSArray-Shuffle.h
#import

@interface NSArray(Shuffle)
-(NSArray *)shuffledArray;
@end
NSArray-Shuffle.m
#import "NSArray-Shuffle.h"

@implementation NSArray(Shuffle)
-(NSArray *)shuffledArray
{

 NSMutableArray *array = [NSMutableArray arrayWithCapacity:[self count]];

 NSMutableArray *copy = [self mutableCopy];
 while ([copy count] > 0)
 {
  int index = arc4random() % [copy count];
  id objectToMove = [copy objectAtIndex:index];
  [array addObject:objectToMove];
  [copy removeObjectAtIndex:index];
 }

   [copy release];
   return array;
}
@end
Encodings Can Byte You
It is 2008, right? I mean, in this day and age, it's not totally unreasonable to expect that NSString to default to using an NSUTF8StringEncoding as the default encoding when loading a file if it can't determine the encoding, right? I mean, since an ASCII file will load correctly using UTF-8, but not vice versa, UTF-8 seems like the best assumption or, at least, a better assumption than ASCII.
Well, it might be a "reasonable" assumption, but it's an incorrect one. NSString's initWithContentsOfFile: apparently assumes an encoding of NSASCIIStringEncoding when it can't determine the real encoding.
This, I'm embarrassed to say, bit me today. I had the following code that I was using to load a UTF-8 file with non-ASCII characters:
But the resulting strings didn't contain the correct non-ASCII characters that were in the file; every time there was supposed to be a diacritical or other non-ASCII character, the string contained two high-order (>128) ASCII characters. That's an indication that you've got UTF-8 data being loaded as ASCII (UTF-16 looks even weirder when it misses the encoding, making it easier to catch).
The solution is simple enough. Just explicitly tell it the encoding to use by calling initWithContentsOfFile:encoding:error: instead :
Well, it might be a "reasonable" assumption, but it's an incorrect one. NSString's initWithContentsOfFile: apparently assumes an encoding of NSASCIIStringEncoding when it can't determine the real encoding.
This, I'm embarrassed to say, bit me today. I had the following code that I was using to load a UTF-8 file with non-ASCII characters:
NSString *sourcePath = [[NSBundle mainBundle] pathForResource:@"act texts" ofType:@"txt"];
NSString *sourceData = [[NSString alloc] initWithContentsOfFile:sourcePath];
But the resulting strings didn't contain the correct non-ASCII characters that were in the file; every time there was supposed to be a diacritical or other non-ASCII character, the string contained two high-order (>128) ASCII characters. That's an indication that you've got UTF-8 data being loaded as ASCII (UTF-16 looks even weirder when it misses the encoding, making it easier to catch).
The solution is simple enough. Just explicitly tell it the encoding to use by calling initWithContentsOfFile:encoding:error: instead :
NSString *sourcePath = [[NSBundle mainBundle] pathForResource:@"act texts" ofType:@"txt"];
NSString *sourceData = [[NSString alloc] initWithContentsOfFile:sourcePath encoding:NSUTF8StringEncoding error:nil];
AppsAmuck WebSite Helps Aspiring iPhone Coders
 A newly published website - http://www.appsamuck.com/ - aims to help aspiring iPhone coders write their applications by providing the source code to real working application in the hopes that users will learn by real-world examples.
This will be a wonderful resource. Apps Amuck offers a directory containing free tutorials for professionals and hobbyists iPhone developers. Their goal is to help you solve your development problems, and learn the newest technologies using the many existing free tutorials available. The site will also contain discussion forums, a free job search, white papers, and other technical reference materials.
Reference:
http://www.appsamuck.com/
Tuesday, October 21, 2008
Idle Timer
If you're making a game, please, please, please remember to turn off the idle timer. The Force Unleashed, a big-budget game loosely modeled after the console game of the same name, is a moderately fun, very polished game, but the screen constantly dims during the game in cutscenes and other places where you're not touching the screen for a while.
C'mon, folks: it's one line of code. Use it.
C'mon, folks: it's one line of code. Use it.
[UIApplication sharedApplication].isIdleTimerDisabled = YES;
Starting in Landscape Mode without Status Bar
Here's another situation where the Simulator doesn't behave the same as the device. It's also something that's not well documented, so let's take a second to look at how to have an application start up in landscape mode without a status bar.
The first thing you have to do is open up Info.plist in your Xcode project. It will be in the Resources group. You need to add two entires. First, add an entry called UIInterfaceOrientation and assign it a value of UIInterfaceOrientationLandscapeRight. Second, ad another entry, and call it UIStatusBarHidden. When you add this row, it should change to a checkbox; make sure the box is checked.
Now, in your application delegate, find the method called applicationDidFinishLaunching:. In it, you need to add the following code,after the last line that's already there. The code you need to add should look like this:
After adding this code, your application, when run on the iPhone will rotate and resize the root view automatically just by virtue of having set the statusBarOrientation to UIInterfaceOrientationLandscapeRight. That's not the case when running it on the simulator, which is why the block of code in the conditional is necessary. With that, the code should behave exactly the same on the device and in the simulator.
To compile this code, you're also going to need to add the CoreGraphics framework. Make sure to add the framework using a reference type of "Relative to Current SDK'. The version for the device is located here:
/Developer/Platforms/iPhoneOS.platform/Developer/SDKs/iPhoneOS2.1.sdk/System/Library/Frameworks/CoreGraphics.framework
The first thing you have to do is open up Info.plist in your Xcode project. It will be in the Resources group. You need to add two entires. First, add an entry called UIInterfaceOrientation and assign it a value of UIInterfaceOrientationLandscapeRight. Second, ad another entry, and call it UIStatusBarHidden. When you add this row, it should change to a checkbox; make sure the box is checked.
Now, in your application delegate, find the method called applicationDidFinishLaunching:. In it, you need to add the following code,
 [[UIApplication sharedApplication] setStatusBarOrientation:UIInterfaceOrientationLandscapeRight animated:NO];

#if (TARGET_IPHONE_SIMULATOR)
 UIScreen *screen = [UIScreen mainScreen];
 viewController.view.bounds = CGRectMake(0, 0, screen.bounds.size.height, screen.bounds.size.width);
 viewController.view.transform = CGAffineTransformConcat(viewController.view.transform, CGAffineTransformMakeRotation((M_PI * 90 / 180.0)));
 viewController.view.center = window.center;
#endif
After adding this code, your application, when run on the iPhone will rotate and resize the root view automatically just by virtue of having set the statusBarOrientation to UIInterfaceOrientationLandscapeRight. That's not the case when running it on the simulator, which is why the block of code in the conditional is necessary. With that, the code should behave exactly the same on the device and in the simulator.
To compile this code, you're also going to need to add the CoreGraphics framework. Make sure to add the framework using a reference type of "Relative to Current SDK'. The version for the device is located here:
/Developer/Platforms/iPhoneOS.platform/Developer/SDKs/iPhoneOS2.1.sdk/System/Library/Frameworks/CoreGraphics.framework
Silicone Case for iPhone 3G
 The Incipio dermaSHOT Silicone Case for iPhone 3G ($14.95) is a rubber silicone case that tries to offer a layer of protection without adding much thickness.
 The Incipio dermaSHOT Silicone Case for iPhone 3G is a fairly simple case that offers protection for the backside, side, and corners of the iPhone 3G. There are multiple color options and the case also includes a clear plastic screen protector. The material used in the Incipio dermaSHOT is a very soft and malleable silicone. It is unique among competitive products because most silicone cases opt for the thicker, rougher material. This soft silicone design choice is both good and bad, it feels great in your hand because it almost conforms to your grip but at the same time is also susceptible to stretching and loosening.

The Incipio dermaSHOT covers the entire back of the iPhone 3G leaving a hole for the camera, headphone jack, and the silent switch. The volume controls and sleep/wake button are protected via a thicker rubber that offers protection but also easy access to its controls. Overall, the design is extremely simple—it doesn’t offer home button protection and doesn’t attempt to over complicate things with a sophisticated design or gimmicky options.
The design of the Incipio dermaSHOT is simple and basic. There will probably be folks that complain that it is perhaps too plain, but the case does its job—it offers great protection and won’t stretch over time. if you want a design that fits great around the iPhone 3G, offers above-average protection, and a multitude of color options at a very affordable price ($14.95), you probably can’t do any better.
Reference:
http://store.theiphoneblog.com/incipio-dermashot-silicone-case/4A54A4013.htm
SQLite Persistent Object Update
Last night, I fixed a bunch of bugs in the SQLite Persistent Objects code. I also wrote an iPhone application that uses it to save its data, and checked the project source code into Subversion as well. I plan to write a basic tutorial around this application, but wanted to make it available for anyone who wanted to see it in action. If you check out the project from Subversion, you should get a new folder called Sample Code . The Xcode project is in there; the links from the project back to the SQLite Persistent Objct code is project-relative, so if you put the Sample Code project anywhere else but in your sqlitepersistentobjects folder, you're going to have to relink those files.
I would appreciate it if someone could try checking it out and compiling it to make sure it works. The program uses the camera, but it can be run on the simulator,the "Take Picture" just won'tt work. If you want to run the sample code on the device, you'll have to change the bundle identifier, developer identity, and developer cert, of course.
I would appreciate it if someone could try checking it out and compiling it to make sure it works. The program uses the camera, but it can be run on the simulator,the "Take Picture" just won'tt work. If you want to run the sample code on the device, you'll have to change the bundle identifier, developer identity, and developer cert, of course.
Monday, October 20, 2008
Device vs. Simulator
The iPhone Simulator is a really cool piece of software. Although I do most of my development testing on an iPhone or iPod Touch, I really like having the option to run code when I don't have a device handy. It's a really cool piece of technology.
Sometimes, it can be downright annoying, though. Today, I hit an example of that. I'm working on a project that needs to run on both the Mac and the iPhone, and it does a fair bit of mucking around in the runtime. I've written programs using for both the Mac and the iPhone with no problems, but periodically would get e-mail from someone asking if I could make it work for the iPhone.
Well, it turns out *blush*... I must have never actually tested the code on an iPhone or iPod Touch, and only used this particular code in the simulator and on the Mac. You see, I have this line of code:
And that code works just fine and dandy for the Mac, and for the iPhone Simulator. But, guess what? obj/objc-runtime.h doesn't seem to exist in the iPhone SDK, so when you switch the SDK to the device and then compile, the build goes down in a blaze of gory (no, not glory, gory... it's ugly).
Fixing it was relatively trivial once I found the problem. The file objc/objc-runtime.h is a very simple header file. Here is what it looks like on the Mac:
That's it. And both of those files do exist for the device SDK. So, I simply replaced the one #import <objc/objc-runtime.h> statement with the two #import statements it contained, and voilá, it started working again. Mostly.
It compiled with no errors, but I got a whole bunch of warnings, all centered around the use of two methods it couldn't find: -className and +className. These methods do nothing more than return the name of the class, one is implemented as an instance method, the other as a class method. I have no idea why these two methods don't exist for the device SDK, but this was also easy enough to fix, since the class name is available through runtime calls.
I added the two methods, but wrapped the code in a pre-compiler conditional statement so it only gets used when compiling for the iPhone:
So, in the header file:
Currently, this resides on the class where I needed it, but I'm going to move it into a category on NSObject. The implementation of these two methods is nearly as short:
And that's all for today, I'm going to bed.
Sometimes, it can be downright annoying, though. Today, I hit an example of that. I'm working on a project that needs to run on both the Mac and the iPhone, and it does a fair bit of mucking around in the runtime. I've written programs using for both the Mac and the iPhone with no problems, but periodically would get e-mail from someone asking if I could make it work for the iPhone.
Well, it turns out *blush*... I must have never actually tested the code on an iPhone or iPod Touch, and only used this particular code in the simulator and on the Mac. You see, I have this line of code:
#import <objc/objc-runtime.h>
And that code works just fine and dandy for the Mac, and for the iPhone Simulator. But, guess what? obj/objc-runtime.h doesn't seem to exist in the iPhone SDK, so when you switch the SDK to the device and then compile, the build goes down in a blaze of gory (no, not glory, gory... it's ugly).
Fixing it was relatively trivial once I found the problem. The file objc/objc-runtime.h is a very simple header file. Here is what it looks like on the Mac:
#import <objc/runtime.h>
#import <objc/message.h>
That's it. And both of those files do exist for the device SDK. So, I simply replaced the one #import <objc/objc-runtime.h> statement with the two #import statements it contained, and voilá, it started working again. Mostly.
It compiled with no errors, but I got a whole bunch of warnings, all centered around the use of two methods it couldn't find: -className and +className. These methods do nothing more than return the name of the class, one is implemented as an instance method, the other as a class method. I have no idea why these two methods don't exist for the device SDK, but this was also easy enough to fix, since the class name is available through runtime calls.
I added the two methods, but wrapped the code in a pre-compiler conditional statement so it only gets used when compiling for the iPhone:
So, in the header file:
#if (TARGET_OS_IPHONE)
- (NSString *)className;
+ (NSString *)className;
#endif
Currently, this resides on the class where I needed it, but I'm going to move it into a category on NSObject. The implementation of these two methods is nearly as short:
#if (TARGET_OS_IPHONE)
- (NSString *)className
{
 return [NSString stringWithUTF8String:class_getName([self class])];
}
+ (NSString *)className
{
 return [NSString stringWithUTF8String:class_getName(self)];
}
#endif
And that's all for today, I'm going to bed.
Another Couple of Tips by Captain Obvious
The iPhone SDK is so large, it's easy to miss things that other people think are obvious. Because of that, I'm going to post another tip that most people probably know already, but that some people might now.
If you create a PNG file of size 320x480 and call it "Default.png" (spelled exactly that way, making sure you have the first letter capitalized), you can then add that image to your Xcode project's Resources group and it will act sort of like a splash screen for our application - it will show that image until your application is fully loaded.
Although I'm not a big fan of splash screens, it's a good idea if you've got a slow-loading application to let the user know everything is proceeding okay. If you've got a slow-loading application, and you don't know why, it may be because you have a lot of resources in your project. The iPhone seems to do some kind of check on application launch, and the more individual files you have in your application bundle, the longer it takes. The actual size of the files doesn't seem to matter, but the number of files definitely does. If you're in this situation, consider reducing the number of files in your bundle somehow. A fairly easy way to do that is to store all those files as blobs inside a single SQLite database. You can use a read-only database from your bundle without copying it to the Documents folder, but you must make sure not to write to it, because if you change anything in your application bundle, code signing for the application will stop working and the user will not be able to launch it again. You can use a separate SQLite database in your application's Documents folder for user data.
Simulator
I thought everybody knew this by now, but I have encountered two people recently who have been developing for the iPhone for a while and who didn't know this, so here it is. Sorry if I'm being Captain Obvious.
If you want to simulate a two-finger gesture in the iPhone simulator, hold down the option key. You will get two dots on the screen instead of one. The two dots will default to pinching - if you bring the dot closer to the center of the screen, the other dot comes toward the center, making it easy to simulate a pinch in or pinch out.
If you want to do a different two-finger gesture, get the two dots the distance apart that you want them to be, then hold down the shift key, while still holding down the option key. That will lock the position of the two finger presses together so you can do, for example, a two-finger swipe.
Still don't know a way to do three-or-more finger gestures, or complex two-finger gestures, but the use of the shift and option key should cover about 95% of the gestures you'd need.
iPhone "Optimized" PNGs
For the most part, Apple's developer documentation for both the Mac and iPhone is excellent. They are well-written, accurate, and provide excellent code samples. There are, of course, always gaps, especially with newer areas. Sometimes these gaps are simply a matter of resource constraints; the volume of documentation the documentation teams have to maintain is staggering, and frameworks are constantly being added and updated.
At other times, Apple is tight-lipped about stuff not because of resource constraints, but rather intentionally, though it's not always clear why. Do you want to know how fast the processor in your iPhone is, or how much memory is available to your application? Both of these are obviously relevant to developing for the iPhone, but don't look to Apple for that information. The information is available (processor | memory), just not from Apple.
Here's another area where Apple is less than fully forthcoming: When it comes to the iPhone's use of PNG images, Apple tells you that Xcode "optimizes" PNGs as part of the build process and, as a result, you should always use PNG images in your iPhone projects. PNG images will usually be bigger than JPEGs, causing your application to be a little larger, but you'll be rewarded by some mysterious kind of improvement.
Since this information is not documented, what follows is something of an educated guess based on research and observations. I will gladly be corrected on any inaccuracies, so don't hesitate to ping me if you see something wrong.
During the build, Xcode basically screws up your PNG image, turning it into something that's technically no longer a PNG image. Xcode doesn't change your original file, but when it copies it to the Resources folder of your application bundle, what it does is it byte-swaps the red and blue octets and also "premultiplies the alpha" (if that doesn't make sense, don't worry, we'll talk about it in a moment). The PNG specification does not support either of these changes, which is why the image is no longer technically a PNG and can't be loaded by most image editing software. Not that it really matters, since the new version only exists inside your application bundle, but it does mean that any PNG file that you include in your app bundle should not be, for example, FTPed or e-mailed from your application directly, because the file will be corrupt as far as most software is concerned.
Byte swapping is exactly what it sounds like. Uncompressed computer graphic images are most-often stored as sequences of three or four bytes or "octets" representing each pixel in the image. Each byte in the pixel represents one of the three additive primaries (red, blue, and green), plus there's often another byte called "alpha", which we'll look at in a moment. There are other ways to store images, but this is the most common technique. The most common byte-ordering used in this technique is RGB (or RGBA) which stands for Red-Green-Blue(-Alpha). This means that a single pixel is represented in memory by four bytes, the first representing the intensity of red, the second representing the intensity of green, and the third representing the intensity of blue (we'll ignore alpha for now). The PNG specification uses this byte-ordering, as do many other image formats.
However, the iPhone's video memory uses a non-standard byte-ordering of BGR or Blue-Green-Red (I don't believe there's an alpha component in the iPhone's vRAM). In order to copy from an image in memory using RGBA to the video memory using GRB is more computationally expensive than just copying from, for example, BGR to BGR, which can be done with a single, fast memory move (or "blit") operation. By doing this byte-swap in the Copy Files Build Phase, your application is (in some situations) able to ignore the alpha component when loading the file into memory so it can use the faster memory move operation to get the image into video memory (and hence onto the screen).
Okay, that makes sense, but what about this "premultiplying the alpha" thing? That one sounds kind of mysterious, doesn't it? As mentioned in the previous section, the iPhone's vRAM has no alpha component, so if we're going to ignore that component, we still need to take it into account somehow. Remember that PNG Images that have been optimized for the iPhone are stored as four values, representing the Blue, Green, Red, and Alpha components (in that order). Although it's called a "component", Alpha isn't really a color component at all. It's more like a modifier that acts on the other three values, and it represents how much of whatever is beneath the color will show through. So, a color that looked like this:
Would represent the color blue, but at 50% opacity. In order for the computer to use the alpha component, it has to multiply the alpha times the other three components (and possibly by other values) before putting them into video memory. This multiplication process is more computationally expensive than just copying the value into video memory. So, Xcode also premultiplies the alpha by the three components and stores the multiplied value. As a result, the color above would look like this after the Copy Files Build Phase:
Notice that the Blue component in this new pixel is equal to the Blue component of the previous version multiplied by the alpha. The result of this premultiplication, is that the alpha component can be ignored when loading the image into memory and the image can then be blitted directly to video memory without having to do the expensive floating-point multiplications to calculate the alpha. Well, at least, sometimes. This pixel is what the pixel would look like when drawn over white.
So, what happens if there's a color beneath that needs to show through? This is where things can get a little confusing. If your application is drawing the image on top of something else, or if you're using the alpha channel in the image as a mask, then the iPhone can't use this optimization. It has to do the alpha calculations (which is why the alpha channel is left intact in the pre-multiplication process), the the byte-swapping still offers some improvement. For the most part, you don't have to worry about this - it all happens under the hood. The thing you should take away from it though, is that you can help your iPhone know when it is safe to use the optimization. The way to do that is to make sure you check the "opaque" checkbox in Interface Builder for your image views, or other views that contain images, or set the opaque property of your UIImageView to YES in code. This tells the iPhone that it's safe to do the faster blit operation and ignore the alpha channel because nothing below shows through an opaque object and there's no need to do any expensive floating point alpha calculations for that object. Of course, if you are using the alpha channel in your image, or if you are doing complex image compositions in your app at run-time, you shouldn't make the view opaque. But, if you're just displaying an image in an UIImageView, checking that opaque checkbox is a really, really good idea.
An awful lot of the time, PNG images have 1.0 for the Alpha value in every pixel. As a result, more often than not, program runs faster and use less memory because of the PNG "optimizations" done by Xcode.
When you use any other file type (or if you load a non-optimized PNG files), your iPhone has to do the byte-swapping and alpha premultiplication at load-time (and possibly re-do the alpha multiplication at display time). Your application basically has to do the same processing that Xcode does, but it's doing it at run-time instead of at build-time. This is going to cost you both in terms of processor cycles and memory overhead. One of the reasons why Mobile Safari is the biggest memory hog of the built-in iPhone applications is because the images it has to load in order to display web-pages are all non-optimized images, mostly JPEGs. Since JPEG is a compressed format, it has the added extra step of having to decompress the image into memory before it can do the premultiplication and byte-swapping.
At other times, Apple is tight-lipped about stuff not because of resource constraints, but rather intentionally, though it's not always clear why. Do you want to know how fast the processor in your iPhone is, or how much memory is available to your application? Both of these are obviously relevant to developing for the iPhone, but don't look to Apple for that information. The information is available (processor | memory), just not from Apple.
Here's another area where Apple is less than fully forthcoming: When it comes to the iPhone's use of PNG images, Apple tells you that Xcode "optimizes" PNGs as part of the build process and, as a result, you should always use PNG images in your iPhone projects. PNG images will usually be bigger than JPEGs, causing your application to be a little larger, but you'll be rewarded by some mysterious kind of improvement.
Since this information is not documented, what follows is something of an educated guess based on research and observations. I will gladly be corrected on any inaccuracies, so don't hesitate to ping me if you see something wrong.
So, just what is this magical, mystery "optimization"?
During the build, Xcode basically screws up your PNG image, turning it into something that's technically no longer a PNG image. Xcode doesn't change your original file, but when it copies it to the Resources folder of your application bundle, what it does is it byte-swaps the red and blue octets and also "premultiplies the alpha" (if that doesn't make sense, don't worry, we'll talk about it in a moment). The PNG specification does not support either of these changes, which is why the image is no longer technically a PNG and can't be loaded by most image editing software. Not that it really matters, since the new version only exists inside your application bundle, but it does mean that any PNG file that you include in your app bundle should not be, for example, FTPed or e-mailed from your application directly, because the file will be corrupt as far as most software is concerned.
Byte Swapping
Byte swapping is exactly what it sounds like. Uncompressed computer graphic images are most-often stored as sequences of three or four bytes or "octets" representing each pixel in the image. Each byte in the pixel represents one of the three additive primaries (red, blue, and green), plus there's often another byte called "alpha", which we'll look at in a moment. There are other ways to store images, but this is the most common technique. The most common byte-ordering used in this technique is RGB (or RGBA) which stands for Red-Green-Blue(-Alpha). This means that a single pixel is represented in memory by four bytes, the first representing the intensity of red, the second representing the intensity of green, and the third representing the intensity of blue (we'll ignore alpha for now). The PNG specification uses this byte-ordering, as do many other image formats.
However, the iPhone's video memory uses a non-standard byte-ordering of BGR or Blue-Green-Red (I don't believe there's an alpha component in the iPhone's vRAM). In order to copy from an image in memory using RGBA to the video memory using GRB is more computationally expensive than just copying from, for example, BGR to BGR, which can be done with a single, fast memory move (or "blit") operation. By doing this byte-swap in the Copy Files Build Phase, your application is (in some situations) able to ignore the alpha component when loading the file into memory so it can use the faster memory move operation to get the image into video memory (and hence onto the screen).
Premultiplied Alpha
Okay, that makes sense, but what about this "premultiplying the alpha" thing? That one sounds kind of mysterious, doesn't it? As mentioned in the previous section, the iPhone's vRAM has no alpha component, so if we're going to ignore that component, we still need to take it into account somehow. Remember that PNG Images that have been optimized for the iPhone are stored as four values, representing the Blue, Green, Red, and Alpha components (in that order). Although it's called a "component", Alpha isn't really a color component at all. It's more like a modifier that acts on the other three values, and it represents how much of whatever is beneath the color will show through. So, a color that looked like this:
B:1.0
G:0.0
R:0.0
A:0.5
Would represent the color blue, but at 50% opacity. In order for the computer to use the alpha component, it has to multiply the alpha times the other three components (and possibly by other values) before putting them into video memory. This multiplication process is more computationally expensive than just copying the value into video memory. So, Xcode also premultiplies the alpha by the three components and stores the multiplied value. As a result, the color above would look like this after the Copy Files Build Phase:
B:0.5
G:0.0
R:0.0
A:0.5
Notice that the Blue component in this new pixel is equal to the Blue component of the previous version multiplied by the alpha. The result of this premultiplication, is that the alpha component can be ignored when loading the image into memory and the image can then be blitted directly to video memory without having to do the expensive floating-point multiplications to calculate the alpha. Well, at least, sometimes. This pixel is what the pixel would look like when drawn over white.
So, what happens if there's a color beneath that needs to show through? This is where things can get a little confusing. If your application is drawing the image on top of something else, or if you're using the alpha channel in the image as a mask, then the iPhone can't use this optimization. It has to do the alpha calculations (which is why the alpha channel is left intact in the pre-multiplication process), the the byte-swapping still offers some improvement. For the most part, you don't have to worry about this - it all happens under the hood. The thing you should take away from it though, is that you can help your iPhone know when it is safe to use the optimization. The way to do that is to make sure you check the "opaque" checkbox in Interface Builder for your image views, or other views that contain images, or set the opaque property of your UIImageView to YES in code. This tells the iPhone that it's safe to do the faster blit operation and ignore the alpha channel because nothing below shows through an opaque object and there's no need to do any expensive floating point alpha calculations for that object. Of course, if you are using the alpha channel in your image, or if you are doing complex image compositions in your app at run-time, you shouldn't make the view opaque. But, if you're just displaying an image in an UIImageView, checking that opaque checkbox is a really, really good idea.
An awful lot of the time, PNG images have 1.0 for the Alpha value in every pixel. As a result, more often than not, program runs faster and use less memory because of the PNG "optimizations" done by Xcode.
What happens when you use different file types
When you use any other file type (or if you load a non-optimized PNG files), your iPhone has to do the byte-swapping and alpha premultiplication at load-time (and possibly re-do the alpha multiplication at display time). Your application basically has to do the same processing that Xcode does, but it's doing it at run-time instead of at build-time. This is going to cost you both in terms of processor cycles and memory overhead. One of the reasons why Mobile Safari is the biggest memory hog of the built-in iPhone applications is because the images it has to load in order to display web-pages are all non-optimized images, mostly JPEGs. Since JPEG is a compressed format, it has the added extra step of having to decompress the image into memory before it can do the premultiplication and byte-swapping.
Sunday, October 19, 2008
iPhone/iPod Integration Hits 58% of U.S.A. Market

Technically motor vehicles, as people who can still afford to fill up the honking huge gas tanks on trucks and the like get their fair share of iPhone/iPod love as well, that integration has now hit a majority level of 58%.
 Proprietary dock port notwithstanding, Apple’s dominance of the music player — and now music phone — market has no doubt driven the adaption. USB integration has hit 33%, with an even higher rate of increase. Says Jeff Smykll: When my significant other bought her new Scion XD earlier in the year, one of the things she was really excited about was the iPod integration that came standard. The unit is pretty slick: the iPod can be controlled from the steering wheel, the information about the currently-playing song is available on the head unit, and the iPod’s playlists can be traversed using the stereo’s knobs.
Reference:
http://arstechnica.com/journals/apple.ars/2008/10/16/report-ipod-integration-in-58-of-2009-us-auto-models
Saturday, October 18, 2008
The iGrip Universal Fit Cigarette Lighter Mount
 The iGrip Universal Fit Cigarette Lighter Mount for iPhone, available in the TiPb Store for $19.95, is one alternative to having your iPhone float freely within the cabin of your car. This mount allows you to affix your iPhone 2G, iPhone 3G, iPod Touch, or iPod Touch 2G and view the display while keeping both hands on the wheel.
 The iGrip Universal Fit Cigarette Lighter Mount for iPhone is designed to accommodate the the different sizes of your iStuff by virtue of an adjustable mounting bracket with padded clamps that narrows or widens to hold your device firmly in place. There are also sliding padded brackets along the bottom to ensure your device doesn’t slip through the bottom.
A stiff but flexible arm attaches the device holder to the base of the mount, which adjusts to fit lighter sockets. The iGrip Universal Fit Mount does NOT have any charging capability — its only function is to secure your device for easy viewing while you drive.
This mount isn’t fancy - it does what it’s supposed to do: fits securely in your lighter socket and firmly secures your device. The clamping mechanism works easily enough. The flexible arm IS flexible, but very stiff.
Reference:
http://store.theiphoneblog.com/igrip-universal-fit-cigarette-lighter-mount/3A78A1740.htm
Friday, October 17, 2008
Chillingo And Rough Cookie To Deliver New iPhone Game - Dougie Moo’s Aqua Antics
 Chillingo, an European iPhone app publisher, has joined forces the Dutch based iPhone development studio Rough Cookie to deliver Dougie Moo’s Aqua Antics, a made-for-accelerometer title targeting casual gamers.
 Thursday, October 16, 2008
ezView Leather Case for iPhone 3G released
 ezGear has released its ezView Leather Case for the iPhone 3G. The new case costs $34.99.
Wednesday, October 15, 2008
Random Thoughts: rand() vs. arc4random()
There are several built-in randomizers on the iPhone, and most people's first thought is to use rand() after seeding it by calling
But... rand() is really not a very good PRNG. random() is a little better, but still less then ideal. Fortunately, these are not the only ones available on the iPhone. Personally, I like arc4random() because it's a decent pseudo-random algorithm and has twice the range or rand().
On the iPhone, RAND_MAX is 0x7fffffff (2147483647), while arc4random() will return a maximum value of 0x100000000 (4294967296), giving much more precision. You also don't need to seed arc4random(), as the first call to it automatically seeds it.
To get an integer value from arc4random() that goes from 0 to x-1, you would do this:
To get an integer in the range 1 to x, just add 1:
The parenthesis aren't really necessary based on order of operation rules, but I'm anal about parens.
Finally, if you need to generate a floating point number, define this in your project:
Then, you can use arc4random() to get a floating point value (at double the precision of using rand()), between 0 and 100, like so:
srandom(time(NULL));
But... rand() is really not a very good PRNG. random() is a little better, but still less then ideal. Fortunately, these are not the only ones available on the iPhone. Personally, I like arc4random() because it's a decent pseudo-random algorithm and has twice the range or rand().
On the iPhone, RAND_MAX is 0x7fffffff (2147483647), while arc4random() will return a maximum value of 0x100000000 (4294967296), giving much more precision. You also don't need to seed arc4random(), as the first call to it automatically seeds it.
To get an integer value from arc4random() that goes from 0 to x-1, you would do this:
int value = arc4random() % x;
To get an integer in the range 1 to x, just add 1:
int value = (arc4random() % x) + 1;
The parenthesis aren't really necessary based on order of operation rules, but I'm anal about parens.
Finally, if you need to generate a floating point number, define this in your project:
#define ARC4RANDOM_MAX 0x100000000
Then, you can use arc4random() to get a floating point value (at double the precision of using rand()), between 0 and 100, like so:
double val = floorf(((double)arc4random() / ARC4RANDOM_MAX) * 100.0f);
Subscribe to:
Posts (Atom)


