Okay, this is the posting that I've been dreading. Conceptually speaking, today's topic is the most difficult part of 3D programming, and it's one I've struggled with.
At this point, you should understand 3D geometry and the cartesian coordinate system. You should understand that objects in OpenGL's virtual world are built out of triangles made up of vertices, and that each vertex defines a specific point in three-dimensional space, and you know how to use that information to do basic drawing using OpenGL ES on the iPhone. If not, you should probably go back and reread the first six installments in this series before tackling this monstrosity.
In order for the objects in your virtual world to be at all useful for interactive programs like games, there has to be a way to change the position of objects in relation to each other and in relation to the viewer. There has to be a way to not only move, but rotate and scale objects. There also has to be way to translate that virtual three-dimensional world onto a two-dimensional computer screen. All of these are accomplished using something called
transformations. The underlying mechanism that enables transformations are
matrices (or
matrixes if you prefer).
Although you can do a fair amount in OpenGL without ever really understanding matrices and the mathematics of the matrix, it is a really good idea to have at least a basic understanding of the mechanism.
Built-In Transformations and the Identity Matrix
You've already seen some of the OpenGL's stock transformations. One call that you've seen in every application we've written is
glLoadIdentity(), which we've called at the beginning of the
drawView: method to reset the state of the world.
You've also seen
glRotatef(), which we used to make our icosahedron spin, and
glTranslatef() which was used to move objects around in the virtual world.
Let's look at the call to
glLoadIdentity() first. This call loads the
identity matrix. We'll talk about this special matrix later, but loading the identity matrix basically resets the virtual world. It gets rid of any transformations that have been previously performed. It is standard practice to call
glLoadIdentity() at the beginning of your drawing method so that your transformations have predictable results because you always know your starting point - the origin.
To give you an idea of what would happen if you didn't call
glLoadIdentity(), grab the
Xcode project from Part 4, comment out the call to
glLoadIdentity() in
drawView: and run the application. Go ahead and do it, I'll wait. What happens?
The icosahedron, which used to just slowly spin in place, scoots away from us doesn't it? Like Mighty Mouse, it flies away and then up into the sky, exit stage right.
1The reason why that happens is because we were using two transformations in that project. The vertices of our icosahedron were defined around the origin, so we used a
translate transformation to move it three units away from the viewer so the whole thing could be seen. The second transformation we used was a
rotation transformation to spin the cube in place. When the call to
glLoadIdentity() was still in place, we started fresh each frame back at the origin looking straight down the Z-axis. Back then, when we translated 3 units away from the viewer, it always ended up at the same location of
z == -3.0. Similarly, the rotation value, which we constantly increase based on the amount of time elapsed, caused the icosahedron to spin at an even pace. Because earlier rotations were removed by the call to
glLoadIdentity() before it was rotated, the rotation was at a consistent speed.
Without the call to
glLoadIdentity(), the first time through, the icosahedron is translated three units away from us and the icosahedron rotates a small amount. The next frame (a fraction of a second later), the icosahedron moves back another three frames, and the adds the value of
rot to the amount the icosahedron was already rotated. This happens each frame, meaning the icosahedron moves away from us three units every frame, and the speed of rotation increases every frame.
It would be possible to not call
glLoadIdentity() and compensate for this behavior, but we can't predict or compensate for transformations done in other code, so the best bet is to start from a known position, which is the origin, with no scaling or rotation, which is why we always call
glLoadIdentity()The Stock Transformations
In addition to
glTranslatef() and
glRotatef(), there is also
glScalef(), which will cause the size of objects drawn to be increased or decreased. There are some other transformation functions available in OpenGL ES, but these three (combined with
glLoadIdentity() are the ones that you'll use the most. The other ones are used primarily in the process of converting the three-dimensional virtual world into a two-dimensional representation, a process known as
projection. We'll touch on projection a little in this article, but in most scenarios, you don't have to be directly involved with that process other then setting up your viewport.
The stock transformations can get you a long way. You could conceivably create an entire game using just these four calls to manipulate your geometry. There are times when you might want to take transformations into your own hands, however. One reason you might want to handle the transformations yourself is that these stock transformations have to be called sequentially as a separate function call, each resulting in a somewhat computationally costly
matrix multiplication (something we'll talk more about later). If you do the transformations yourself rather than using the transformations provided by OpenGL, you can often combine multiple transformations into a single matrix, reducing the number of matrix multiplication operations that have to be performed every frame.
It's also possible to eke out better performance by doing your own matrices because you can
vectorize your matrix multiplication calls. As far as I can tell, the iPhone's behavior in this regard is not documented, but as a general rule, OpenGL ES will hardware accelerate multiplication between a vector or vertex and a matrix, but not between two transformation matrices. By vectorizing matrix multiplication, you can actually get better performance than you can by letting OpenGL do the matrix multiplication. This won't give you a huge performance boost, as there are generally far less matrix by matrix multiplication calls than vector/vertex by matrix multiplication calls, but in complex 3D programs, every little bit of extra performance can help.
Enter the Matrix
Obviously, I have to make a reference to the movie "The Matrix", since we're going to spend the next few thousand words talking about matrices. It's sort of a geek requirement, so let me get it out of the way:
Unfortunately, nobody can be told what The Matrix is.
Only, it's not true in this case; matrices are really not that big of a deal. A matrix is just a two-dimensional array of values. That's it. Nothing mystical here. Here's a simple example of a matrix:
That's a 3x3 matrix, because it has three columns and three rows. Vectors and Vertices can actually be represented in a 1x3 matrix (remember this for later, it's kind of important):
A vertex could also be represented by a 3x1 array instead of a 1x3 array, but for our purposes, we're going to represent them using the 1x3 format (you'll see why later). Even a single data element is technically a 1x1 matrix, although that's not a very useful matrix.
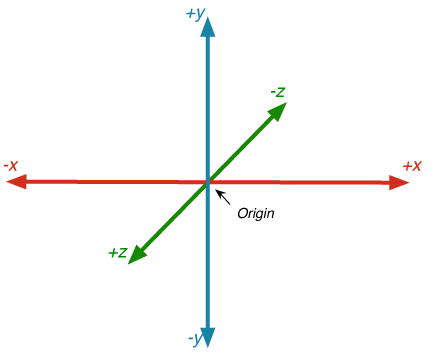
You know what else can be represented in an array? Coordinate systems. Watch this, it's kind of cool. You remember vectors, right? Vectors are imaginary lines running from the origin to a point in space. Now, remember that the Cartesian coordinate system has three axes:
So, what would a normalized vector that ran down the X axis look like? Remember: A normalized vector has a length of one, so, a normalized vector that runs up the X axis would look like this:
Notice that we're representing the vector as a 3x1 matrix rather than a 1x3 matrix as we did with the vertex. Again, it doesn't actually matter, as long as we use the opposite for vertices and these vectors. All three of the values in this vector apply to the same axis. I know, it probably doesn't make sense yet, but bear with me, this will clear in up in a second. A vector that runs up the Y axis would look like this:
And one that runs up the Z axis looks like this:
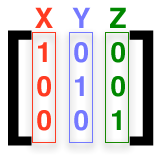
Now, if we put these three vector matrices together in the same order as they are represented in a vertex (x then y then z), it would look like this:
That's a special matrix called the
identity matrix. Sound familiar? When you call
glLoadIdentity(), you are loading that matrix right there
2. Here's why this is a special matrix. Matrices can be multiplied together, and multiplying matrices is how you combine them. If you multiply any matrix by the identity matrix, the result is the original matrix. Just like multiplying a number by one. You can always calculate the identity matrix for any given size matrix by setting all the values to
0.0 except where the row and column number are the same, in which case you set the value to
1.0.
Matrix Multiplication
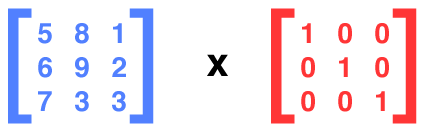
Matrix multiplication is the key to combining matrices. If you have a one matrix that defines a translate, and another that defines a rotate, if you multiply them together, you get a single matrix that defines both a rotate and a translate. Let's look at a simple example of matrix multiplication. Imagine these two matrices:
The result of a matrix multiplication is another matrix that is exactly the same size as the matrix on the left side of the equation. Matrix multiplication is not commutative. The order matters. The result of multiplying matrix a by matrix b is not necessarily the same as the result from multiplying matrix b by matrix a (although it could be in some situations).
Here's another thing about matrix multiplication: Not every pair of matrices can be multiplied together. They don't have to be the same size, but the matrix on the right side of the equation has to have the same number of rows as the number of columns that the matrix on the left side of the equation has. So, you can multiply a 3x3 matrix with another 3x3 matrix, or you can multiply a 1x3 matrix with a 3x6 matrix, but you can't multiply a 2x4 matrix with, say, another 2x4 matrix because the number of columns in a 2x4 matrix is not the same as the number of rows in a 2x4 matrix.
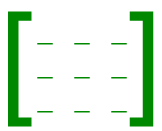
To figure the result of a matrix multiplication, we make an empty matrix of the same size as the matrix on the left side of the equation:
Now, for each spot in this matrix, we take the corresponding row from the left-hand matrix and the corresponding column from the right hand matrix. So, for the top left position in the result matrix, we take the top row of the left side of the equation and the first column of the right side of the equation, like so:
Then we multiply the first value in the row from the left-hand matrix by the first value in the right-hand column, multiply the second value in the left-hand row by the second value in the right-hand column, multiply the third value in the left-hand row by the third value in the right-hand column, then add them all together. So, it would be:
If you repeat this process for every spot in the result matrix, then you get the result of the matrix multiplication:
And look at that. We multiplied a matrix (the blue one) by the identity matrix (the red one) and the result is exactly the same as the original matrix. If you think about it, it makes sense since the identity matrix represents our coordinate system with no transformations. This also works with vertices. We can multiply a vertex by a matrix, and the same thing happens:
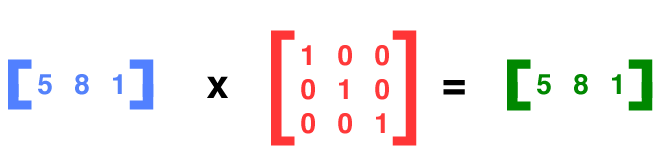
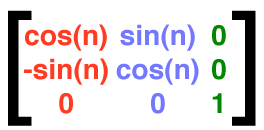
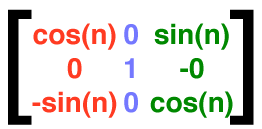
Now, let's say that we wanted to rotate an object. What we do is define a matrix that describes a coordinate system that is rotated. In a sense, we actually rotate the world, and then draw the object into it. Let's say we want to spin an object along the Z axis. To do that, the Z axis is going to remain unchanged, but the X axis and the Y axis need to change. Now, this is a little hard to imagine, and it's not really vital that you understand the underlying math, but to define a coordinate system rotated on the z axis, we would adjust the x and y vectors in our 3x3 matrix, in other words, we have to make changes to the first and second column.
So, the X value of the X-axis vector and the Y value of the Y-axis vector need to be adjusted by the cosine of the rotation angle. The cosine, remember, is the length of the side adjacent to the angle in a triangle. We also need to adjust the Y value of the X-axis vector by an amount equal to minus the sine of the angle and the X value of the Y-axis vertex by the sine of the angle. The sine of an angle is the length of the opposite side of the angle in a triangle. That's hard to follow, it might be easier to understand expressed as a matrix:
Now, if you take ever vertex in every object in your world and multiply them by this matrix, you get the new location of the vertex in the rotated world. Once you've applied this matrix to every vertex in your object, you have an object that has been rotated along the Z-axis by
n degrees.
If that doesn't make sense, it's okay. You really don't need to understand the math to use matrices. These are all solved problems, and you can find the matrices for any transformation using google. In fact, you can find most of them in the OpenGL man pages. So don't beat yourself up if you're not fully understanding why that matrix results in a Z-axis rotation.
A 3x3 matrix can describe the world rotated at any angle on any axis. However, we actually need a fourth row and column in order to be able to represent all the transformations we might need. We need a fourth column to hold translation information, and a fourth row which is needed to do the perspective transformation. I don't want to get into the math underlying the perspective transformation because they require understanding homogenous coordinates and projective space, and it's not really important to becoming a good OpenGL programmer. In order to multiply a vertex by a 4x4 matrix, we just pad it with an extra value, usually referred to as W. W should be set to
1. After the multiplication is complete, ignore the value W. We're not actually going to look at vector by matrix multiplication in this installment because OpenGL already hardware accelerates that, so there's usually not a need to handle that manually, but it's a good idea to understand the basic process.
OpenGL ES's Matrices
OpenGL ES maintains two separate matrices, both are 4x4 matrices of
GLfloats. One of these matrices, called the
modelview matrix is the one you'll be interacting with most of the time. This is the one that you use to apply transformations to the virtual world. To rotate, translate, or scale objects in your virtual world, you do it by making changes to the model view matrix.
The other matrix is used in creating the two-dimensional representation of the world based on the viewport you set up. This second matrix is called the
projection matrix. The vast majority of the time, you won't touch the projection matrix.
Only one of these two matrices is active at a time, and all matrix-related calls, including those to
glLoadIdentity(),
glRotatef(),
glTranslatef(), and
glScalef() affect the active matrix. When you call
glLoadIdentity, you set the active matrix to the identity matrix. When you call the other three, OpenGL ES creates an appropriate translate, scale, or rotate matrix and multiplies the active matrix by that matrix, replacing the results of the active matrix with the result of the matrix multiplication operation.
For most practical purposes, you'll just set the modelview matrix as the active matrix early on and then leave it that way. In fact, if you look at my OpenGL ES template, you'll se that I do that in the
setupView: method, with this line of code:
glMatrixMode(GL_MODELVIEW);
OpenGL ES's matrix are defined as an array of 16
GLfloats, like this:
GLfloat matrix[16];
They could also be represented as two-dimensional C arrays like this:
GLfloat matrix[4][4];
Both of those declarations result in the same amount of memory being allocated, so it's a matter of personal preference which you use, though the former seems to be more common.
Let's Play
Okay, at this point, I'm sure you've had enough theory and want to see some of this in action, so create a new project using my
OpenGL ES template, and replace the
drawView: and
setupView: with the versions below:
- (void)drawView:(GLView*)view;
{
static GLfloat rot = 0.0;
static GLfloat scale = 1.0;
static GLfloat yPos = 0.0;
static BOOL scaleIncreasing = YES;
static const Vertex3D vertices[]= {
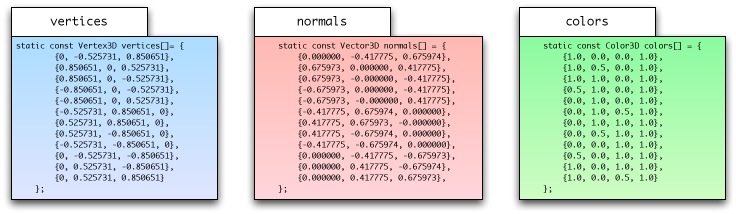
{0, -0.525731, 0.850651}, {0.850651, 0, 0.525731}, {0.850651, 0, -0.525731}, {-0.850651, 0, -0.525731}, {-0.850651, 0, 0.525731}, {-0.525731, 0.850651, 0}, {0.525731, 0.850651, 0}, {0.525731, -0.850651, 0}, {-0.525731, -0.850651, 0}, {0, -0.525731, -0.850651}, {0, 0.525731, -0.850651}, {0, 0.525731, 0.850651} };
static const Color3D colors[] = {
{1.0, 0.0, 0.0, 1.0},
{1.0, 0.5, 0.0, 1.0},
{1.0, 1.0, 0.0, 1.0},
{0.5, 1.0, 0.0, 1.0},
{0.0, 1.0, 0.0, 1.0},
{0.0, 1.0, 0.5, 1.0},
{0.0, 1.0, 1.0, 1.0},
{0.0, 0.5, 1.0, 1.0},
{0.0, 0.0, 1.0, 1.0},
{0.5, 0.0, 1.0, 1.0},
{1.0, 0.0, 1.0, 1.0},
{1.0, 0.0, 0.5, 1.0}
};
static const GLubyte icosahedronFaces[] = {
1, 2, 6,
1, 7, 2,
3, 4, 5,
4, 3, 8,
6, 5, 11,
5, 6, 10,
9, 10, 2,
10, 9, 3,
7, 8, 9,
8, 7, 0,
11, 0, 1,
0, 11, 4,
6, 2, 10,
1, 6, 11,
3, 5, 10,
5, 4, 11,
2, 7, 9,
7, 1, 0,
3, 9, 8,
4, 8, 0,
};
static const Vector3D normals[] = {
{0.000000, -0.417775, 0.675974},
{0.675973, 0.000000, 0.417775},
{0.675973, -0.000000, -0.417775},
{-0.675973, 0.000000, -0.417775},
{-0.675973, -0.000000, 0.417775},
{-0.417775, 0.675974, 0.000000},
{0.417775, 0.675973, -0.000000},
{0.417775, -0.675974, 0.000000},
{-0.417775, -0.675974, 0.000000},
{0.000000, -0.417775, -0.675973},
{0.000000, 0.417775, -0.675974},
{0.000000, 0.417775, 0.675973},
};
glLoadIdentity();
glTranslatef(0.0f,yPos,-3);
glRotatef(rot,1.0f,1.0f,1.0f);
glScalef(scale, scale, scale);
glClearColor(0.0, 0.0, 0.05, 1.0);
glClear(GL_COLOR_BUFFER_BIT | GL_DEPTH_BUFFER_BIT);
glEnableClientState(GL_VERTEX_ARRAY);
glEnableClientState(GL_COLOR_ARRAY);
glEnable(GL_COLOR_MATERIAL);
glEnableClientState(GL_NORMAL_ARRAY);
glVertexPointer(3, GL_FLOAT, 0, vertices);
glColorPointer(4, GL_FLOAT, 0, colors);
glNormalPointer(GL_FLOAT, 0, normals);
glDrawElements(GL_TRIANGLES, 60, GL_UNSIGNED_BYTE, icosahedronFaces);
glDisableClientState(GL_VERTEX_ARRAY);
glDisableClientState(GL_COLOR_ARRAY);
glDisableClientState(GL_NORMAL_ARRAY);
glDisable(GL_COLOR_MATERIAL);
static NSTimeInterval lastDrawTime;
if (lastDrawTime)
{
NSTimeInterval timeSinceLastDraw = [NSDate timeIntervalSinceReferenceDate] - lastDrawTime;
rot+=50 * timeSinceLastDraw;
if (scaleIncreasing)
{
scale += timeSinceLastDraw;
yPos += timeSinceLastDraw;
if (scale > 2.0)
scaleIncreasing = NO;
}
else
{
scale -= timeSinceLastDraw;
yPos -= timeSinceLastDraw;
if (scale < 1.0)
scaleIncreasing = YES;
}
}
lastDrawTime = [NSDate timeIntervalSinceReferenceDate];
}
-(void)setupView:(GLView*)view
{
const GLfloat zNear = 0.01, zFar = 1000.0, fieldOfView = 45.0;
GLfloat size;
glEnable(GL_DEPTH_TEST);
glMatrixMode(GL_PROJECTION);
size = zNear * tanf(DEGREES_TO_RADIANS(fieldOfView) / 2.0);
CGRect rect = view.bounds;
glFrustumf(-size, size, -size / (rect.size.width / rect.size.height), size /
(rect.size.width / rect.size.height), zNear, zFar);
glViewport(0, 0, rect.size.width, rect.size.height);
glMatrixMode(GL_MODELVIEW);
glEnable(GL_LIGHTING);
glEnable(GL_LIGHT0);
static const Color3D light0Ambient[] = {{0.3, 0.3, 0.3, 1.0}};
glLightfv(GL_LIGHT0, GL_AMBIENT, (const GLfloat *)light0Ambient);
static const Color3D light0Diffuse[] = {{0.4, 0.4, 0.4, 1.0}};
glLightfv(GL_LIGHT0, GL_DIFFUSE, (const GLfloat *)light0Diffuse);
static const Color3D light0Specular[] = {{0.7, 0.7, 0.7, 1.0}};
glLightfv(GL_LIGHT0, GL_SPECULAR, (const GLfloat *)light0Specular);
static const Vertex3D light0Position[] = {{10.0, 10.0, 10.0}};
glLightfv(GL_LIGHT0, GL_POSITION, (const GLfloat *)light0Position);
static const Vertex3D objectPoint[] = {{0.0, 0.0, -3.0}};
const Vertex3D lightVector = Vector3DMakeWithStartAndEndPoints(light0Position[0], objectPoint[0]);
glLightfv(GL_LIGHT0, GL_SPOT_DIRECTION, (GLfloat *)&lightVector);
glLightf(GL_LIGHT0, GL_SPOT_CUTOFF, 25.0);
glLoadIdentity();
glClearColor(0.0f, 0.0f, 0.0f, 1.0f);
}
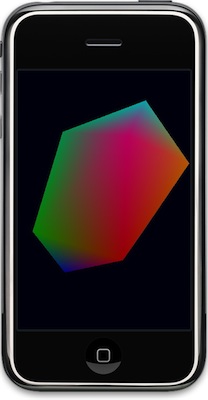
This creates a simple program with our friend, the icosahedron. It rotates, as it did before, but it also moves up and down along the Y axis using a translate transform, and it increases and decreases in size using a scale transform. This uses all the common modelview transforms; we load the identity matrix, do a scale, a rotate, and a translate using the stock OpenGL ES transform functions.
Let's replace each of stock functions with our own matrices. Before proceeding, build and run the application so you know what the correct behavior for our application looks like.
Defining a Matrix
Let's define our own object to hold a matrix. This is just to make our code easier to read:
typedef GLfloat Matrix3D[16];
Our Own Identity Matrix
For our first trick, let's create our own identity matrix. The identity matrix for a 4x4 matrix needs to look like this:
Here's a simple function to populate an existing
Matrix3D with the identity matrix.
static inline void Matrix3DSetIdentity(Matrix3D matrix)
{
    matrix[0] = matrix[5] =  matrix[10] = matrix[15] = 1.0;
    matrix[1] = matrix[2] = matrix[3] = matrix[4] = 0.0;
    matrix[6] = matrix[7] = matrix[8] = matrix[9] = 0.0;
    matrix[11] = matrix[12] = matrix[13] = matrix[14] = 0.0;
}
Now, this probably looks wrong at first glance. It looks like we're passing
Matrix3D by value, which wouldn't work. However we're using a
typedef3 array, and due to C99's array-pointer equivalency, arrays are passed by reference and not by value, so we can just assign the individual values of the arrays and don't have to pass pointers.
I'm using
inline functions to eliminate the overhead of a function call. This involves a trade-off (primarily increased code size) and all the code in this article will work just as well as regular C functions. To use them that way, just remove the
static inline keywords and place them in a .c or .m file instead of a .h file. Note that the
static keyword is correct (and a good idea) in C and Objective-C programs, but if you're using C++ or Objective-C++, then you should probably exclude it. The
GCC Manual recommends making C
inline functions like this one
static because doing so allows the compiler to remove the generated assembly for unused inline functions. However, if you're using C++ or Objective-C++ the
static keyword can potentially impact linkage behavior and offers no real benefit.
Okay, let's use this new function to replace the call to
glLoadIdentity(). Delete the call to
glLoadIdentity() and replace it with the following code:
    static Matrix3D    identityMatrix;
    Matrix3DSetIdentity(identityMatrix);
    glLoadMatrixf(identityMatrix);
So, we declare a
Matrix3D, populate it with the identity matrix, and then we load that matrix using
glLoadMatrixf(), which replaces the active matrix (in our case, the modelview matrix) with the identity matrix. That's exactly the same thing as calling
glLoadIdentity(). Exactly. Build and run the program now, and it should look exactly the same as before. No difference.
Now, you know really know what
glLoadIdentity() does since you've done it manually. Let's continue.
Matrix Multiplication
Before we can implement any more transformations, we need to write a function to multiply two matrices. Remember, multiplying matrices is how we combine two matrices into a single matrix. We could write a generic matrix multiplication method that would work with any size array and that used
for loops to do the calculation, but let's just do it without the loop. Loops have a tiny bit of overhead associated with them, and unrolling loops in functionality that gets called a lot can make a difference. Since OpenGL ES's matrices are always 4x4, the fastest multiplication is to just do each calculation. Here's our matrix multiplication:
static inline void Matrix3DMultiply(Matrix3D m1, Matrix3D m2, Matrix3D result)
{
    result[0] = m1[0] * m2[0] + m1[4] * m2[1] + m1[8] * m2[2] + m1[12] * m2[3];
    result[1] = m1[1] * m2[0] + m1[5] * m2[1] + m1[9] * m2[2] + m1[13] * m2[3];
    result[2] = m1[2] * m2[0] + m1[6] * m2[1] + m1[10] * m2[2] + m1[14] * m2[3];
    result[3] = m1[3] * m2[0] + m1[7] * m2[1] + m1[11] * m2[2] + m1[15] * m2[3];

    result[4] = m1[0] * m2[4] + m1[4] * m2[5] + m1[8] * m2[6] + m1[12] * m2[7];
    result[5] = m1[1] * m2[4] + m1[5] * m2[5] + m1[9] * m2[6] + m1[13] * m2[7];
    result[6] = m1[2] * m2[4] + m1[6] * m2[5] + m1[10] * m2[6] + m1[14] * m2[7];
    result[7] = m1[3] * m2[4] + m1[7] * m2[5] + m1[11] * m2[6] + m1[15] * m2[7];

    result[8] = m1[0] * m2[8] + m1[4] * m2[9] + m1[8] * m2[10] + m1[12] * m2[11];
    result[9] = m1[1] * m2[8] + m1[5] * m2[9] + m1[9] * m2[10] + m1[13] * m2[11];
    result[10] = m1[2] * m2[8] + m1[6] * m2[9] + m1[10] * m2[10] + m1[14] * m2[11];
    result[11] = m1[3] * m2[8] + m1[7] * m2[9] + m1[11] * m2[10] + m1[15] * m2[11];

    result[12] = m1[0] * m2[12] + m1[4] * m2[13] + m1[8] * m2[14] + m1[12] * m2[15];
    result[13] = m1[1] * m2[12] + m1[5] * m2[13] + m1[9] * m2[14] + m1[13] * m2[15];
    result[14] = m1[2] * m2[12] + m1[6] * m2[13] + m1[10] * m2[14] + m1[14] * m2[15];
    result[15] = m1[3] * m2[12] + m1[7] * m2[13] + m1[11] * m2[14] + m1[15] * m2[15];
}
Again, this function doesn't allocate any memory, it just populates an existing result array (
result) by multiplying the other two arrays. The result array should not be one of the two values being multiplied, however, because that would yield incorrect results since values are changed that will be used again.
But, wait… this can actually be faster. at least when you run the program on the iPhone instead of the simulator. The iPhone has four vector processors that are able to do floating point math much faster than the iPhone's CPU can. Taking advantage of these vector processors, however, requires writing ARM6 assembly because there are no libraries for accessing the vectors from C.
Fortunately, somebody's already figured out how to a matrix multiply using the vector processors. The
VFP Math Library contains a lot of vectorized functionality, and it's released under a fairly permissive license. So, I took the VFP Math Library vectorized matrix multiply and incorporated it into my method, so that when it's run on the device, the vectorized version is used, but the regular version is used when run on the simulator (note that I've included the original comments with ownership and licensing information and identified that the code has been modified in order to comply with VFP Math Library license):
#if TARGET_OS_IPHONE && !TARGET_IPHONE_SIMULATOR
#define VFP_CLOBBER_S0_S31 "s0", "s1", "s2", "s3", "s4", "s5", "s6", "s7", "s8", \
"s9", "s10", "s11", "s12", "s13", "s14", "s15", "s16", \
"s17", "s18", "s19", "s20", "s21", "s22", "s23", "s24", \
"s25", "s26", "s27", "s28", "s29", "s30", "s31"
#define VFP_VECTOR_LENGTH(VEC_LENGTH) "fmrx r0, fpscr \n\t" \
"bic r0, r0, #0x00370000 \n\t" \
"orr r0, r0, #0x000" #VEC_LENGTH "0000 \n\t" \
"fmxr fpscr, r0 \n\t"
#define VFP_VECTOR_LENGTH_ZERO "fmrx r0, fpscr \n\t" \
"bic r0, r0, #0x00370000 \n\t" \
"fmxr fpscr, r0 \n\t"
#endif
static inline void Matrix3DMultiply(Matrix3D m1, Matrix3D m2, Matrix3D result)
{
#if TARGET_OS_IPHONE && !TARGET_IPHONE_SIMULATOR
__asm__ __volatile__ ( VFP_VECTOR_LENGTH(3)
"fldmias %2, {s8-s23} \n\t"
"fldmias %1!, {s0-s3} \n\t"
"fmuls s24, s8, s0 \n\t"
"fmacs s24, s12, s1 \n\t"
"fldmias %1!, {s4-s7} \n\t"
"fmacs s24, s16, s2 \n\t"
"fmacs s24, s20, s3 \n\t"
"fstmias %0!, {s24-s27} \n\t"
"fmuls s28, s8, s4 \n\t"
"fmacs s28, s12, s5 \n\t"
"fldmias %1!, {s0-s3} \n\t"
"fmacs s28, s16, s6 \n\t"
"fmacs s28, s20, s7 \n\t"
"fstmias %0!, {s28-s31} \n\t"
"fmuls s24, s8, s0 \n\t"
"fmacs s24, s12, s1 \n\t"
"fldmias %1, {s4-s7} \n\t"
"fmacs s24, s16, s2 \n\t"
"fmacs s24, s20, s3 \n\t"
"fstmias %0!, {s24-s27} \n\t"
"fmuls s28, s8, s4 \n\t"
"fmacs s28, s12, s5 \n\t"
"fmacs s28, s16, s6 \n\t"
"fmacs s28, s20, s7 \n\t"
"fstmias %0!, {s28-s31} \n\t"
VFP_VECTOR_LENGTH_ZERO
: "=r" (result), "=r" (m2)
: "r" (m1), "0" (result), "1" (m2)
: "r0", "cc", "memory", VFP_CLOBBER_S0_S31
);
#else
result[0] = m1[0] * m2[0] + m1[4] * m2[1] + m1[8] * m2[2] + m1[12] * m2[3];
result[1] = m1[1] * m2[0] + m1[5] * m2[1] + m1[9] * m2[2] + m1[13] * m2[3];
result[2] = m1[2] * m2[0] + m1[6] * m2[1] + m1[10] * m2[2] + m1[14] * m2[3];
result[3] = m1[3] * m2[0] + m1[7] * m2[1] + m1[11] * m2[2] + m1[15] * m2[3];
result[4] = m1[0] * m2[4] + m1[4] * m2[5] + m1[8] * m2[6] + m1[12] * m2[7];
result[5] = m1[1] * m2[4] + m1[5] * m2[5] + m1[9] * m2[6] + m1[13] * m2[7];
result[6] = m1[2] * m2[4] + m1[6] * m2[5] + m1[10] * m2[6] + m1[14] * m2[7];
result[7] = m1[3] * m2[4] + m1[7] * m2[5] + m1[11] * m2[6] + m1[15] * m2[7];
result[8] = m1[0] * m2[8] + m1[4] * m2[9] + m1[8] * m2[10] + m1[12] * m2[11];
result[9] = m1[1] * m2[8] + m1[5] * m2[9] + m1[9] * m2[10] + m1[13] * m2[11];
result[10] = m1[2] * m2[8] + m1[6] * m2[9] + m1[10] * m2[10] + m1[14] * m2[11];
result[11] = m1[3] * m2[8] + m1[7] * m2[9] + m1[11] * m2[10] + m1[15] * m2[11];
result[12] = m1[0] * m2[12] + m1[4] * m2[13] + m1[8] * m2[14] + m1[12] * m2[15];
result[13] = m1[1] * m2[12] + m1[5] * m2[13] + m1[9] * m2[14] + m1[13] * m2[15];
result[14] = m1[2] * m2[12] + m1[6] * m2[13] + m1[10] * m2[14] + m1[14] * m2[15];
result[15] = m1[3] * m2[12] + m1[7] * m2[13] + m1[11] * m2[14] + m1[15] * m2[15];
#endif
}
Now that we have the ability to multiply matrices together we can combine multiple matrices. Since our matrix multiply is hardware accelerated and OpenGL ES does
not hardware accelerate matrix by matrix multiplication, our version should actually be a tiny bit faster than using the stock transformations
4. Let's add the translate transformation now.
Our Own Translate
If you recall earlier, one of the reasons why we need to use a 4x4 matrix instead of a 3x3 matrix was because we needed an extra column for translation information. Indeed, this is what a translation matrix looks like:
We can turn that into a function like this:
static inline void Matrix3DSetTranslation(Matrix3D matrix, GLfloat xTranslate, GLfloat yTranslate, GLfloat zTranslate)
{
    matrix[0] = matrix[5] =  matrix[10] = matrix[15] = 1.0;
    matrix[1] = matrix[2] = matrix[3] = matrix[4] = 0.0;
    matrix[6] = matrix[7] = matrix[8] = matrix[9] = 0.0;
    matrix[11] = 0.0;
    matrix[12] = xTranslate;
    matrix[13] = yTranslate;
    matrix[14] = zTranslate;
}
Now, how do we incorporate that into our
drawView: method? Well, we can delete the call to
glTranslatef(), and replace it with code that declares another matrix, populates it with the appropriate translation values, multiplies that matrix by the existing matrix and then load the result into the OpenGL, right?
    static Matrix3D    identityMatrix;
    Matrix3DSetIdentity(identityMatrix);
    static Matrix3D    translateMatrix;
    Matrix3DSetTranslation(translateMatrix, 0.0, yPos, -3.0);
    static Matrix3D    resultMatrix;
    Matrix3DMultiply(identityMatrix, translateMatrix, resultMatrix);
    glLoadMatrixf(resultMatrix);
Well, yeah, that'll work, but it's doing unnecessary work. Remember, if you multiply any matrix by the identity matrix, the result is itself. So when working with our own matrices, we no longer need to load the identity matrix first if we're using any other transformation. Instead, we can just create the translation matrix and load that:
    static Matrix3D    translateMatrix;
    Matrix3DSetTranslation(translateMatrix, 0.0, yPos, -3.0);
    glLoadMatrixf(translateMatrix);
Since we don't have to load the identity matrix, we saved ourself a little tiny bit of work each time through this method. Also notice that I'm declaring the
Matrix3Ds as
static. We don't want to constantly allocate and deallocate memory. We know we're going to need this matrix several times every second all while the program is running, so by declaring it
static, we cause it to stick around and be reused rather than having the overhead of constant memory allocation and deallocation.
Our Own Scaling Transformation
A matrix to change the size of objects looks like this:
A value of 1.0 for x, y, or z indicates that there is no change in scale in that direction. A 1.0 for all three would result in (you guessed it) the identity matrix. If you pass a 2.0, it will double the size of the object along that axis. We can turn the scaling matrix into an OpenGL ES matrix like this:
static inline void Matrix3DSetScaling(Matrix3D matrix, GLfloat xScale, GLfloat yScale, GLfloat zScale)
{
    matrix[1] = matrix[2] = matrix[3] = matrix[4] = 0.0;
    matrix[6] = matrix[7] = matrix[8] = matrix[9] = 0.0;
    matrix[11] = matrix[12] = matrix[13] = matrix[14] = 0.0;
    matrix[0] = xScale;
    matrix[5] = yScale;
    matrix[10] = zScale;
    matrix[15] = 1.0;
}
Now, we are going to have to multiply matrices because we want to apply more than one trasnformation. To apply both a scaling and a rotation ourself, we need to multiply those two matrices together. Delete the call to
glScalef() and the previous code we wrote and replace with this:
    static Matrix3D    translateMatrix;
    Matrix3DSetTranslation(translateMatrix, 0.0, yPos, -3.0);
    static Matrix3D    scaleMatrix;
    Matrix3DSetScaling(scaleMatrix, scale, scale, scale);
    static Matrix3D     resultMatrix;
    Matrix3DMultiply(translateMatrix, scaleMatrix, resultMatrix);
    glLoadMatrixf(resultMatrix);
We create a matrix and populate it with the appropriate translate values. Then we create a scaling matrix and populate it with the appropriate values. Then we multiply those two together and load them into the model view matrix. Now for the tough one. Rotation.
Our Own Rotation
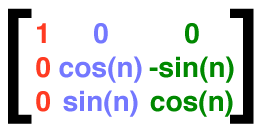
Rotation is a little tougher. We can create matrices for rotation around each of the axes. We already know what Z-axis rotation looks like:
X-axis rotation looks similar:
And so does Y-axis rotation:
These three rotations can be turned into OpenGL matrices with these functions:
static inline void Matrix3DSetXRotationUsingRadians(Matrix3D matrix, GLfloat degrees)
{
    matrix[0] = matrix[15] = 1.0;
    matrix[1] = matrix[2] = matrix[3] = matrix[4] = 0.0;
    matrix[7] = matrix[8] = 0.0;
    matrix[11] = matrix[12] = matrix[13] = matrix[14] = 0.0;

    matrix[5] = cosf(degrees);
    matrix[6] = -fastSinf(degrees);
    matrix[9] = -matrix[6];
    matrix[10] = matrix[5];
}
static inline void Matrix3DSetXRotationUsingDegrees(Matrix3D matrix, GLfloat degrees)
{
    Matrix3DSetXRotationUsingRadians(matrix, degrees * M_PI / 180.0);
}
static inline void Matrix3DSetYRotationUsingRadians(Matrix3D matrix, GLfloat degrees)
{
    matrix[0] = cosf(degrees);
    matrix[2] = fastSinf(degrees);
    matrix[8] = -matrix[2];
    matrix[10] = matrix[0];
    matrix[1] = matrix[3] = matrix[4] = matrix[6] = matrix[7] = 0.0;
    matrix[9] = matrix[11] = matrix[13] = matrix[12] = matrix[14] = 0.0;
    matrix[5] = matrix[15] = 1.0;
}
static inline void Matrix3DSetYRotationUsingDegrees(Matrix3D matrix, GLfloat degrees)
{
    Matrix3DSetYRotationUsingRadians(matrix, degrees * M_PI / 180.0);
}
static inline void Matrix3DSetZRotationUsingRadians(Matrix3D matrix, GLfloat degrees)
{
    matrix[0] = cosf(degrees);
    matrix[1] = fastSinf(degrees);
    matrix[4] = -matrix[1];
    matrix[5] = matrix[0];
    matrix[2] = matrix[3] = matrix[6] = matrix[7] = matrix[8] = 0.0;
    matrix[9] = matrix[11] = matrix[12] = matrix[13] = matrix[14] = 0.0;
    matrix[10] = matrix[15] = 1.0;
}
static inline void Matrix3DSetZRotationUsingDegrees(Matrix3D matrix, GLfloat degrees)
{
    Matrix3DSetZRotationUsingRadians(matrix, degrees * M_PI / 180.0);
}
There's two methods for each axis' rotation, one to set by radians and another to set by degrees. These three matrices represent what are called
Eular angles The problem with Eular angles is that we have to apply rotations along multiple axes sequentially, and when we set rotation on all three angles, we'll end up experiencing a phenomenon called
gimbal lock, which results in the loss of rotation on one axis. In order to avoid this problem, we need to create a single matrix that can handle rotation on multiple axes. In addition to eliminating problem gimbal lock, this will also save processing overhead when rotations are needed on more than one axis.
Now, honestly, I don't pretend to understand the math behind this one. I've read doctoral theses on this (a matrix representation of
quaternions) but the math just doesn't fully sink in, so you and I are just going to take it on faith that this multi-rotation matrix works (it does). This matrix assumes a single angle designated N, and a vector expressed as three floating point values. Each component of the vector will be multiplied by N to result in the angle of rotation about that axis:
This matrix requires that the vector passed in be a unit vector (aka a normalized vector), so we have to ensure that before populating the matrix. Expressed as an OpenGL matrix, it would be:
static inline void Matrix3DSetRotationByRadians(Matrix3D matrix, GLfloat angle, GLfloat x, GLfloat y, GLfloat z)
{
    GLfloat mag = sqrtf((x*x) + (y*y) + (z*z));
    if (mag == 0.0)
    {
        x = 1.0;
        y = 0.0;
        z = 0.0;
    }
    else if (mag != 1.0)
    {
        x /= mag;
        y /= mag;
        z /= mag;
    }

    GLfloat c = cosf(angle);
    GLfloat s = fastSinf(angle);
    matrix[3] = matrix[7] = matrix[11] = matrix[12] = matrix[13] = matrix[14] = 0.0;
    matrix[15] = 1.0;


    matrix[0] = (x*x)*(1-c) + c;
    matrix[1] = (y*x)*(1-c) + (z*s);
    matrix[2] = (x*z)*(1-c) - (y*s);
    matrix[4] = (x*y)*(1-c)-(z*s);
    matrix[5] = (y*y)*(1-c)+c;
    matrix[6] = (y*z)*(1-c)+(x*s);
    matrix[8] = (x*z)*(1-c)+(y*s);
    matrix[9] = (y*z)*(1-c)-(x*s);
    matrix[10] = (z*z)*(1-c)+c;

}
static inline void Matrix3DSetRotationByDegrees(Matrix3D matrix, GLfloat angle, GLfloat x, GLfloat y, GLfloat z)
{
    Matrix3DSetRotationByRadians(matrix, angle * M_PI / 180.0, x, y, z);
}
This multi-rotation version works exactly the same way as
glRotatef().
Now that we've replaced all three of the stock functions, here's the new
drawView: method using only our own matrices and no stock transformation. The new matrix code is
bold:
- (void)drawView:(GLView*)view;
{
static GLfloat rot = 0.0;
static GLfloat scale = 1.0;
static GLfloat yPos = 0.0;
static BOOL scaleIncreasing = YES;
static const Vertex3D vertices[]= {
{0, -0.525731, 0.850651}, {0.850651, 0, 0.525731}, {0.850651, 0, -0.525731}, {-0.850651, 0, -0.525731}, {-0.850651, 0, 0.525731}, {-0.525731, 0.850651, 0}, {0.525731, 0.850651, 0}, {0.525731, -0.850651, 0}, {-0.525731, -0.850651, 0}, {0, -0.525731, -0.850651}, {0, 0.525731, -0.850651}, {0, 0.525731, 0.850651} };
static const Color3D colors[] = {
{1.0, 0.0, 0.0, 1.0},
{1.0, 0.5, 0.0, 1.0},
{1.0, 1.0, 0.0, 1.0},
{0.5, 1.0, 0.0, 1.0},
{0.0, 1.0, 0.0, 1.0},
{0.0, 1.0, 0.5, 1.0},
{0.0, 1.0, 1.0, 1.0},
{0.0, 0.5, 1.0, 1.0},
{0.0, 0.0, 1.0, 1.0},
{0.5, 0.0, 1.0, 1.0},
{1.0, 0.0, 1.0, 1.0},
{1.0, 0.0, 0.5, 1.0}
};
static const GLubyte icosahedronFaces[] = {
1, 2, 6,
1, 7, 2,
3, 4, 5,
4, 3, 8,
6, 5, 11,
5, 6, 10,
9, 10, 2,
10, 9, 3,
7, 8, 9,
8, 7, 0,
11, 0, 1,
0, 11, 4,
6, 2, 10,
1, 6, 11,
3, 5, 10,
5, 4, 11,
2, 7, 9,
7, 1, 0,
3, 9, 8,
4, 8, 0,
};
static const Vector3D normals[] = {
{0.000000, -0.417775, 0.675974},
{0.675973, 0.000000, 0.417775},
{0.675973, -0.000000, -0.417775},
{-0.675973, 0.000000, -0.417775},
{-0.675973, -0.000000, 0.417775},
{-0.417775, 0.675974, 0.000000},
{0.417775, 0.675973, -0.000000},
{0.417775, -0.675974, 0.000000},
{-0.417775, -0.675974, 0.000000},
{0.000000, -0.417775, -0.675973},
{0.000000, 0.417775, -0.675974},
{0.000000, 0.417775, 0.675973},
};
static Matrix3D translateMatrix;
Matrix3DSetTranslation(translateMatrix, 0.0, yPos, -3.0);
static Matrix3D scaleMatrix;
Matrix3DSetScaling(scaleMatrix, scale, scale, scale);
static Matrix3D tempMatrix;
Matrix3DMultiply(translateMatrix, scaleMatrix, tempMatrix);
static Matrix3D rotationMatrix;
Matrix3DSetRotationByDegrees(rotationMatrix, rot, 1.0f, 1.0f, 1.0f);
static Matrix3D finalMatrix;
Matrix3DMultiply(tempMatrix, rotationMatrix, finalMatrix);
glLoadMatrixf(finalMatrix);
glClearColor(0.0, 0.0, 0.05, 1.0);
glClear(GL_COLOR_BUFFER_BIT | GL_DEPTH_BUFFER_BIT);
glEnableClientState(GL_VERTEX_ARRAY);
glEnableClientState(GL_COLOR_ARRAY);
glEnable(GL_COLOR_MATERIAL);
glEnableClientState(GL_NORMAL_ARRAY);
glVertexPointer(3, GL_FLOAT, 0, vertices);
glColorPointer(4, GL_FLOAT, 0, colors);
glNormalPointer(GL_FLOAT, 0, normals);
glDrawElements(GL_TRIANGLES, 60, GL_UNSIGNED_BYTE, icosahedronFaces);
glDisableClientState(GL_VERTEX_ARRAY);
glDisableClientState(GL_COLOR_ARRAY);
glDisableClientState(GL_NORMAL_ARRAY);
glDisable(GL_COLOR_MATERIAL);
static NSTimeInterval lastDrawTime;
if (lastDrawTime)
{
NSTimeInterval timeSinceLastDraw = [NSDate timeIntervalSinceReferenceDate] - lastDrawTime;
rot+=50 * timeSinceLastDraw;
if (scaleIncreasing)
{
scale += timeSinceLastDraw;
yPos += timeSinceLastDraw;
if (scale > 2.0)
scaleIncreasing = NO;
}
else
{
scale -= timeSinceLastDraw;
yPos -= timeSinceLastDraw;
if (scale < 1.0)
scaleIncreasing = YES;
}
}
lastDrawTime = [NSDate timeIntervalSinceReferenceDate];
}
Wacky and Wonderful Custom Matrices
Are you still with me? This has been a doozy of an installment, hasn't it? We can't stop quite yet, though. And here's the reason why - so far I've only shown you how to recreate existing functionality in OpenGL. Yeah, what we've done can give a tiny performance boost thanks to the fact that our matrix multiplication is hardware accelerated, but that's not really enough of a justification in 99% of the cases to recreate the wheel like this.
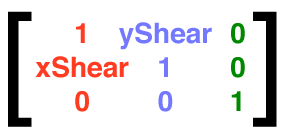
But, there are other benefits to handling the matrix transformations yourself. You can, for example, create transformations that OpenGL ES doesn't have built-in to it. For example, we could do a
shear transformation. Shearing is basically skewing an object along two axes. If you applied a shear axis to a tower, you'd get the leaning tower of Pisa. Here is what the shear matrix looks like:
Here's what it looks like in code:
static inline void Matrix3DSetShear(Matrix3D matrix, GLfloat xShear, GLfloat yShear)
{
    matrix[0] = matrix[5] =  matrix[10] = matrix[15] = 1.0;
    matrix[1] = matrix[2] = matrix[3] = 0.0;
    matrix[6] = matrix[7] = matrix[8] = matrix[9] = 0.0;
    matrix[11] = matrix[12] = matrix[13] = matrix[14] = 0.0;
    matrix[1] = xShear;
    matrix[4] = yShear;
}
And if we add the shear matrix, we get:
Try doing that with stock calls. You can also combine matrix calls. So we could, for example, create a single function to create a translate and scale matrix without having to do even a single matrix multiplication.
Exit the Matrix
Matrices are a huge and often misunderstood topic, one that many people (including me) struggle with understanding. Hopefully this gives you enough of an understand of what's going on under the hood, and it also gives you a library of matrix-related functions you can use in your own applications. If you want to download the project and try it out yourself, please
feel free. I've defined two constants that you can change to switch between using stock transforms and custom transforms, and also to turn on and off the shear transformation. You can find these in
GLViewController.h:
#define USE_CUSTOM_MATRICES 1
#define USE_SHEAR_TRANSFORM 1
Setting them to 1 turns them on, setting them to 0 turns them off. I've also updated the
OpenGL ES Xcode Template with the new Matrix functions, including the vectorized matrix multiply function. Best of luck with it, and don't worry if you don't fully grok, this is hard stuff, and for 99% of what most people do in OpenGL ES, you don't need to fully understand projective space, homogeneous coordinates, or linear transformations, so as long as you get the big picture, you should be fine.
With great thanks to Noel Llopis of Snappy Touch for his help and patience. If you haven't checked out his awesome Flower Garden, you really should - it's an absolute treat.
Footnotes- No, that's not an error. Stage right is what the audience would perceive as going to the left. Our icosahedron goes off to the left, so it is existing "stage right".
- Actually, not quite. When you call glLoadIdentity(), you're loading the 4x4 identity matrix, that illustration shows the 3x3 identity matrix.
- You might want to use a struct instead of a typedef to gain type safety. If you do that, then you'll have to make sure that you specifically pass parameters in by reference because structs are NOT automatically passed by reference, unlike arrays.
- Using Shark, the drawView: method went from being .7% of processing time to .1% of processing time. A substantial improvement in the speed of that method, but not in the overall application performance.