I've added three new projects to my iOS OpenGL ES repository on GitHub. They are fairly simple examples of how to use GLKit and GLKBaseEffect. You can find them in the GLKit Stuff directory.
They're kind of rough, but they should be helpful to you if you're just getting started with GLKit and trying to figure out how to use it.
Thanks to Julián Oliver for tweeting the solution to a problem I was having getting textures to work with GLKBaseEffect.
Showing posts with label OpenGL ES. Show all posts
Showing posts with label OpenGL ES. Show all posts
Wednesday, October 19, 2011
Thursday, July 7, 2011
Update on UpdateConf
Just wanted to let you know that I'm speaking at another conference. I'll be speaking at the inaugural UpdateConf in Brighton, UK on September 5th.
As part of the conference, I'm also giving a two-day intensive workshop on OpenGL ES. The workshop assumes no prior experience with graphics program, but will be fairly fast-paced and will cover a lot of ground because there's a lot of new ground to cover. I'll be going over the new GLKit and the incredible new OpenGL debugger as well as the updated OpenGL ES Instruments templates.
Not interested in OpenGL ES? There are four other two-day workshops going on with some really awesome instructors. Marcus Zarra is doing a two-day workshop on Core Data, Drew McCormack is doing a workshop on Core Animation, Sarah Parmenter is doing one on iOS UI design, and Remy Sharp is doing one on HTML5 for mobile. The worst thing about giving this workshop is that doing so will prevent me from going to one of the other great workshops.
The conference proper has a number of speakers, including the workshop instructors and it's really shaping up to to be quite a conference, and also quite a steal at £99 for early bird tickets to the conference (the workshops are extra). You can sign up for the conference on EventBrite.
Hope to see you there!
Friday, June 3, 2011
Thoughts on Unity3D
As I stated in my previous post on 3D engines, I'm going to do four blog posts giving my thoughts on each of the four engines that I looked into using for a project recently. Those four engines are Unity3D, Sio2, Ogre3D, and Cocos3D. I'm starting with Unity3D, which we selected for one of our recent projects.
Now, let me state up front, that all four of these are competent engines and I could see situations where I would recommend three of the four engines for client projects and could easily imagine situations where all four of them would be good choices.These four do not make an exhaustive list; there are other engines out there, including some really good ones, but these were the four that we looked at for this specific project. As much as I like the UDK, for example, I don't like it enough to spend quality time in Windows, so that one is off the table for me until the fine folks at Epic decide to port their dev and content tools to the Mac.
One of the best things about Unity3D is the fact that it supports both Windows and Mac OS equally as development platforms. Regardless of which platform you develop on, you can generate games that runs on every platform Unity supports (assuming you're licensed for it). You can even have part of your team developing on Macs and the other part on Windows with no problems.
At the time I'm writing this, it is possible to generate games from Unity that run on Mac OS X and Windows (both native apps as well as games playable through a web plug-in), iOS, Android, Wii, Xbox 360, and PS3. The Unity folks are also actively working on adding Linux support. Console licenses are negotiated on an individual basis and are likely quite expensive, but it's nice to have the option to take a successful game to so many platforms without having to do a full port each time.
Having had to port OpenGL ES apps from iOS to Android more than once (which is no fun), I can honestly state that the Android support should be a huge selling point you're giving any thought to supporting both iOS and Android.
The other potential downside in some situations is that the underlying C++ source code is not available. You work primarily in either JavaScript or C# (MonoScript) and at a higher level of abstraction. Unity supports a few other languages besides Javascript and C#, but only those two languages work for mobile development.
After about two weeks of spending my evenings with Unity, I actually came to the conclusion that not having access to the source isn't really much of a drawback, and for many developers, working this way will be better than working in C++. The engine takes care of almost all the low-level stuff you'd need to do, but even if it doesn't, Unity has a shader language that lets you write code that runs on the GPU and anything that needs to run on the CPU can be done by scripting inside Unity.
Although the programming in Unity3D is done with scripting languages, the scripts you write are actually compiled, so there's not a huge performance overhead to using them. In the exceedingly rare situation where C# or Javascript isn't sufficient, it is possible to send messages into and out of Unity from your application's C or Objective-C code.
If you don't already know something about graphics programming, you still don't need to be too scared or intimidated. Most of the gnarly stuff is squirreled away where you won't see it until you need it, and you can do a surprising amount by just configuring things in the development GUI. You can create, for example, a fairly full-featured physics simulations without ever writing a line of code. Want to stack up a bunch of crates and roll a ball into them and watch them all fall? You can do it without ever opening a text editor. Heck, you can even do that without opening a 3D program.
Unity bypasses almost all of this tedium. When you save your assets from your 3D program or Photoshop, you simply save them in your Unity project's Assets folder. When you launch Unity, or navigate back to it if it's already open, Unity detects the new file, or any changes you've made to an existing file. It imports it and adds it to the list of available assets.Anything you need to do that can't be done in your 3D program, such as specify a shader or identify the physics engine properties for the object, you do right in Unity, and most of that can be done without writing code (though everything you can configure without code can also be changed from code).
Which 3D program do you need to use? Pretty much any one you're comfortable with. Unity3D has direct import support for the native file formats from several programs including Blender , but any package that can export to Autodesk FBX or Collada can be used with full support for all features like bones, textures, animations, etc.It also supports native Photoshop files (.psd) for textures, flattening layers in a non-destructive manner when you build your app.Assets can even be given different characteristics for different platforms. You could have, for example, a 2048x2048 texture asset for the desktop version of your game but tell Unity to use a 1024x1024 version for game consoles and a 512x512 version on iOS and Android.
A good, experienced graphics programmer working in mobile right now can easily ask $200 per hour or more because the demand far outstrips the supply. Figure it out. Unity's full iOS license is basically the equivalent of 15 hours of a graphics programmer's time. Yet, Unity will easily cut five times that many hours off of any decent size software game project's schedule, probably a lot more.
I'm giving Unity3D two big thumbs up. I'm using it on a project now and hope to use it on many more in the future because it's fun to use and removes much of the tedium associated with 3D programming without removing power.
1 Many of the more advanced features require the more expensive "Pro" license, however, and really cutting edge features from the latest games generally take a little while to show up in the tools
Now, let me state up front, that all four of these are competent engines and I could see situations where I would recommend three of the four engines for client projects and could easily imagine situations where all four of them would be good choices.These four do not make an exhaustive list; there are other engines out there, including some really good ones, but these were the four that we looked at for this specific project. As much as I like the UDK, for example, I don't like it enough to spend quality time in Windows, so that one is off the table for me until the fine folks at Epic decide to port their dev and content tools to the Mac.
Unity Overview
Unity3D actually predates the iPhone, and of the four engines, it's the one that feels the most mature and has the most robust developer tools. It also has one of the most active developer communities. Unity3D is a closed-source commercial product that you must pay for, which might be a turn-off for some, but it is worth every penny of the license fee.Unity Pros
Unity is actually fairly easy to learn, yet has a feature set that is compares favorably to most other engines. Unity's asset pipeline is really robust and their tools give you the ability to very quickly make changes and test those changes.One of the best things about Unity3D is the fact that it supports both Windows and Mac OS equally as development platforms. Regardless of which platform you develop on, you can generate games that runs on every platform Unity supports (assuming you're licensed for it). You can even have part of your team developing on Macs and the other part on Windows with no problems.
At the time I'm writing this, it is possible to generate games from Unity that run on Mac OS X and Windows (both native apps as well as games playable through a web plug-in), iOS, Android, Wii, Xbox 360, and PS3. The Unity folks are also actively working on adding Linux support. Console licenses are negotiated on an individual basis and are likely quite expensive, but it's nice to have the option to take a successful game to so many platforms without having to do a full port each time.
Having had to port OpenGL ES apps from iOS to Android more than once (which is no fun), I can honestly state that the Android support should be a huge selling point you're giving any thought to supporting both iOS and Android.
Unity Cons
The downsides to Unity3D are relatively few, actually.It is the most expensive of the engines I looked at, and the costs are completely front-loaded. You pay a flat per-developer license per platform up front, but then you can create as many games as you want for the platforms you're licensed for. For the basic iOS license, it's $400 per seat (one developer using up to two machines), for the Pro license, you're looking at $3,000 (because the $1,500 iOS Pro requires the $1,500 Unity Pro), which might sound like a lot of money, but it's really a pittance compared to the amount of development time it can save you. The "Basic" version of Unity, which allows you to generate Mac, Windows, and Web games (though excludes some of the more advanced features) is available completely free of charge.The other potential downside in some situations is that the underlying C++ source code is not available. You work primarily in either JavaScript or C# (MonoScript) and at a higher level of abstraction. Unity supports a few other languages besides Javascript and C#, but only those two languages work for mobile development.
After about two weeks of spending my evenings with Unity, I actually came to the conclusion that not having access to the source isn't really much of a drawback, and for many developers, working this way will be better than working in C++. The engine takes care of almost all the low-level stuff you'd need to do, but even if it doesn't, Unity has a shader language that lets you write code that runs on the GPU and anything that needs to run on the CPU can be done by scripting inside Unity.
Although the programming in Unity3D is done with scripting languages, the scripts you write are actually compiled, so there's not a huge performance overhead to using them. In the exceedingly rare situation where C# or Javascript isn't sufficient, it is possible to send messages into and out of Unity from your application's C or Objective-C code.
Learning Curve
I found Unity surprisingly easy to learn. There are some really good resources out there, including lots of tutorials and instructional videos. I actually had a game functioning after about two hours of playing. It was ugly and the game mechanics were simple, but it was playable. Unity also has a fairly active developer community forum where you can go and get help when you get stuck.If you don't already know something about graphics programming, you still don't need to be too scared or intimidated. Most of the gnarly stuff is squirreled away where you won't see it until you need it, and you can do a surprising amount by just configuring things in the development GUI. You can create, for example, a fairly full-featured physics simulations without ever writing a line of code. Want to stack up a bunch of crates and roll a ball into them and watch them all fall? You can do it without ever opening a text editor. Heck, you can even do that without opening a 3D program.
Complexity
I was scared of one thing going into learning Unity: I was concerned that because it was so easy (at least I had heard it was), that it was going to be a dumbed down game maker that sacrificed more advanced features for the sake of lowering the obstacles to entry. My fears were completely misplaced, though. That's not the case at all. The Unity folks have done a really great job of making their tools easy to use while still giving you the ability to do most anything you'd ever need to do. It's even possible (though the process is a bit convoluted) to integrate UIKit and Unity3D within the same application.Asset Pipeline
The thing that actually impressed me most about Unity is what they call their "asset pipeline", which is the process by which you get 3d models, textures, and other assets into your game. If you've ever developed a game or game mod for the UDK, a Valve Source game, or other commercial engine, usually there's kind of a convoluted process you have to go through to get your game assets including characters, textures, props, and environments, into the game. You usually have to use separate applications to specify shaders and physics options, sometimes write a compile script or other text document to define certain trains, and then compile the object and package it all up into some kind of bundle or package. While developing a single mod, you typically iterate through this process many, many times. It can be a bit tedious and hard to learn and usually requires the use of multiple tools and lots of trial and error.Unity bypasses almost all of this tedium. When you save your assets from your 3D program or Photoshop, you simply save them in your Unity project's Assets folder. When you launch Unity, or navigate back to it if it's already open, Unity detects the new file, or any changes you've made to an existing file. It imports it and adds it to the list of available assets.Anything you need to do that can't be done in your 3D program, such as specify a shader or identify the physics engine properties for the object, you do right in Unity, and most of that can be done without writing code (though everything you can configure without code can also be changed from code).
Which 3D program do you need to use? Pretty much any one you're comfortable with. Unity3D has direct import support for the native file formats from several programs including Blender , but any package that can export to Autodesk FBX or Collada can be used with full support for all features like bones, textures, animations, etc.It also supports native Photoshop files (.psd) for textures, flattening layers in a non-destructive manner when you build your app.Assets can even be given different characteristics for different platforms. You could have, for example, a 2048x2048 texture asset for the desktop version of your game but tell Unity to use a 1024x1024 version for game consoles and a 512x512 version on iOS and Android.
The Bottom Line
As I stated earlier, there are situations where I could see any of the four engines I looked at being a good choice, as could many of the other engines I didn't look at. But, honestly, if I had to make an engine decision without detailed information, Unity3D would be my first recommendation. The tools are solid, the company and community support is awesome, it supports many platforms, and getting assets into your game couldn't be easier. It's relatively easy to start using for both experienced developers and those who aren't.A good, experienced graphics programmer working in mobile right now can easily ask $200 per hour or more because the demand far outstrips the supply. Figure it out. Unity's full iOS license is basically the equivalent of 15 hours of a graphics programmer's time. Yet, Unity will easily cut five times that many hours off of any decent size software game project's schedule, probably a lot more.
I'm giving Unity3D two big thumbs up. I'm using it on a project now and hope to use it on many more in the future because it's fun to use and removes much of the tedium associated with 3D programming without removing power.
1 Many of the more advanced features require the more expensive "Pro" license, however, and really cutting edge features from the latest games generally take a little while to show up in the tools
Saturday, May 14, 2011
3D Game and Graphics Engines
One thing that I get asked about a lot is whether you should use a game or graphics engine instead of learning OpenGL ES. Often, these emails are prefaced by a statement about how hard graphics programming. I've had to answer this question enough times now that it seems like a good topic for a blog post.
Honestly, I find it kind of hard to answer, because I don't see the "using an engine" and "learning graphics programming" as being distinct or mutually exclusive approaches. While a good game or graphics engine will handle a lot of the more gnarly programming tasks for you and shorten your development time, you still need to understand the underlying concepts to build anything of any complexity.
All of these engines are built on top of OpenGL (and/or DirectX if they support Windows), and are subject to the same limitations and strengths. Not understanding, at least at some level, how these lower-level graphics libraries work and the basic maths of 3D programming will eventually hold you back.
But… that doesn't necessarily mean you need to learn OpenGL before you can start using these tools effectively. You don't. It's just that some of the difficult, sticky math and concepts that might be scaring you away from OpenGL are still there (though better hidden), and you may well still have to deal with them at some point if you're doing the coding on the game (as opposed to just creating assets or doing level design).
Here's kind of a simple nutshell rule:
So, when shouldn't you use an existing engine if your goal is to make a game and not to try and be the next John Carmack? Almost never. Rolling your own game engine should be a labor of love. It's got to be an itch you can't scratch; the kind of desire that I probably couldn't talk you out of anyway. Otherwise, it's just a waste of your time.
What about when there just isn't an engine that works for what you want to do?
Honestly, that's not all that likely in this day and age, but even if it is, you're far better off starting with an existing engine and then modifying it to meet your needs.
From a business and financial perspective, it's almost never better to start from scratch. Even many of the AAA commercial game engines are derivatives of other engines. To give an example: Valve's Source Engine, is derived from their older Goldsource Engine, which itself was forked from the Quake Engine back around 1996.
Though there are quite a few game engines around, a very large percentage of high-end commercial games, both console and PC, are based on either the Unreal engine or the Quake engine or one of their derivatives. If you throw in a handful of other engines, like the CryEngine, you've probably covered all but a few outliers.
If it's not cost effective for large, multi-person development teams with multi-million dollar budgets to develop their own game engines, it's probably not the best choice for individual indie developers or small shops.
So, don't reinvent the wheel. Use an engine and stand on the shoulders of John Carmack and others like him. Don't spend your time trying to solve problems that are long-solved. Just be aware that using an engine can't completely eliminate the need to learn a little math or to understand the underlying concepts.
I won't be discussing the UDK, even though it's a phenomenal engine, because it requires using Windows for many tasks, and I don't want to spend time in Windows. If you've got both a Mac and a Windows machine, however, and don't mind splitting time between OS X and Windows, you might want to check it out. A lot of time and brainpower has gone into getting the UDK to have incredible performance on iOS and the license terms have been changed to be much more friendly to small indie shops ($99 plus 25% of royalties after the first $50,000).
Honestly, I find it kind of hard to answer, because I don't see the "using an engine" and "learning graphics programming" as being distinct or mutually exclusive approaches. While a good game or graphics engine will handle a lot of the more gnarly programming tasks for you and shorten your development time, you still need to understand the underlying concepts to build anything of any complexity.
All of these engines are built on top of OpenGL (and/or DirectX if they support Windows), and are subject to the same limitations and strengths. Not understanding, at least at some level, how these lower-level graphics libraries work and the basic maths of 3D programming will eventually hold you back.
But… that doesn't necessarily mean you need to learn OpenGL before you can start using these tools effectively. You don't. It's just that some of the difficult, sticky math and concepts that might be scaring you away from OpenGL are still there (though better hidden), and you may well still have to deal with them at some point if you're doing the coding on the game (as opposed to just creating assets or doing level design).
Here's kind of a simple nutshell rule:
If you love graphics programming or are fascinated by it, then study OpenGL ES and the underlying maths and forget about using the engines at first (though studying their source is a great way to learn). There's always going to be work for good graphics programmers and you can't put a price tag on doing what you love.
If, on the other hand, your goal is to make a game or other graphics-heavy application, and graphics programming is just a means to that end, then use an engine, because it will shorten the amount of work you have to do tremendously, which inherently increases your chances of making money because time is money and there's never enough of it.
So, when shouldn't you use an existing engine if your goal is to make a game and not to try and be the next John Carmack? Almost never. Rolling your own game engine should be a labor of love. It's got to be an itch you can't scratch; the kind of desire that I probably couldn't talk you out of anyway. Otherwise, it's just a waste of your time.
What about when there just isn't an engine that works for what you want to do?
Honestly, that's not all that likely in this day and age, but even if it is, you're far better off starting with an existing engine and then modifying it to meet your needs.
From a business and financial perspective, it's almost never better to start from scratch. Even many of the AAA commercial game engines are derivatives of other engines. To give an example: Valve's Source Engine, is derived from their older Goldsource Engine, which itself was forked from the Quake Engine back around 1996.
Though there are quite a few game engines around, a very large percentage of high-end commercial games, both console and PC, are based on either the Unreal engine or the Quake engine or one of their derivatives. If you throw in a handful of other engines, like the CryEngine, you've probably covered all but a few outliers.
If it's not cost effective for large, multi-person development teams with multi-million dollar budgets to develop their own game engines, it's probably not the best choice for individual indie developers or small shops.
So, don't reinvent the wheel. Use an engine and stand on the shoulders of John Carmack and others like him. Don't spend your time trying to solve problems that are long-solved. Just be aware that using an engine can't completely eliminate the need to learn a little math or to understand the underlying concepts.
Engines
It just so happens that for a number of proposals I've done lately, I've been looking at game engines in some depth. I'm not going to do "reviews" per se, but over the next few weeks, I will try and post my thoughts about several of the engines available for iOS, including Unity3D, Sio2, Ogre3D, and Cocos3D.I won't be discussing the UDK, even though it's a phenomenal engine, because it requires using Windows for many tasks, and I don't want to spend time in Windows. If you've got both a Mac and a Windows machine, however, and don't mind splitting time between OS X and Windows, you might want to check it out. A lot of time and brainpower has gone into getting the UDK to have incredible performance on iOS and the license terms have been changed to be much more friendly to small indie shops ($99 plus 25% of royalties after the first $50,000).
Wednesday, May 4, 2011
Empty OpenGL ES Application Xcode 4 Template
Jacques De Schepper sent in an updated version of my old Empty OpenGL ES Application Template, updated to use Xcode 4's completely revamped templating mechanism. You can download the new Xcode 4 version of the template right here. I haven't had a chance yet to test this out, but once I do, I'll also add it to GitHub.Thanks, Jacques!
Tuesday, April 5, 2011
Blender 2.57 Objective-C Export Script
A few days ago, the Blender Foundation put out the first release candidate of Blender 2.5. This release unexpectedly broke compatibility with most existing 2.5 python scripts, including my Objective-C header Export Script.
Which was great timing, since I needed to use the script today. I could've just gone back to an older version of Blender, but decided instead to re-write the script to work. I just added to GitHub, the new 2.57 compatible version of the export script. This version is back to being an add-on that you can add through the User Preferences.
I've also added a few options that you can select when exporting (they're on the left side of the file selection screen, underneath the volumes and recently visited locations). You can see the new options in the following screen grab:
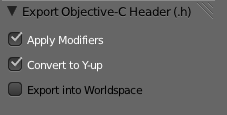
The first option lets you specify whether modifiers are applied before exporting the mesh. If you uncheck this, the script will strip the modifiers before exporting, otherwise, it will apply them to the mesh before exporting.
The second option will rotate the object 90° along the X axis, which converts the object from Blender's Z-up coordinate space to OpenGL's Y-up coordinate space. I've made this the default, but I could foresee situations where people would want to skip the conversion.
The final option will move the export the object using its world space coordinates rather than exporting it using object space coordinates. This option will, for example, preserve relative distance between multiple objects exported from the same file into different headers. Or, to put it another way, objects exported will normally have use their coordinates as they relate to the object's origin, regardless of where the object is in the Blender scene. If this is checked, the vertex coordinates will be exported relative to the scene's origin.
NB: There was a problem with the triangulation code in the version posted earlier. If you're having problems, pull again from GitHub.
Tuesday, February 22, 2011
Blender 2.5 beta 6 Objective-C Export
A kind reader updated my Objective-C export script for Blender to work with the 2.5 beta 6 version of Blender. You can find the new version on GitHub.
On a related note, if you make a change to your clone of any of my public repositories on Github, you can send me a pull request. I'm happy to take additions, bug fixes, and other updates back into the master repository.
Thanks to John Becker for updating the script!
On a related note, if you make a change to your clone of any of my public repositories on Github, you can send me a pull request. I'm happy to take additions, bug fixes, and other updates back into the master repository.
Thanks to John Becker for updating the script!
Tuesday, February 8, 2011
MC3D - Platform Agnostic 3D Foundation
Sorry for the lack of posts recently. Things have been, well… you know. Same old story. Super busy. Which is good, but it's murder on blog post frequency.
I've recently had to port some OpenGL ES work I did from iOS to Android. It used to be that doing so would have been insanely painful (as opposed to just painful). I would have had to convert the Objective-C code to Java, and then maintain completely distinct sets of code that do the same exact thing. Fortunately, the Android NDK (Native Development Kit) allows you to write code for Android in C/C++. The version of the NDK supported on 2.2 still requires part of the Activity (Android's counterpart to an iOS view controller) to be written in Java, but does allow you to call C/C++ code using JNI. In 2.3 and 3.0, you can do entire activities in C or C++.
This is a huge step forward for Android for those of us who do performance-critical work on multiple platforms, but it's not without some pain. Debugging across the JNI bridge is… less than easy. But, being able to share code across platforms is a huge win, and being able to get native speeds in the process is teh awseome.
During these projects, I've been taking a lot of my 3D-related code and creating a new set of platform-agnostic C functions and types. I've been cleaning up and making names consistent, and placing appropriate pre-compiler macros to make sure the code compiles correctly everywhere. On iOS, the library will take advantage of the Accelerate Framework in places, but doesn't require Accelerate to function.
I've chosen C because I don't like mixing C++ and Objective-C. The object models are too different for my tastes. But I've also made sure to include proper ifdef'd extern statements so that you can import the MC3D header files from C++ without hassle.
I've dubbed this set of functions MC3D, and I'm making it open source under a simplified version of the simplified BSD license (simplified simplified BSD license?). I've taken out the attribution requirement, so the only requirement is that if you re-distribute the source code, you have to leave the copyright and license text intact. That's it. Otherwise, you can use it for free in any project, commercial or otherwise, without paying anything, without attributing, and without asking (no really, you don't need to ask).
MC3D is still very much a work in progress, and I'm only adding code to the repository that I feel is ready for public consumption. Much of what's in MC3D has been posted here before, sometimes with different names or in slightly different form.
I have other code that I plan to add in the future, including higher-level functionality like model loading, scene management, and skeletal animation, but I won't add anything until its both solid and platform agnostic.
Currently, documentation is very sparse, and I currently can't offer any support or help with using it, so caveat emptor! I will gladly accept contributions, bug fixes, and new functionality back into the MC3D codeline.
MC3D on GitHub.
Link fixed, sorry about that
Wednesday, December 22, 2010
More Animation Curves than You Can Shake a Stick at
Core Animation is awesome. It makes doing a lot of complex, fancy animations downright easy. One of the really nice built-in features of Core Animation is the ability to use animation curves. These curves let you specify whether the animation happens linearly (at the same pace throughout the animation), or whether the animation eases in, eases out, or does both.
When you have to go closer to the metal and use OpenGL ES, you're not so lucky. We don't have animation curves provided for us in OpenGL ES. We have to interpolate ourselves. Fortunately, the math behind animation curves is straightforward. Plus, there are far more curves than just the four Apple offers.
I haven't run across a good library for generating animation curves, so I've decided to release my animation curve functions as public domain (no attribute required, no rights reserved). Here is a graph of all the different animation curves I'm releasing:
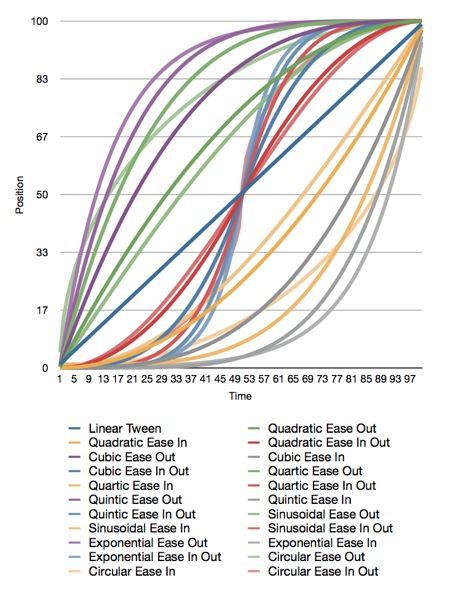
Here is the original Numbers.app document that generated the graph, and here is the Xcode project that generated the data. The project also contains all the functions needed to plot these curves.
Apple doesn't document which calculations they use for easing, but my guess is that they're quadratic. I'm not sure, though, since many of the curves yield similar results.
All of the interpolation functions included in the Xcode project above take three inputs and return a GLfloat containing the interpolated value. The first parameter, t, is the percent of the way through the animation you want a value calculated for. This is a clamped float that should be in the range 0.0 to 1.0. Values above 1.0 will be treated as 1.0 and values below 0.0 are treated as 0.0. The second parameter, start, is the value when the animation starts. The third parameter, end, is the final value to be animated toward.
If you want to apply a curve to a CGPoint or Vector3D, you have to call the function multiple times for each component (x/y or x/y/z).
Have fun!
Here are the functions included in the project above:
GLfloat
GLfloat
GLfloat
GLfloat
GLfloat
GLfloat
GLfloat
GLfloat
GLfloat
GLfloat
GLfloat
GLfloat
GLfloat
GLfloat
GLfloat
GLfloat
GLfloat
GLfloat
GLfloat
GLfloat
GLfloat
GLfloatTuesday, December 21, 2010
The Little Grashopper Blog
Well, I'm not sure how I never ran across it before, but Philip Rideout, author of O'Reilly's iPhone 3D (a book I recommended last week), has a hell of a blog for people interested in OpenGL. A lot of the posts are specific to desktop OpenGL (and recent versions of OpenGL at that!), but there's tons of great information that applies to OpenGL ES as well. It's a veritable treasure trove of advanced graphics goodness from a guy who's been doing it for years.
Sunday, December 12, 2010
OpenGL ES Book Recommendation
Since canceling my OpenGL ES 2.0 for iOS 4 book, I've had several people request book recommendations to use instead of my book. Honestly, I didn't really have one to give before today, partially because I intentionally avoided reading competing books while working on mine.
Today, while stuck on a train, I checked out Philip Rideout's iPhone 3D Programming by O'Reilly. Now, it's never easy to give an objective opinion on a book that competes with one you're writing, and even though my book is currently not on a production schedule and I have no time to work on it, I tend to still think of myself as working on an OpenGL ES book. Although there are several things that I would have done differently, I also know it's unfair to judge a book that way. Deciding what to include and what not to include in a book is a horribly difficult thing with an expansive topic like OpenGL ES and no two authors are going to make the same exact decision in that regard, so I'm not going to criticize Philip Rideout for, well, for not being me. Hell, normally not being me is taken as a bit of a compliment anyway.
Yet, though it's not the book I would have written, I can wholeheartedly recommend it. The information is solid and useful and it's presented in a way that doesn't assume or require a Ph.D in math. One thing that Rideout does do that I opted not to even attempt, is to give both the OpenGL ES 1.1 and OpenGL ES 2.0 approach to tasks that can be done in both environments, which is actually interesting on multiple grounds. One, it's a great transition for people who know 1.1 but not 2.0, but also, it shows the interesting ways people have figured out to work around the limitations of the fixed pipeline. These kinds of solutions fascinate me because they're the result of people refusing to accept technical limitations.
Much (all?) of the material from this book is available free online, but I'd recommend buying the book, which gives you access to the book's source code and also will also help an angel get his wings. Well, I'm not 100% sure on the latter, but it seems likely this time of year.
If you're floundering a bit with OpenGL ES, this book is well worth your time.
Friday, November 19, 2010
OpenGL ES Course on iTunes University
Those of you waiting for the next chapter of OpenGL ES 2.0 for iOS can do yourselves a favor by checking out this course on iTunes University. It's an Advanced iOS Development course taught by Brad Larsson at the Madison Area Technical College, and the most recent lesson is on OpenGL ES. You can also find the course notes here.
Wednesday, November 17, 2010
OpenGL ES Update
Sorry for the silence around here lately.
Unfortunately, the next chapter of OpenGL ES 2.0 I plan to release contains detailed, step-by-step instructions based on Xcode 4 (mostly written around the time of DP2) which is still under NDA. As a result, this chapter is going to take a little longer to scrub, and I haven't had much time to scrub lately.
In the meantime, I realized that I've never linked to the PowerVR Insider SDK, so I'm rectifying that. The company that makes the GPU in all iOS devices has an SDK you can download - in fact, they have several versions of it for different platforms, including iOS. Most of the code is fairly generic C++ with just enough Objective-C around them to work, but there's a metric buttload of good code there for doing all sorts of things. Definitely worth signing and downloading, because they show you how to do a lot of common tasks. It's not very beginner-friendly, granted, but still a great resource you should know about. Most of the code is general OpenGL ES and not actually specific to their hardware, though some of the texture-related tools and optimizations are designed for best performance on their hardware and in some cases use vendor-specific extensions. If you're an iOS-only dev, that's not a problem at all unless Apple changes their GPU vendor.
Tuesday, November 2, 2010
OpenGL ES 2.0 for iOS, Chapter 4 - Introducing the Programmable Pipeline
The code for this chapter can be found here.I've mentioned OpenGL ES 2.0's programmable pipeline, but it may not be clear to you exactly what that term means. If that's the case, let's clear it up now. The term “pipeline” refers to the entire sequence of events, starting from when you tell OpenGL ES to draw something (usually called rendering), through the point where the objects submitted have been fully drawn. Typically, an OpenGL ES program is repeatedly drawing as the program runs, with each completed image begin referred to as a frame.
Versions of OpenGL ES prior to 2.0 (including 1.1, which is supported by all iOS devices) used what's called a fixed rendering pipeline, which means that the final image was generated by OpenGL ES without any chance for you to do anything. A better term for it might have been “closed pipeline”, because you shove stuff in one end, and it comes out the other end and you have no ability to influence it once it starts going down the pipeline
In the fixed pipeline, the entire image is rendered based on the values you submit to OpenGL ES in your Application's previous API calls. Every time OpenGL ES 1.x renders something, it does so using the same set of algorithms and calculations. If you want a light, for example, you call a handful of OpenGL ES functions in your application code to define the kind of light you want, the position of the light, the strength of the light, and perhaps a few other attributes. OpenGL ES 1.1 then takes the information you've provided and does all the calculations needed to add the light to your scene. It figures out how to shade your objects so that they look like the light is hitting them and draws them accordingly. The fixed pipeline insulates you from a lot of things. It basically says, “Oh, honey… give me the information about your scene, and don't worry your pretty little head about all the math.”
The good thing about fixed pipeline programming is that it's conceptually straightforward and easy. Oh, I know… it doesn't feel easy when you're learning it, but compared to the programmable pipeline, the basic idea is much easier to grasp. Want to set up a view that simulates perspective? OpenGL ES will basically do it for you if you give it a handful of inputs using a couple of API calls. Want to move, rotate, or scale an object? There are functions to do that for you, too. Want to add a light or six to your scene? Just make a few calls per light before drawing, and you're good to go.
The bad thing about the fixed pipeline is that it limits what you can do. A lot of the fancy lighting and texturing effects that you see in modern 3D games, for example, can't be created easily (or at all) using the fixed pipeline. With the fixed pipeline, you're only able to do what the authors of the graphics library anticipated you might need to do, in the way they anticipated you would need to do it. Want a lens flare or depth of field? Well, you can probably figure out a way to do these kinds of things using the fixed pipeline, but it won't be easy or straightforward. People have come up with some really ingenious workarounds to outwit the limitations of the fixed pipeline, but even if you do manage to find a way to work around the limitations of the fixed pipeline to achieve some effect, your code's likely to be a bit of a hack---and more importantly, some of the code you write to implement that functionality is probably going to be running in the wrong place for best performance. Let's talk about why that is, because it's a critical piece of information once we start working with the programmable pipeline.
Hardware Architecture
OpenGL ES insulates you from having to code to any specific hardware, but it's important to understand, at least at a very high level, how iOS devices calculate and display graphic content. Every iOS device ever made has two processors inside of it. They all have a general purpose processor called the CPU, as well as a second processor called a GPU, which stands for graphics processing unit.¹The CPU can do most anything you need it to do, and it's where your application's code primarily runs. The CPU is very fast at doing integer operations, but not anywhere near as fast when it comes to doing floating point operations². The GPU, on the other hand, is much more specialized. It's good at doing large numbers of small floating point calculations very quickly. It was designed to work as a helper to the CPU to handle those tasks that the CPU isn't particularly good at, rather than serving as a standalone processor. The CPU, in essence, hands off certain tasks that the GPU is better at performing. With the two processors working in parallel, the device is capable of doing a lot more work at one time. But this “helping” doesn't happen automatically in your programs.When you write C, Objective-C, or C++ code in Xcode, the compiled binary code executes on the CPU. There are some libraries, such as Core Animation, that implicitly hand off tasks to the GPU on your behalf, but generally speaking, you have to use special libraries to get access to the GPU. Fortunately, OpenGL ES, is just such a library. Both with the fixed pipeline and the programmable pipeline, most of the OpenGL ES rendering happens on the GPU. That makes make sense, if you think about it: calculations for graphics are what the GPU was designed to do (hence the “G” in GPU). Much of OpenGL ES 2.0's pipeline, like all of the fixed pipeline, is outside your control. There are, however, two specific places where you can (and, in fact, must) write code. The code you write runs on the GPU and can't be written in Objective C, C, or C++. It has to be written in a special language specifically designed for the purpose. Programs that you write for the programmable pipeline run on the GPU and are called shaders. The language you write shaders in is called GLSL, which stands for GL Shading Language.
The term shader is another example of nonintuitive naming in OpenGL. Shaders are nothing more than small pieces of executable code that run on the GPU instead of the CPU. Among the tasks they perform is the calculation of the shading (or color) of each pixel that represents a virtual objects, but they can do far more than that. Shaders are fully fledged programs written in a Turing-complete programming language.
OpenGL ES Shaders
There are two types of shaders that you can write for OpenGL ES: vertex shaders and fragment shaders. These two shaders make up the “programmable” portion of the OpenGL ES 2.0 programmable pipeline. The GLSL language that you program these shaders with uses a C-like syntax. We'll look at a few simple examples of GLSL in this chapter, and we'll work with it extensively throughout the rest of the book.An important thing to realize about shaders is that they are not compiled when you build your application. The source code for your shader gets stored in your application bundle as a text file, or in your code as a string literal. At runtime, before you use the shaders, your application has to load and compile them. The reason for this deferred compilation is to preserve device independence. If shaders were compiled when you built your application and then Apple were to change to a different GPU manufacturer for a future iPhone release, the compiled shaders very well might not work on the new GPU. Deferring the compile to runtime avoids this problem, and any GPU---even those that don't exist when you create your application---can be supported fully without a need to rebuild your application.
Vertex Shaders
The shader that runs first in the OpenGL ES pipeline is called the vertex shader because it runs once for every vertex that you submit to OpenGL ES. If you submit a 3D scene with a thousand vertices, the vertex shader will get called a thousand times when you submit that scene to OpenGL ES to be drawn, once per vertex. The vertex shader is where you do what OpenGL ES imaginatively calls vertex processing. It's where you handle moving, scaling, or rotating objects, simulating the perspective of human vision, and doing any other calculation that affects vertices or depends on some piece of data that you have on a per-vertex basis.Shaders do not have return values, but both vertex and fragment shaders have required output variables that you must write a value to before the end of the shader's main() function. These output variables essentially function as required return values. For the vertex shader, the required output is the final position for the current vertex. Remember, the shader gets called once for each vertex, so the output of the shader is the final position of the vertex the shader is currently running for. In some cases, it may just be the vertex's original value, but more often than not, each vertex will be altered in some way. Doing calculations on vertices to scale, rotate, or move an object is something the GPU is much better at than the CPU, so typically, we don't try to implement those kinds of calculations in our application code, but instead do them here in the vertex shader. Once your shader has calculated the final position for a given vertex, it needs to set a special output variable called gl_Position. If your vertex shader doesn't write to gl_Position, it results in an error.
There's a slight catch, however. The gl_Position variable is a vec4 variable, which stands for vector 4. The vec4 is a datatype that contains four floating point values. You probably remember that in a Cartesian coordinate system, we use three values (X, Y, Z), not four, so it would seem like the required output should be a vec3, which contains three floating point values just the Vertex3D struct we've wrote last chapter. The first three values in gl_Position represent the Cartesian X, Y, and Z values for the current vertex. The fourth value is typically called W. Don't worry too much about why there's an extra component. It will become important a few chapters from now when we start talking about something called matrix transformations, but for now, just think of W as a work value (that's not actually what it stands for, though) that we'll need in order to do certain calculations to manipulate our vertices. Unless you know w should be set to a different value, set it to 1.0.
Here is an extremely simple example of a vertex shader:
void main()
{
    gl_Position = vec4(0.0, 0.0, 0.0, 1.0);
}
All this shader does is move each vertex to the origin. The function vec4() is built into GLSL, and all it does is create a vector datatype with four members. We're using it to create a vertex at the origin (0,0,0) with a w value set to 1.0. By assigning a value to gl_Position, we are indicating the final position of the current vertex. This is not, perhaps, a very practical fragment shader example — any model you submit to this shader will get turned into a dot at the origin — but it is a simple one that illustrates how you set the final value of the vertex, which is the one task every vertex shader must do every time it runs.
We'll be doing a lot of work with vertex shaders throughout the book; don't worry if you don't fully understand them yet. It's a complex topic, but they'll start to make sense once you've used them. For now, the important points to remember about vertex shaders are:
- Vertex shaders run once for every vertex that OpenGL ES draws.
- Vertex shaders must set gl_Position to indicate the location of the current vertex using Cartesian coordinates (x,y,z), along with an additional value called W. For the time being, we'll always set W to to 1.
Fragment Shaders
The second programmable part of the OpenGL ES 2.0 programmable pipeline is called a fragment shader, and it's called that because, well… the fragment shader runs once for every fragment in the drawing operation. That's probably not very helpful, huh? So… what's a “fragment”?Think of a fragment as a possible drawn pixel. A fragment includes all of the various things in the virtual world that could potentially affect one pixel's final color. Imagine that an OpenGL ES view on your iPhone or iPad's screen is a window into a virtual world. Now pick a single pixel in your OpenGL view. If you were to take a slice of your virtual world starting with that pixel, and moving into the virtual world as far as the eye can see, everything that lies behind that one pixel constitutes the fragment for that pixel. Sometimes you'll see fragment shaders called pixel shaders. This is actually a bit of a misnomer, but it's helpful for visualizing a fragment.
Like vertex shaders, fragment shaders have a required output, which is the final color of the pixel that corresponds to the current fragment. You indicate the pixel's color by setting a special GLSL variable called gl_FragColor. Here is the simplest possible fragment shader; it just sets the fragment's color to an opaque blue:
void main()
{
    gl_FragColor = vec4(0.0, 0.0, 1.0, 1.0);
}
Colors, as we saw in the last chapter, are represented by four components in OpenGL ES (red, green, blue, and alpha), and OpenGL ES expects those components in that specific order. GLSL doesn't have a datatype specifically designed for holding colors. Instead, it uses the same datatype it uses for vectors and vertices, so by building a vec4 (a vector datatype with four floating point members) with these four values, we are creating a color in which red and green are set to zero, and blue and alpha are set to one, which is an opaque blue. By assigning that value to gl_FragColor, we're telling OpenGL ES how to draw the pixel that corresponds to this fragment.
You might expect this fragment shader to create a view that's filled entirely with blue, but that's not necessarily what it does. Understanding this will help you understand the difference between a fragment and a pixel. Each frame starts empty, with the background set to a specific color — often black, but it can be set to any color. The vertex data (and other data) describing the scene to be drawn are submitted to OpenGL ES, and a function is called to kick off the rendering pipeline. If there's nothing in the virtual world that can affect a particular screen pixel, the fragment shader doesn't run for that pixel; it just gets left at the background color. This is the reason the term “pixel shader” is not technically correct: a pixel with no corresponding fragment doesn't get processed by the shader. A fragment has one and only one pixel, but a pixel doesn't necessarily have to have a fragment.
What the fragment shader above does is set any pixel that has part of one or more virtual objects “behind” it (so to speak) to blue. That's probably a little confusing, but it will become clear when we write our first OpenGL ES application in the next chapter. For now, the points to remember about fragment shaders are the following:
- Fragment shaders run once for every fragment, which means once for every pixel in which something can potentially be drawn.
- Fragment shaders must set gl_FragColor to indicate the color that the fragment's pixel should be drawn.
Sending Data to the Shaders
Shaders do not have access to your application's main memory. Any data that a shader needs to do its job has to be specifically sent over to the GPU from your application code. Sending this data incurs overhead and can be a bottleneck in the rendering pipeline. In order to keep rendering performance up, it's important to only send the data that your shaders need. There are two types of data you can send from your application code to your shaders: attributes and uniforms.Attributes
An attribute is data for which you have one distinct value for each vertex being submitted. If, for example, you are submitting a scene with a thousand vertices, any attributes you pass must contain a thousand values. If you have an attribute of colors, you must pass in a thousand colors. If you have an attribute of vectors, you must pass in a thousand vectors. You will virtually always have at least one attribute, containing the Cartesian coordinates of each vertex to be drawn or, at least, the starting position of each vertex before it gets transformed by the vertex processor. Without this data, there's really no way to do anything in your vertex shader. You can only submit floating point data in an attribute, not integer data, though you can provide multiple floating point values to each vertex in a single attribute. A color, for example, contains four floating point numbers, so to provide data for color attribute, you need to provide an array containing 4 floats multiplied by the number of vertices being submitted. That same attribute will comes into the shader as a single vec4.Each time your vertex shader runs, the pipeline will provide it with just the value that corresponds to the vertex that the shader is executing for. So, in your application code, attributes are represented by an array with one or more values for each vertex, but in your vertex shader, you must deal with only a single chunk of data from that submitted array, which contains the values that correspond to the current vertex. We'll see how to send attributes from your application to the shader a little later in the chapter, but here's how you work with an attribute insode your vertex shader:
attribute vec4 position;

void main()
{
    gl_Position = position;
}
It's pretty straightforward; you declare the attribute at the top of the shader, and that's pretty much all you have to do in on the shader side. The OpenGL ES pipeline takes care of handing your shader the right data element each time. That means you can treat the attribute (position, in this case) as an input variable, almost like an argument to a function. In this example, we're taking the value from the position attribute for this vertex and assigning it as-is to the special gl_Position output variable. In this case, our final position for each vertex is the starting position that was supplied to us by our application code. We'll see how to send attributes from our application code a little later in this chapter - there's some other information we need to go over before it will make sense.\
Uniforms
Uniforms are the second kind of data that you can pass from your application code to your shaders. Uniforms are available to both vertex and fragment shaders — unlike attributes, which are only available in the vertex shader. The value of a uniform cannot be changed by the shaders, and will have the same value every time a shader runs for a given trip through the pipeline. Uniforms can be pretty much any kind of data you want to pass along for use in your shader.We'll look at how to pass uniforms from your application code a little later, but in your shader, working with a uniform is just like working with an attribute. You declare it at the top and then treat it as an input value in your code, like so:
attribute vec4 position;
uniform float translate;

void main()
{
    gl_Position = position;
    gl_Position.y += translate;
}
In this example, we're passing a floating point value called translate, then using it to modify the gl_Position output variable, moving the vertex along the Y axis based on the value of the translate uniform. NB: This is not how you would normally move an object in your shader. This is just a simple example to illustrate how uniforms work.
Varyings
Since attributes are only available in the fragment shader and the value of uniforms can't be changed, how can the fragment shader know what values to use when drawing a given pixel? Let's say, for example, that we have an attribute containing per-vertex colors. In order to be able to determine the final pixel color in our fragment shader, we would need access to that particular piece of per-vertex information, wouldn't we?
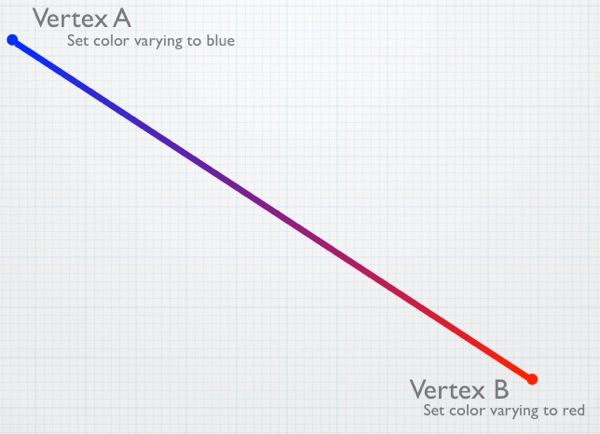
Why, yes, we would. And that's where something called a varying comes into play. Varyings are special variables that can be passed from the vertex shader to the fragment shader, but it's cooler than it sounds. There is no set relationship between vertices and fragments. So, how can a value from the vertex shader be used later in the fragment shader? How does it figure out which vertex's value to use? What happens with varyings is that the value set in the vertex shader is automatically interpolated for use in the fragment shader based on the fragment's pixel's relative distance from the vertices that affect it. Let's look at a simple example. Say we're drawing a line:

A varying set in the vertex shader for V1 and V2 would have a value halfway between those two values when the fragment shader runs for fragment F. If the varying color was set to red in the vertex shader for V1 and to blue in the vertex shader for V2, when the fragment shader for the fragment corresponding to the pixel at F runs and reads that varying, it will contain neither blue nor red. Instead, it will have a purple color, halfway between red and blue because that fragment is roughly halfway between those two vertices. The pipeline automatically figures out which vertices affect the drawing of a given fragment and automatically interpolates the values set for the varyings in the vertex shaders based on the relative distances of the fragment from those vertices.

Variables are easy to use: you just declare them in both shaders. Then any value you set in the vertex shader will be available, in interpolated form, in the fragment shader. Here's a very simple example of a vertex shader that assigns a value from a per-vertex color to a varying:
attribute vec4 position;
attribute vec4 color;

varying vec4 fragmentColor;

void main()
{
    gl_Position = position;
    fragmentColor = color;
}
In this example, color is the color for this vertex that was passed in from our application code. We've declared a varying called fragmentColor to let us pass a color value to the fragment shader. We've declared it as a vec4 because colors are comprised of four component values. In addition to setting gl_Position based on the vertex's position value that was passed into the shader using the position attribute, we also assign the value from the color per-vertex attribute to the varying called fragmentColor. This value will then be available in the fragment shader in interpolated form.
Here's what a simple fragment shader using that same varying would look like:
varying lowp vec4 fragmentColor;

void main()
{
    gl_FragColor = fragmentColor;
}
The declaration of the varying in the fragment shader has the same name (fragmentColor) as it did in the vertex shader. This is important; if the names don't match, OpenGL ES won't realize it's the same variable. It also has to be the same datatype. In this case, it's vec4, just like it was in the vertex shader. Notice, however, that there's an additional keyword, lowp. This is a GLSL keyword used to specify the precision or, in other words, the number of bytes used to represent a number. The more bytes used to represent a number, the less problems you'll have with the rounding that necessarily happens with floating point calculations. Depending on the amount of precision you need, you can specify lowp, mediump, or highp to indicate how many bytes will store the floating point value while it's being used in the shaders. The actual number of bytes used to represent a variable is decided by OpenGL ES, but the precision keyword lets you give it a hint about how much precision you think this variable needs in this situation.
GLSL allows the user of precision modifiers any time a variable is declared, but this is the one place where it is required. If you don't include it when declaring varyings in your fragment shader, your shader will fail to compile. In other places, the precision modifier is optional and the GLSL specification lays out a set of rules that will be used to determine the precision when no explicit modifier is provided.
The lowp keyword is going to give the best performance but the least accuracy during interpolation. It is often the best choice for things like colors, where small rounding errors won't really matter. When in doubt, start with lowp. You can always increase the precision to mediump or highp if the lack of precision causes problems in your application.
All we do with the value from fragmentColor, which is the interpolated version of the color values set in the vertex shader, is assign it to gl_FragColor so that the pixel gets drawn in the interpolated color. This creates a gradient between the vertices if those vertices aren't the same color.
Before we look at how to pass attributes and uniforms to the shader from our application code, we first need to talk about how shaders get loaded and compiled, because the way we pass data in relies on that mechanism. Let's look at that now; then we'll return to attributes and uniforms from the other side of the pipeline.
OpenGL ES Programs
Shaders always work in pairs in OpenGL ES. At any given moment, there can only be one active vertex shader and one active fragment shader, and when you tell OpenGL ES to draw something, an active vertex and fragment shader must already be in place. Even though only one shader pair can be active at any given moment, you can have different shader pairs for drawing different objects. This allows you to, for example, apply different lighting or different effects to objects in the same scene.OpenGL ES has a concept called a program that combines a vertex shader and fragment shader along with their attributes into a single OpenGL ES object. You can create as many of these programs as you want, but only one of them can be active at any specific time. If you make a program active, the program that was previously active becomes inactive. Typically, programs are created and the shaders loaded and compiled when your application starts, or at some other time before you actually being drawing, such as when loading a level in a game. You don't want to wait until you need the shader to load and compile it because doing so can be a costly operation that would cause a noticeable hiccup in the drawing process.
Loading programs and getting them ready to use is a bit of an involved process. Here is the basic flow:
- Create and compile the shaders. The following steps must be performed twice---once for the vertex shader, and again for the fragment shader:
- Load the shader source code into memory.
- Call glCreateShader() to create an empty shader object, saving the returned value to refer to this shader in future calls.
- Use glShaderSource() to pass the newly created shader object its source code.
- Call glCompileShader() to compile the shader.
- Use glGetShaderiv() to check the compile status and make sure that the shader compiled correctly.
- Call glCreateProgram() to create an empty program and save the returned value so that you can use the program in future calls.
- Attach the two shaders to the program using glAttachShader().
- Delete the shaders using glDeleteShader(). The program will have made its own copy of the shaders, so deleting them doesn't prevent the program from working.
- Bind each of the vertex shader's attributes to the program using glBindAttribLocation().
- Link the program using glLinkProgram().
- When you want to use this program for the first time, or if you want to change the active program to this program, call glUseProgram().
- When you're done with a program, get rid of it using glDeleteProgram().
The following is an example of a fairly typical OpenGL ES program loading code for iOS 4. Don't worry too much about what this is doing, just scan it over and and shake your head a little:
GLuint program;
GLuint vertShader;
GLuint fragShader;
GLint status;
const GLchar *source;
NSString *vertShaderPathname = ;
source = (GLchar *);
if (!source)
vertShader = glCreateShader(GL_VERTEX_SHADER);
if (status == 0)
NSString *fragShaderPathname = ;
source = (GLchar *);
if (!source)
fragShader = glCreateShader(GL_FRAGMENT_SHADER);
if (status == 0)
if (status == 0)
return NO;
if (vertShader)
if (fragShader)
That's pretty ugly, isn't it? It's not much fun to write, either. Fortunately, we can simplify the process quite a bit by creating our own Objective-C wrapper class to represent OpenGL ES programs. Instead of stepping through the code above and examining it, let's package that same functionality up into a more reusable form and discuss that, instead. Doing so kills two birds with one stone: it allows us to step through and understand the process involved in creating programs in OpenGL ES, and makes our lives easier down the road by saving us from having to write nasty code like that every time we need to create a program.Writing the GLProgram class
Open up Xcode or a text editor and create two empty text files. Call one of them GLProgram.h and the other GLProgram.m. We'll be using this class in every one of the projects we create in this book, so make sure to save the two files somewhere you can find them easily. Or, if you prefer, copy my version from the code folder that came with the book.Put the following code in GLProgram.h:
Take a look at the header file we just created; notice that we haven't created any properties, and we don't have any instance variables in our header. We haven't exposed anything here because there shouldn't be any need for other classes to have direct access to any of our instance variables. Everything the program needs to do should be handled using the various methods on our GLProgram object.
New Objective-C Features
Because this book focuses on iOS 4, I'm using a lot of newer functionality in Objective-C 2.0 & 2.1. One instance is in GLProgram: I've used Objective-C's new ability to declare instance variables in a class extension. This allows me to have private instance variables that aren't advertised to other classes because they aren't contained in my class' header file. This feature is not available on the iOS prior to the 4.0 SDK, however, so if you try to use some of the code samples from this book in older versions of the SDK, you may get compilation issues. If you run into this problem, copy the instance variable declarations from the class extension into the class's header file.The first method in our class is our initialization method. It takes the name of the file containing the vertex shader source code and the name of the file that contains the fragment shader source code as arguments. This method loads the source and compiles both shaders as part of initializing the object.
After that, we have the method that will be used to add attributes to our program, followed by two methods that can be used to retrieve the index values for a given attribute or uniform. These index values are used to submit data to the shaders and can be retrieved any time after the program is linked. All of the program's attributes must be added to the program before linking.
The next method we declare, link, is similar to the linking that happens after you compile your application's source code. Xcode handles compiling and linking as a single step when you build your application, but with shaders, it's a necessary, separate step that links all the various components together and gets them ready to use. We couldn't link right after we compiled the shaders because OpenGL needs to know about the program's attributes before it can link properly.
The use method is called when we want to draw using this program's shaders. You can call this method repeatedly, allowing you to switch between shaders at runtime.
The final three methods are primarily for debugging purposes. Since shaders are compiled at runtime, not build time, a syntax error or other problem in a shader won't cause our application build to fail in Xcode, but it will cause the shader compile and/or the program link to fail at runtime. If the link method returns NO, these three methods are how we can find out what went wrong so we can fix it.
Make sure you save GLProgram.h, then switch over to the other text file that you named GLProgram.m and put the following code in it (or you can just copy mine out of the book's source code folder):
typedef
typedef
Let's take this piece by piece and make sure we're clear on what it's doing. The first section might seem a little confusing. We've defined two datatypes to represent function pointers:
typedef
typedefWhile writing the code for the three log methods, it became clear that all three methods were nearly identical. The two shader logs were exactly the same except for the value passed into the two OpenGL ES functions. The program log file had almost identical logic, except it used two different OpenGL ES API calls to retrieve the log data. However, those functions had exactly the same arguments in both cases. This allows us to write a generic method to handle all three types of log by accepting function pointers as a parameter, shortening the code, and making it easier to maintain---since the log logic wouldn't have to be repeated. These type definitions make the code with function pointers easier to read.
Next, we use an Objective-C extension to declare the instance variables and two private methods two methods. The first instance variable we have is a mutable array that will be used to keep track of the program's attributes. There's no reason to keep track of varyings or uniforms. The varyings are strictly between the two shaders, and declaring a varying in both shaders is all that's required to create it. We also don't need to keep track of uniforms because OpenGL ES will assign each of the uniforms an index value when it links the program. With attributes, however, we have to come up with an index number for each one and tell OpenGL ES what index number we're using for which attribute when we bind them. OpenGL ES doesn't assign attribute indices for us for the attributes. Sticking the attributes into an array and using the index values from the array is the easiest way to handle that task in Objective-C, so that's what we're doing.
After the array, we have three GLuints. These are for keeping track of the numbers that OpenGL ES will assign to uniquely identify our program and its two shaders.
Then we have two private methods, which are methods that will be used within this class, but that code outside of this class should never need access to. One is a method that compiles a shader. Since the process of compiling a fragment shader and a vertex shader is exactly the same, we create one method to do them both. The second method is the generic log method mentioned earlier that is used by the three public log methods.
After that, we have a init method. This method takes the name of the two shaders (without the file extension), loads and attempts to compile both of them, and then creates a program to hold them. Once it has a program, it attaches the two shaders to the program and returns the initialized object. It also creates the mutable array that will be used to hold the attribute information. If the shaders fail to compile, it still returns a valid object. If we were to release the object and return nil, we would have no way to get to the log data that tells me what went wrong. By returning a valid object when the shader compile fails, the link step will fail and return NO, which will be the calling code's indication that something went wrong and the logs should be checked.
- (id)initWithVertexShaderFilename:(NSString *)vShaderFilename
fragmentShaderFilename:(NSString *)fShaderFilename
To actually load and compile the shaders, the init method calls the next method in the file twice, once for each shader:- (BOOL)compileShader:(GLuint *)shader
type:(GLenum)type
file:(NSString *)file
The file containing the shader source is loaded from the application bundle. If the method is unable to load the specified file, it returns NO. If it was able to get the shader's source, then it uses OpenGL ES API functions to create a shader, give the newly created shader the loaded source code, and then compile it. After compiling, the compile status is checked and a value returned based on whether the shader was successfully compiled.Once a GLProgram instance has been created and initialized, the next thing that we need to do is to tell it what attributes the vertex shader uses. The next method in the file is used for that purpose:
- (void)addAttribute:(NSString *)attributeName
This method checks to make sure the attribute hasn't already been added to the attributes array before adding it, since attributes must have unique names. It also calls glBindAttribLocation() to let OpenGL ES know about the attribute. Remember: OpenGL ES needs to know about every attribute before we link the program, and this is how we do that. Attributes are identified by their index numbers, and we specify the index number from my array when we call glBindAttribLocation(). That ensures each attribute has a unique index value. The traditional approach to attributes is to create an enum for each of the attributes to be used, but our approach makes the code a little more readable and the program functionality more self-contained.
Uniforms don't need to be kept track of or added before linking. OpenGL will assign each uniform an index without the input. When the shaders are compiled, OpenGL ES will discover the uniforms. When we link the program, OpenGL ES will assign each of the uniforms used in the shaders an index value.
Attributes and Uniform Indices
Why do attribute indices have to be specified before linking, but uniform indices are assigned by OpenGL ES without any input? I don't know. As far as I've been able to discover, the reason for the difference is not specifically documented.
I have a theory, however, that it may be due to the way attributes and uniforms are stored. All attributes take up at least the space of a vec4. That means, if you have an attribute that contains a single floating point value for each vertex, it's still going to take up the same amount of register space on the GPU as an attribute that contains four floating point values for each vertex.
Uniforms, on the other hand, are packed more efficiently into the register space available on the GPU. If we have four float uniforms, for example, they will be packed together into a single register. To do this, OpenGL ES may have to reorder the uniforms to make the most efficient use of the available space.
It seems likely that since attributes won't be packed and therefore won't be reordered during the build phase; as a result, OpenGL ES can let us choose our index values for attributes. However, OpenGL ES takes on the responsibility of assigning the values for uniforms so it can make the best use of the available register space.
You can read more about the way GLSL works by reading the GLSL specification for OpenGL ES (which is different than the GLSL specification for regular OpenGL) here:
Information specifically about uniform packing can be found in Appendix A, part 7.
The next two methods simply return the index number for a given attribute or uniform. For the attribute, it will return the index from the array because that's what we told OpenGL ES to use when we called glBindAttribute(). For uniforms, we have to ask OpenGL ES to give us the index value it assigned at link time. Note that both of these methods involve doing string compares, so if possible, they should be called only once. The controller class that creates the instance of GLProgram should probably keep track of the values returned from attributeIndex: and uniformIndex:. String lookups are costly enough that doing them a few hundred times a second could have a noticeable impact on drawing performance.
- (GLuint)attributeIndex:(NSString *)attributeName
- (GLuint)uniformIndex:(NSString *)uniformName
Next up is the method that gets called to link the program after the attributes have been added. It links and validates the program, then retrieves the link status. If the link failed, we immediately return NO. If the link operation happened successfully, we delete the two shaders and then return YES to indicate success. The reason we don't delete the shaders when the link fails is so our object will still have access to the shader logs, and we can debug if anything goes wrong. Once a shader is deleted, its log are gone as well.
- (BOOL)link
The method to make this program the active one is called use, and it does nothing more than call a single OpenGL ES method, passing in program:
- (void)use
The next four methods are the log methods. As I mentioned earlier, we have one private method that handles the functionality, and that method is called by the three public method. The way you get logs from OpenGL ES is a little old school. No, it's a lot old school. It's practically medieval. We have to first ask OpenGL ES to tell us how long the specific log we're interested is, then allocate a buffer to hold that much data, then retrieve the long into that buffer. In our case, we then turn those characters into an NSString and free() the buffer before returning the NSString instance with the log data:
- (NSString *)logForOpenGLObject:(GLuint)object
infoCallback:(GLInfoFunction)infoFunc
logFunc:(GLLogFunction)logFunc
The next three methods are the public log methods, and they all just call the private method above:
- (NSString *)vertexShaderLog
- (NSString *)fragmentShaderLog
- (NSString *)programLog
Finally, we have our dealloc method, which releases the mutable array, then checks the two shaders and the program, and if any of them are non-zero, that means there's an OpenGL ES object that needs to be deleted, so we delete them.
- (void)dealloc
Got all that? Good. Now you can forget most of it. You need to remember what programs, shaders, attributes, and uniforms are and how they relate to each other, but you can forget about the nitty-gritty details of creating programs.
Using GLProgram
Using the GLProgram object we just created is relatively easy. You first allocate and initialize an instance by providing the names of the two files containing the shaders' source code, leaving off the .vsh and .fsh extensions.
GLProgram *theProgram = [[GLProgram alloc] initWithVertexShaderFilename:@"Shader"
fragmentShaderFilename:@"Shader"];
Next, add any attributes used in your shader to the program. If you had two attributes, one with the position of each vertex called position, and one with a color for each vertex called color, your code to add attributes would look like this:
[program addAttribute:@"position"];
[program addAttribute:@"color"];
After you add the attributes, link the program. If the program is unable to successfully link, it will return NO and you should dump the logs to the console so you can debug the problem. Once you've dumped the logs, it's a good idea to release the program in order to free up the memory they were using, and so you don't try to use an invalid program:
if (![program link])
{
NSLog(@"Link failed");
NSString *progLog = [program programLog];
NSLog(@"Program Log: %@", progLog);
NSString *fragLog = [program fragmentShaderLog];
NSLog(@"Frag Log: %@", fragLog);
NSString *vertLog = [program vertexShaderLog];
NSLog(@"Vert Log: %@", vertLog);
[program release];
program = nil;
}
If the link process was successful and returns YES, retrieve the uniform and attribute indices and then call use to start using the shaders in this program to draw objects:
GLuint positionAttribute = [program attributeIndex:@"position"];
GLuint colorAttribute = [program attributeIndex:@"color"];
GLuint translateUniform = [program uniformIndex:@"translate"];
[program use];
Once you've called use, you're ready to start submitting uniform and attribute data.
Sending Attributes and Uniforms to the Shaders
We're almost ready to try out the OpenGL ES programmable pipeline by writing our first complete OpenGL ES application, but before we do that, we need to talk about how we actually ship the attributes and uniforms over to the shader. It's actually a straightforward process, although it can look intimidating when you first see it in code. The process for attributes and uniforms are slightly different, so we'll look at them individually.Submitting Uniforms
Let's look at uniforms first because they're a little easier to grok. After we link our program, we retrieve the index value for each of our uniforms and save that index value so we can use it to submit the data for that uniform to OpenGL ES:GLuint translateUniform = [program uniformIndex:@"translate"];
Once we have the index value (translateUniform in the previous line of code), we just have to use a function called glUniform() to submit the data for that uniform to our shaders. glUniform() is one of those “alphabet soup” functions that comes in many different forms. Because the shaders run on the GPU, and the GPU deals primarily with floating point numbers, all of the glUniform() variants take one or more GLfloats or one or more pointers to GLfloats.³ To send a single floating point value as a uniform, for example, we'd select either glUniform1f() or glUniform1fv(), depending on whether we needed to send a GLfloat or a pointer to a GLfloat. If we wanted to send a single vertex, which would be represented by a vec3 in the shader, we'd choose either glUniform3f() or glUniform3fv().
Regardless of which of the glUniform() variants we choose, the first argument we pass needs to be the index of the uniform we're submitting data for, which is the value we earlier retrieved from uniformIndex:. When using the non-pointer variants of glUniform() (the ones with a name ending in f), the uniform index is followed by the data being submitted in the proper order. If we need to submit a vertex's location, for example, we would submit the value for X as the second argument, the value of Y as the third argument, and the value of Z as the fourth argument. So, to pass a single non-pointer value using glUniform(), we would do this:
glUniform1f(translateUniform, 25.3f);
To pass a vertex with three values to a uniform, we'd do something like this:
glUniform3f(vectorUniform, 2.3f, -1.34f, 0.34f);
When using the glUniform() variants that end in v, we follow the uniform's index with the size of the data being passed and then a pointer to the actual data, like so:
GLfloat vertex[3];
vertex[0] = 2.3f;
vertex[1] = -1.34f;
vertex[2] = 0.34f;
glUniform3fv(vectorUniform, 1, vertex);
In effect, this code is exactly identical to the previous example, but we're using one of the pointer variants of glUniform() to pass all three values of the array that will make up the vec3 uniform. The gotcha here is the size argument. You might think you should pass 3 in the above example because the vertex array has a length of three, but because we're using glUniform3fv(), we specify 1 because that method assumes that each data element is already three GLfloats long. If they were shorter, you'd be using glUniform2fv() or glUniform1fv().
Submitting Attributes
Sending attribute data to the shader is only slightly more involved than submitting uniforms. First, you have to retrieve the index value for the attribute, like so:GLuint positionAttribute = [program attributeIndex:@"position"];
Just like with uniform indices, you'll want to do this only once, if possible, and definitely not every time you draw because it invokes a string comparison operation as it loops through the attributes array, which is computationally expensive. Once you have the index, you need to submit the data using the OpenGL ES function family called glVertexAttrib(). Like glUniform(), glVertexAttrib() is an alphabet-soup function with many different versions. However, since you're almost always going to be sending a large array of data to the shader when you're working with attributes, in practice, you almost always use the same function: glVertexAttribPointer(), which allows you to submit a variable length block of data to the attribute in your shader. Here's what a typical call to glVertexAttribPointer() might look like:
glVertexAttribPointer(positionAttribute, 3, GL_FLOAT, 0, 0, vertices);
The first parameter (positionAttribute in the previous line of code) is the index that corresponds to the attribute we're providing data for, the one we just retrieved from attributeIndex:. The second parameter (3 above) tells OpenGL ES how many data elements there are for each vertex or, in other words, how big a chunk of the submitted data should get sent to each run of the vertex shader. So, if you're submitting vertex position data (x,y,z), each run of the vertex shader needs three data elements, and this argument should be set to 3. If you are sending a color (r,g,b,a) for each vertex, each run of the vertex would need four elements and you would pass 4. The next argument tells OpenGL ES what type of data is submitted. In this case, each vertex is comprised of three GLfloats, so pass GL_FLOAT to tell it that. In theory, there are several values you could pass here, but in reality, since attributes have to be made up of one or more floating point variables, you will always pass GL_FLOAT.
The fourth argument to glVertexAtttribPointer() can be ignored. Just pass 0 for this argument. This element is used only with GL_FIXED datatypes. The GLfixed datatype allows you to represent a floating point value using integers, which allows for speedier calculations on systems that are slow at floating point operations, either because there's no GPU, or because the GPU internally uses fixed point representations of data. All iOS devices have a GPU that internally use floating point representations and which are capable of doing fast floating point math, so we'll never use the GLfixed datatype when programming for the iOS, and you don't have to worry about whether fixed point data values are normalized when sent to the shader.
We're not going to look at the fifth element right now. We're just going to pass 0 for this element for the time being. The fifth argument is known as the stride argument, and it can be used to pack more than one kind of data into a single block of data. We could, for example, pack our colors and vertices into a single interleaved array and use the stride argument to let OpenGL ES know to skip the color data when passing vertex attributes to the shader. We'll look at how to do data interleaving in the chapter on optimizing performance.
The final argument to glVertexAttribPointer() is the pointer to the actual data we're submitting for this attribute. This is going to be either an array or a pointer to a chunk of memory created with alloc().
For each attribute, there's a second call we have to make called glEnableVertexAttribArray(), passing the index of the attribute we're enabling. By default, all attributes are disabled, so we have to specifically tell OpenGL ES to enable an attribute in order for it to ship that attribute's data across to the shader. You can actually call this function just once after you link your program and then never worry about it again. However, it's a very low overhead call, and if an attribute were to get disabled somehow, it would be a very difficult problem to figure out. As a result, it's not uncommon to call glEnableVertexAttribArray() every time you draw to ensure that the attribute data gets sent to the shader.
Once your attributes have all been enabled and you've submitted your attribute data, you're ready to tell OpenGL ES to draw.
Drawing to a Close
The process of telling OpenGL ES to start rendering is kicked off by one of two function calls: glDrawArrays() or glDrawElements(). There are many nuances to drawing, and the easiest way to learn those nuances is to use the two functions. In the next chapter, we're going to build our first app, which will use glDrawArrays(). A few chapters later, we're going to learn about glDrawElements() and the reasons for having two different drawing functions in the first place.In this chapter, we've taken a look at OpenGL ES 2.0's programmable pipeline. You learned that vertex shaders run once for every vertex and that fragment shaders run once for every fragment, which corresponds to once for every pixel that will be drawn. You also saw what simple fragment and vertex shaders look like, and learned how to compile them and link a shader pair into a single OpenGL ES program. You even saw how to pass data from your application code to the shaders using uniforms and attributes and how to pass data between the vertex shader and the fragment shader using varyings.
This has been a long chapter, but now we're ready to put the programmable pipeline to use. Take a deep breath, pat yourself on the back for getting through all this boring, but important, up-front stuff.
1 - Actually, the iPad and iPhone 4 use Apple's A4 “system on a chip,” which has an integrated CPU and GPU on a single chip instead of separate CPU and GPU chips, but that doesn't really affect how you program for it, nor does it change the basic way that the two processors interact with each other.
2 - The chip in all iOS devices is capable of doing fast floating point math using something called vector processors. Your code doesn't automatically take advantage of the vector processors, however, so this statement is true, generally speaking. We'll look at how to leverage the vector processors in application code that runs on the CPU in the chapter on optimization.
3 - There's also a related function called glUniformMatrix() that we'll look at when we discuss matrix transformations in a future chapter. We don't want to get ahead of ourselves, but matrices are really nothing more than two-dimensional arrays of GLfloats.
Subscribe to:
Posts (Atom)


