Showing posts with label Xcode. Show all posts

Sunday, February 13, 2011

Xcode 4 Icons

Well, now that Xcode 4 is GM, it has the same icon as Xcode 3.25. Ordinarily, this wouldn't be an issue, since a GM release means you can throw out the old one and use it full-time.

Only, you may not be able to with all of your projects. Xcode 4 GM has a few issues that make it hard to go full-time with it, including a linker error that can only be worked around by turning some level of code optimization, a change that makes it hard to debug. A few of these problems impact projects I'm working on, so as a result, I have to grudgingly use Xcode 3.25 for some tasks.

Despite a small handful of problems, though, Xcode 4 is where I want to be whenever possible. Having multiple identical icons in your Dock can be a bit of a pain.

Unfortunately, I didn't save the old Xcode 4 installers. If I had, I would have just gone and stolen the old preview icon and continued using that. Since I didn't, I did the same thing I did for beta iOS releases and made a customized version of the app icon for Xcode 4. If you want to use it, you can download it here. To install, you just copy the .icns file into Xcode 4's app bundle, replacing the existing one. And, no, replacing the icon file with a new one doesn't cause problems with Xcode 4 due to code signing, though I feared it might.

This is what it looks like:

Xcode

Thursday, September 16, 2010

Global Symbolic Breakpoints in Xcode 4

It wasn't obvious to me how to set a global symbolic breakpoint in Xcode 4. I stumbled across the answer today. Because Xcode 4 is still under NDA, I can't post this here, so instead, I wrote it up on Apple's Dev Forums (Dev Center login with beta access required).

Thursday, August 5, 2010

Xcode 3, Instruments 4

This was a bit of a "duh" moment for me, but probably worth mentioning, despite being a "Captain Obvious" post.

I'm a big fan of what Apple's doing with Xcode 4, but in my opinion it's just not ready for production use yet. I'm using it for the book and occasional forays, but not for regular client work yet. However, I also run my machine using the 64-bit kernel, which means I can't use Shark without rebooting. I've been really looking forward to the Time Profiler template in the 4.0 version of Instruments as well as the two new OpenGL ES templates and the Energy Diagnostics template.

But, while grumbling about their lack in the current release version of Instruments, it struck me: you don't have to launch Instruments from the same folder you launch Xcode from. You can launch Instruments separately and attach it to a running process in the Simulator or on an attached iPhone. That means, you can launch Instruments from the Xcode4 folder instead of from the Developer folder. This allows you to develop and debug with the less-shiny-but-production-ready Xcode 3.x and also use the new Instruments templates like Time Profiler, OpenGL ES, and Energy Diagnostics.

Sunday, August 1, 2010

NSOperation Xcode File Template

Although I'm generally averse to using a lot of template or boilerplate code, there are times when it's handy to have file template beyond those that Apple provides. Something I've done a fair amount of lately is to create NSOperation subclasses, and there's enough work involved with setting up an operation that I made an Xcode file template that contains all that setup work.

This template includes a delegate and a protocol and some private methods for communicating with the delegate. Now, when I have lots of NSOperation subclasses in a single project, I'll actually move much of this stuff to an abstract parent class or a category on NSOperation, but templates don't have any way of setting up dependencies, so I've made this self-contained and you can do your own refactoring.

I added this particular template under the Objective-C class icon so that it comes up as a new option under the Subclass of popup menu.

Screen shot 2010-08-01 at 1.53.48 PM.png

You can find the template files right here. The zip file contains the full path to install everything in the correct place, so if you want to install it so that you can use it from Xcode, you would use the following command:
unzip NSOperationTemplate.zip -d /

If you just unzip it regularly, you'll find the actual files nested several folders down as a result of the path information.

I've only touched one existing file, which is a property list that causes the new template to show up in Xcode's Subclass of dropdown menu. The rest are new files, so installing this shouldn't interfere with Xcode in any way. But caveat emptor. You do keep good backups, right?

Hopefully this will be useful to some of you. If you have suggestions for making it better, please let me know.

Friday, July 9, 2010

Thumb

I thought I had done a post on this at some point, but after Googling around, I guess I never did. There were a couple of Twitter discussions about the subject in the past few days, so I thought it was worth mentioning. You can get more in-depth detail about this subject by watching the two OpenGL ES videos from the 2009 Tech Talk World Tour Videos (iTunes link, requires logging in with iPhone SDK account).

The ARM architecture has something called thumb mode (or just thumb). Now, I'm not a hardware engineer so the following may not be 100% technically accurate, but my understanding is that basically thumb mode uses a subset of the processor's available operations and passes two 16-bit operations in the space of a single 32-bit operation, allowing commands to be sent to the CPU twice as fast. For most applications, this is great, and leads to an improvement in overall performance.

However, with the ARMv6-based chips in the original iPhone, the iPhone 3g, and the first generation iPod touch¹, thumb mode didn't have access to the vector processors, so floating point operations forced the processor to convert the two 16-bit operations back into two 32-bit operations, perform the floating point math, and then convert back to the thumb operations, meaning you not only didn't see a performance increase, you often saw a dramatic decrease in performance with thumb on when writing heavy floating-point code, such as you would for an OpenGL ES application.

The version of thumb in ARMv7 which is used by the chip in the iPhone 3Gs and which is also used by Apple's A4 chip and therefore available on the iPad and iPhone 4, does have full access to the vector processors, so you can get the benefit of thumb while doing large amounts of floating point operations, so you want thumb on for these processors.

Therefore, if you're writing an OpenGL ES application, or anything else that does a lot of floating point operations, you want to use conditional build settings in Xcode to turn "Compile for Thumb" ON for ARMv7 and OFF for ARMv6.

You can add conditional build settings by selecting the build setting in Xcode and using the little gear button in the lower left corner of the Build Settings window. If you click it, it will popup a menu, and one of the options will be "Add Conditional Build Setting", which will add a new subrow to that setting. Select "ARMv6" on the left column and use the right column to turn it off. Once you do that, your application will build as a fat binary with an ARMv6 version that doesn't use thumb, and an ARMv7 version of the binary that does. Generally, the increase in application size is relatively minor compared to application's image and sound resources, and the performance gains can be substantial.

Monday, May 31, 2010

Accessorizer 2.0 is out!

acc_saw_clock_icon_512_version14.pngAccessorizer by Kevin Callahan is one my absolute favorite utilities, as I've mentioned before. Well, now, there's a new reason to love it. Kevin just released 2.0 over the weekend. And there's great news for those of you who have bought previous versions: it's a free upgrade.

If you do any serious amount of Objective-C programming, Accessorizer should definitely be in your toolbox.

Thursday, May 6, 2010

Testing 3.x Apps on Phone Running Beta OS

#alttext#
Like many iPhone devs, I have more than one device that I use for testing. I have an iPod Touch that I usually leave at the current release version, an iPad WiFi that I leave at the current release version for the iPad, and I have an iPhone 3Gs that I keep on the bleeding edge beta release version. This way, I have a device to test and run stuff under the beta SDK and under the release SDK, and I keep both installed on my machine so I have the ability to check out and learn the next release of the SDK while still creating applications using the current release of the SDK.

Normally, this is a perfectly sufficient setup for my purposes, but today, it wasn't. I have a problem I'm trying to debug that happens when running on EDGE or on a really slow 3G connection; it never happens under WiFi. I'm doing a fix for a client that will need to go onto the App Store long before 4.0 goes GM, so I need to be working under 3.1.2.

In order to try and reproduce this problem, I have to be able to run the app on my phone because the iPod touch and iPad both only have WiFi connections so, therefore, I can't reproduce the problem there. I don't want to build against the beta SDK because this is a bug fix on an existing app, and the beta install doesn't include the current release SDK that I needs to build under, so I can't build a 3.1.2 app using the beta tools. This is probably done to discourage people from building apps for the App Store with the beta tools (which you really, really shouldn't do). The only problem is, OS versions have to match between the tools and phone, so I can't launch the GM Xcode and and debug apps on my iPhone on which I've installed the beta OS and if I run on my iPod touch, I can't reproduce the problem I need to debug because it doesn't happen under WiFi.

There's actually a solution, which is to create a symbolic link from SDK in the GM tools folder to the beta tools folder. So, in my case, I have GM tools installed at /Developer and the current beta release installed at /DevBeta. In order to compile a 3.1.3 application so I can test it on a phone that's been upgraded to 4.0, I can drop to the terminal and do this:
sudo ln -s /Developer/Platforms/iPhoneOS.platform/Developer/SDKs/iPhoneOS3.1.3.sdk \
/DevBeta/Platforms/iPhoneOS.platform/Developer/SDKs/iPhoneOS3.1.3.sdk
If I need to to run and test an application with a base SDK of 3.0 on a phone that's been upgraded to 4.0, instead I do this:
sudo ln -s /Developer/Platforms/iPhoneOS.platform/Developer/SDKs/iPhoneOS3.0.sdk \
/DevBeta/Platforms/iPhoneOS.platform/Developer/SDKs/iPhoneOS3.0.sdk
Do this with Xcode closed, then when you re-open your project with an older base SDK, it should work. All we're doing is creating a symbolic link from the beta tools directory to the appropriate SDK in the GM tool directory.

Now, be aware, this action is likely to be frowned upon by the Mothership; they excluded those SDKs for a reason. But, I haven't disclosed anything about the beta release other than its existence, which is widely known, and there are valid reasons to use the beta tools and the GM SDKs, so I though it worth sharing. Caveat emptor - do this at your own risk and don't get mad at me if it causes problems.

Saturday, May 1, 2010

Validate Build Product

In the last post, I mentioned Xcode 3.2's new Validate option that runs the same checks the App Store Review Team will use before looking at the content of your app and which may be used by Build and Archive (or any other Build command, for that matter), I probably should have mentioned what determines whether it will get run. It's your project settings. To turn it on or off, select Edit Project Settings from the Project menu, and it's under the Build Options, and it's just a checkbox you can turn on or off.

Screen shot 2010-05-01 at 10.14.00 AM.png

I would recommend not waiting until App Store submission to run validate. Do it before you send to testers or to your client. It will allow you to address problems before your app gets tested, reducing the need for regression testing.

Xcode 3.2: Build and Archive

One aspect of iPhone development that I'm no big fan of is ad hoc distribution. In Xcode 3.2, Apple added a new feature to Xcode that makes ad hoc distribution more than a fair bit better. But, for the first few weeks of using Xcode 3.2, I didn't even notice this item. I know many of you probably have, but I've talked to enough people that also missed it, that I figured it's worth a short post.

This new item lives under the Build menu, but frankly, I don't use menus much in Xcode. I use a very custom set of key bindings and have all my regular tasks' key commands memorized. The new option is called Build and Archive.

I still wish Apple would get rid of the whole process, but it's unlikely they will in the near future. In light of the situation, this makes life much, much better. It's a pretty good compromise between Apple's desires and the needs of developers, all in all.

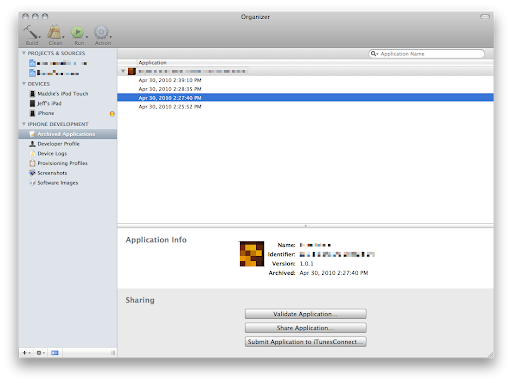
Build and Archive builds your application, code signs it, and stores the application folder along with its symbols file (which you need to decode crash logs generated by ad hoc or release builds). Xcode's Organizer window gives you ready access to any previous build, and lets you e-mail an ad hoc build packaged up as an .ipa file with the mobile provisioning profile you compiled with embedded right into the application. This allows your clients or tester to simply drag the generated .ipa file into iTunes. The organizer will even generate an e-mail with the .iap embedded in it.

Screen shot 2010-05-01 at 9.43.08 AM.png


Screen shot 2010-05-01 at 9.45.42 AM.png


As part of 
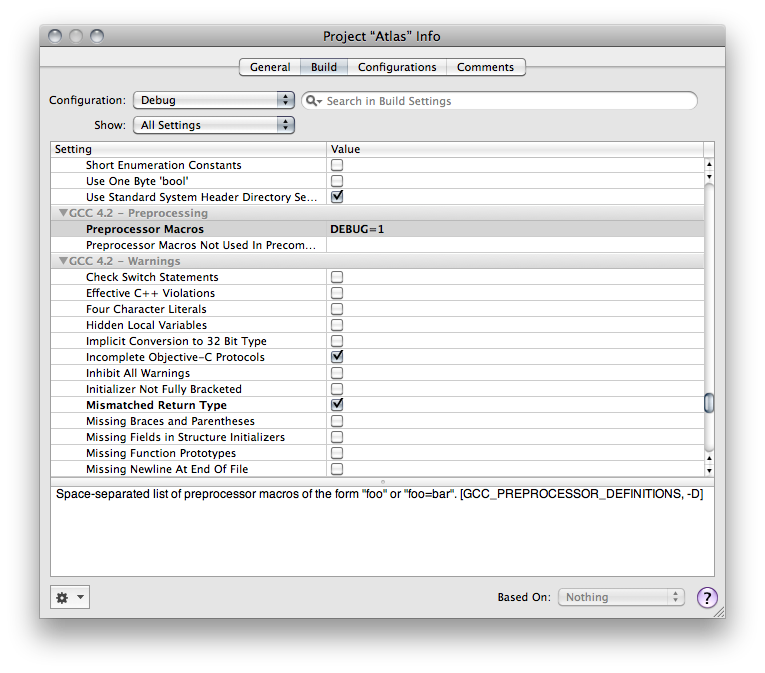
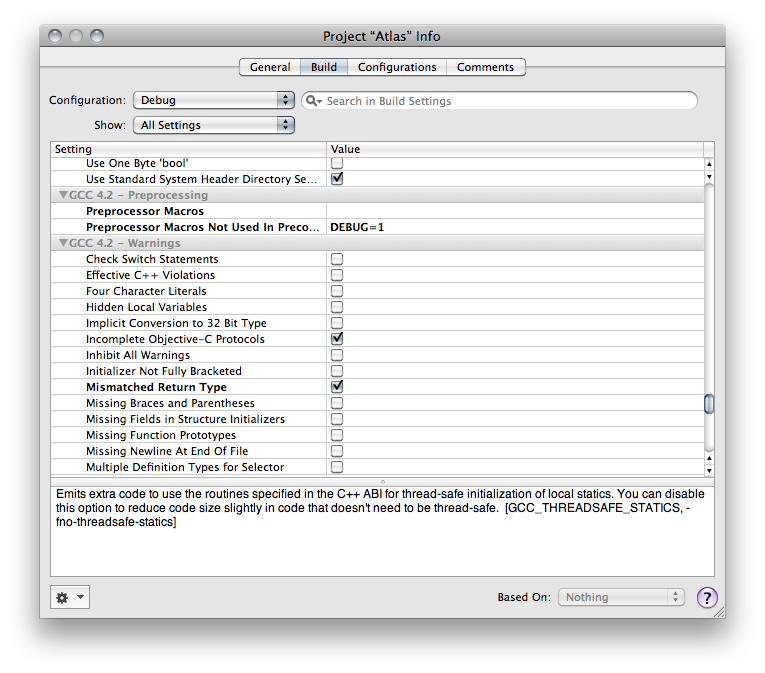
Build and Archive, Xcode checks your application to make sure it's code signed and provisioned properly. It may also (depending on your project settings) automatically run the new Validate feature that checks to make sure your application is valid for app store submission. This is the same check that the app review team will run on your app before actually looking at it. The details of what Validate checks are not documented, but in general terms, it will make sure everything is okay and that you haven't used anything you shouldn't have used. It's not a guarantee that your app won't get rejected because there's still the manual review for content and HIG, but if your app passes validation, that's one less possible obstacle between you and the app store. In other words, make sure you validate your apps before submitting them.

One thing to note, however, is that when you use Validate for ad hoc builds instead of building for submission to the app store (and I recommend that you do so that you find problems before testing rather than after), your app may fail one of the Validate checks. If you get this warning message when using either Build and Archive or Build and Validate with an ad hoc build:
warning: Application failed codesign verification. The signature was invalid, or it was not signed with an Apple submission certificate. (-19011)
You might be fine (assuming you received no other warnings or errors). The difficult thing is that this warning can be generated by more than one specific problem, so there's no way to know for sure whether this needs to be addressed other than to try and install the generated .ipa file on a non-development phone. You may (will?) get this warning with ad hoc builds even if the build is fine because you don't use an "Apple submission certificate" for ad hoc builds.

One of the best things you can do is to have a second iPhone or iPod touch that's not used for development (ever) that you can use to test ad hoc distributions. Even a second-hand, cheap iPod touch is sufficient since all you're testing is that the install works If you do this, make sure you add the UDID of this unit to your ad hoc distribution profiles, but not to your development profile.

When you see this warning with Validate when building using an Ad Hoc Distribution configuration, don't panic, but do try and install it on a machine that doesn't have your development profile installed before sending it to a tester or client.

Monday, April 5, 2010

A Few More Notes on Creating Universal Apps

Now that I've had some more time with the iPad and making Universal Apps, I've realized there are some important things I left out of Saturday's post.

First, I talked about the newly defined macro UI_USER_INTERFACE_IDIOM(). There's a problem with this right now, however, because iPhone OS 3.2 was an iPad only release. Most of us are assuming that iPhone and iPad will eventually run on the same OS version, but for now they don't ,and UI_USER_INTERFACE_IDIOM() doesn't exist in 3.1.2 and earlier. So, if you're creating a Universal Binary, you can't compile code that uses it.

Instead, you need to use a different technique, which is the check the precompiler definition __IPHONE_OS_VERSION_MAX_ALLOWED, which is set to the OS version number without dots. The definition is five digits, the first is the major release number, the second and third are the minor release number, and the fourth and fifth number are the patch release number. So, 3.2 would be defined to 30200 and 3.1.2 would be defined to 30102, so here's how you should probably design your code for the time being:

#if __IPHONE_OS_VERSION_MAX_ALLOWED >= 30200
if (UI_USER_INTERFACE_IDIOM() == UIUserInterfaceIdiomPad)
NSLog(@"iPad Idiom");
else
#else
NSLog(@"iPhone Idiom");
#endif


In the future, you won't need to check this, but it won't hurt to after. Since it's resolved during pre-compilation, there are no drawbacks other than a little bit of code clutter.

I forgot to mention that there's an option to upgrade Targets to Universal under the Project menu. It will convert your target for you, and you should use it instead of manually setting the project (the way I did my first few). If the option is grayed out, make sure that your project's base SDK (not just the currently selected SDK) is iPhone Device 3.0+. If it's older, or if it can't find the Base SDK, you won't get the option.

This option will do a few things. It will update your Base SDK to 3.2 and your Deployment SDK to the original Base SDK. It will configure your targets either to create a Universal Application, or two separate applications. It will create your application's main iPad NIB for you. It will strip out the ARM6 instructions from the iPad portion of the binary.

Note: As a few people have pointed out in the comments, UI_USER_INTERFACE_IDIOM() works just fine in Universal Apps. Where you can't use it is if you want to test your universal app's iPhone functionality in the simulator. The 3.2 Simulator only works in iPad configuration, so to test the iPhone build on the simulator, you need to set the Active SDK to 3.1.2, and this check will allow your code to compile against the 3.1.2 Simulator target. If you're testing on the device, the code above is unnecessary (but also doesn't hurt anything). Sorry for the confusion.

Wednesday, December 30, 2009

Updated Navigation-Based Core Data Application Template

Periodically, while working on the Core Data chapters in More iPhone 3 Development, I would update my copy of Apple's provided Navigation-Based Core Data Application project template with logic to handle different common scenarios. While working on the previous blog post, I made some more tweaks to the template to better handle object changes that trigger managed objects to move between sections when specifying a sectionNameKeyPath. You can find the most recent version of this project template here, and I've included the four delegate methods from the template at the end of this blog post.

I've really tried to give NSFetchedResultsController the benefit of the doubt. It's a really, really great concept and when it works, I really like it, but the execution is way below Apple's normal level of code quality. All of the code I've added to this template is needed simply to handle typical use-cases supposedly supported by this class… things that should be handled out of the box without any need for additional code. In this particular case, the delegate methods should really only be required for handling extraordinary or unusual scenarios.

If I have time, I may try to encapsulate this logic into a subclass of NSFetchedResultsController, but for the time being, if you use this template or the delegate methods at the end of this posting, it should take care of the bulk of situations for you automatically. I suspect that there will be a few more tweaks to this code as I use it in real-world code, but if there are, I'll post the changes and a new version of the template here. In any case, this template is a far better starting point than Apple's provided template and may just keep you from pulling all your hair out.

- (void)controllerWillChangeContent:(NSFetchedResultsController *)controller {
[self.tableView beginUpdates];
}

- (void)controllerDidChangeContent:(NSFetchedResultsController *)controller {
[self.tableView endUpdates];
}

- (void)controller:(NSFetchedResultsController *)controller didChangeObject:(id)anObject atIndexPath:(NSIndexPath *)indexPath forChangeType:(NSFetchedResultsChangeType)type newIndexPath:(NSIndexPath *)newIndexPath {
switch(type) {
case NSFetchedResultsChangeInsert:
[self.tableView insertRowsAtIndexPaths:[NSArray arrayWithObject:newIndexPath] withRowAnimation:UITableViewRowAnimationFade];
break;
case NSFetchedResultsChangeDelete:
[self.tableView deleteRowsAtIndexPaths:[NSArray arrayWithObject:indexPath] withRowAnimation:UITableViewRowAnimationFade];
break;
case NSFetchedResultsChangeUpdate: {
NSString *sectionKeyPath = [controller sectionNameKeyPath];
if (sectionKeyPath == nil)
break;
NSManagedObject *changedObject = [controller objectAtIndexPath:indexPath];
NSArray *keyParts = [sectionKeyPath componentsSeparatedByString:@"."];
id currentKeyValue = [changedObject valueForKeyPath:sectionKeyPath];
for (int i = 0; i < [keyParts count] - 1; i++) {
NSString *onePart = [keyParts objectAtIndex:i];
changedObject = [changedObject valueForKey:onePart];
}

sectionKeyPath = [keyParts lastObject];
NSDictionary *committedValues = [changedObject committedValuesForKeys:nil];

if ([[committedValues valueForKeyPath:sectionKeyPath] isEqual:currentKeyValue])
break;

NSUInteger tableSectionCount = [self.tableView numberOfSections];
NSUInteger frcSectionCount = [[controller sections] count];
if (tableSectionCount != frcSectionCount) {
// Need to insert a section
NSArray *sections = controller.sections;
NSInteger newSectionLocation = -1;
for (id oneSection in sections) {
NSString *sectionName = [oneSection name];
if ([currentKeyValue isEqual:sectionName]) {
newSectionLocation = [sections indexOfObject:oneSection];
break;
}

}

if (newSectionLocation == -1)
return; // uh oh

if (!((newSectionLocation == 0) && (tableSectionCount == 1) && ([self.tableView numberOfRowsInSection:0] == 0)))
[self.tableView insertSections:[NSIndexSet indexSetWithIndex:newSectionLocation] withRowAnimation:UITableViewRowAnimationFade];
NSUInteger indices[2] = {newSectionLocation, 0};
newIndexPath = [[[NSIndexPath alloc] initWithIndexes:indices length:2] autorelease];
}

}

case NSFetchedResultsChangeMove:
if (newIndexPath != nil) {

NSUInteger tableSectionCount = [self.tableView numberOfSections];
NSUInteger frcSectionCount = [[controller sections] count];
if (frcSectionCount >= tableSectionCount)
[self.tableView insertSections:[NSIndexSet indexSetWithIndex:[newIndexPath section]] withRowAnimation:UITableViewRowAnimationNone];
else
if (tableSectionCount > 1)
[self.tableView deleteSections:[NSIndexSet indexSetWithIndex:[indexPath section]] withRowAnimation:UITableViewRowAnimationNone];


[self.tableView deleteRowsAtIndexPaths:[NSArray arrayWithObject:indexPath] withRowAnimation:UITableViewRowAnimationFade];
[self.tableView insertRowsAtIndexPaths: [NSArray arrayWithObject:newIndexPath]
withRowAnimation: UITableViewRowAnimationRight
]
;

}

else {
[self.tableView reloadSections:[NSIndexSet indexSetWithIndex:[indexPath section]] withRowAnimation:UITableViewRowAnimationFade];
}

break;
default:
break;
}

}

- (void)controller:(NSFetchedResultsController *)controller didChangeSection:(id <NSFetchedResultsSectionInfo>)sectionInfo atIndex:(NSUInteger)sectionIndex forChangeType:(NSFetchedResultsChangeType)type {
switch(type) {

case NSFetchedResultsChangeInsert:
if (!((sectionIndex == 0) && ([self.tableView numberOfSections] == 1)))
[self.tableView insertSections:[NSIndexSet indexSetWithIndex:sectionIndex] withRowAnimation:UITableViewRowAnimationFade];
break;
case NSFetchedResultsChangeDelete:
if (!((sectionIndex == 0) && ([self.tableView numberOfSections] == 1) ))
[self.tableView deleteSections:[NSIndexSet indexSetWithIndex:sectionIndex] withRowAnimation:UITableViewRowAnimationFade];
break;
case NSFetchedResultsChangeMove:
break;
case NSFetchedResultsChangeUpdate:
break;
default:
break;
}

}

Sunday, December 27, 2009

Precompiler Defines

I had considered writing about this topic at one point, but discarded the idea as being too simple. I assumed it was already common knowledge.

In the last week, I've received two e-mails asking about this, so I decided it might be worth a quick post, even though many of you certainly know this already.

A lot of people like to put code in that is compiled into the debug version of their app, but not into the release version. Something along the lines of:

#ifdef DEBUG
NSLog(@"Some Debug Statement telling me the value of %@", foo);
#endif

I generally don't do much of this myself, preferring to use things like breakpoint actions for things that I don't want in my code. Personally, I want the code that gets compiled in Release and Debug builds to be as similar as possible to minimize unexpected surprises.

But, I recognize that this is a widely used approach that many people will want to use, and how you do it in Xcode isn't immediately obvious. If you open up the Project Info window by selecting Edit Project Settings from the Project menu, or double-clicking the project's root node in the Groups & Files pane, then click on the Build tab, you have the ability to set various options on a per-configuration basis. Under the heading GCC x.x - Preprocessing (where x.x is the version of GCC you are using), there is an option called Preprocessor Macros. You can define precompiler constants here on a per-configuration basis. Here's a screenshot that shows the value DEBUG being defined for the Debug configuration only:

Screen shot 2009-12-27 at 11.52.40 AM.png

The one problem with using this option is that defining a macro here triggers the precompiled headers to get re-compiled every time. Fortunately, the next option after Preprocessor Macros is called Preprocessor Macros Not used In Precompiled Headers, and it does exactly the same thing, only it doesn't define the macros until after the .pch file is read, meaning it won't trigger a recompile of the precompiled headers. That will result in shorter compile times. So, most of the time, this is what you want, unless you manually add something to the .pch file that relies on the macro:

Screen shot 2009-12-27 at 12.09.58 PM.png

Wednesday, November 11, 2009

Navigation-based Application Core Data Template

I've updated the Navigation-Based Core Data Application Xcode project to include a suggested workaround to a problem in NSFetchedResultsController. I believe this problem only existed in SDK 3.0 and was later fixed, but for backwards compatibility, I've added the workaround to the project template for anyone interested in supporting 3.0 users.

As before, unzip and copy the folder to this location, replacing the one that's there:

/Developer/Platforms/iPhoneOS.platform/Developer/Library/Xcode/Project Templates/Application/Navigation-based Application/
Note: I updated the project yet again, at 1:11 pm Eastern time, to deal with a problem with inserting the first object when using a section name key path. Because tables can't have zero sections, this new version checks to make sure before inserting a new section, that it isn't an empty table getting its first row. In that case, the table will already have one section and doesn't need a second. Adding a second in that scenario causes a crash.
Note Again: Another update to the project at 10:21 eastern time on November 11. Fixed a few more issues I found. I hope this will be the last version.
Note Yet Again: I forgot to move the update into the right folder on the web server, so the 10:21 eastern time update actually happened at 10:59. Re-download if you grabbed it between those times.


Thanks to Simon Wolf for catching it

Friday, August 7, 2009

Translations and Xcode

Chris Hanson has a really handy post today. In the localization chapter of Beginning iPhone Development, we mentioned that Apple recommended using the ISO two letter language code for your localizations, but that Xcode used the older style language codes for your development base language. Chris shows how to work around this inconsistency.

Wednesday, June 24, 2009

Empty OpenGL ES Application Project Template Updated for 3.0

I have updated my OpenGL ES Xcode project to work with SDK 3.0. You can find the new version right here.

This new version is actually a rewrite from the ground up, and it fixes several issues that the old one had, including the problem where the controller wasn't receiving touch events and, of course, the fact that it didn't work on 3.0. It also includes more OpenGL-related convenience functions, and a class that makes it easier to do texture mapping.

Wednesday, April 1, 2009

Automated Commit and Build Number Incrementing

For some projects, I like to commit and increment my build number every time I compile. Not every project, but on some. In other cases, I only want to automatically commit and increment the build number when I do a Release configuration build.

Apple provides a tool called agvtool which stands for Apple Generic Versioning Tool. But, you generally don't want to use it while you have an Xcode project open, so incorporating it into a run script build phase is not advised.

I've found a few examples on the internet of scripts that incorporate the Subversion build number, but they didn't quite fit my needs. The ones I found were written in Perl and Python, and I'm not particularly comfortable in either of those languages, so I decided to write my own in Ruby, with which I have a much higher comfort level, rather than tweak those existing ones to meet my needs.

This script does not utilize the versioning system built-into Xcode, but rather directly sets the Bundle Version based on the Subversion version number. It also does a commit if there have been any changes since the last build before grabbing the version number from Subversion.

To use this script, right-click on your Target where you want to use this and select Add->New Build Phase->New Run Script Build Phase.

When the window opens up, set the Shell to
/usr/bin/ruby
and then paste the following script into the window if you want to commit and increment on every build:

def get_file_as_string(filename)
data = ''
f = File.open(filename, "r")
f.each_line do |line|
data += line
end
return data
end

# commit if any changes
%x[svn -m 'automated build commit' commit]

svn_version = %x[svnversion -n]
parts = svn_version.split(":")
new_version = parts[1]

# Figure out where the Info.plist file is
project_dir = ENV['PROJECT_DIR']
infoplist_file = ENV['INFOPLIST_FILE']
plist_filename = "#{project_dir}/#{infoplist_file}"
infoplist = get_file_as_string("/Users/jeff/dev/FlyPaper/Resources/Info.plist")
start_of_key = infoplist.index("CFBundleVersion")
start_of_value = infoplist.index("<string>", start_of_key)
end_of_value = infoplist.index("</string>", start_of_value) + "</string>".length
old_value = infoplist[start_of_value, end_of_value - start_of_value]

new_key = "<string>#{new_version}</string>"
new_info_plist = "#{infoplist[0, start_of_value]}#{new_key}\n#{infoplist[end_of_value+1, infoplist.length - (end_of_value+1)]}"

File.open(plist_filename, 'w') {|f| f.write(new_info_plist) }


or use this script if you only want to commit and increment the build number on builds using the Release configuration:

def get_file_as_string(filename)
data = ''
f = File.open(filename, "r")
f.each_line do |line|
data += line
end
return data
end

if ENV['BUILD_STYLE'] == "Release"
# commit if any changes
%x[svn -m 'automated build commit' commit]
end

svn_version = %x[svnversion -n]
parts = svn_version.split(":")
new_version = parts[1]

# Figure out where the Info.plist file is
project_dir = ENV['PROJECT_DIR']
infoplist_file = ENV['INFOPLIST_FILE']
plist_filename = "#{project_dir}/#{infoplist_file}"
infoplist = get_file_as_string("/Users/jeff/dev/FlyPaper/Resources/Info.plist")
start_of_key = infoplist.index("CFBundleVersion")
start_of_value = infoplist.index("<string>", start_of_key)
end_of_value = infoplist.index("</string>", start_of_value) + "</string>".length
old_value = infoplist[start_of_value, end_of_value - start_of_value]

new_key = "<string>#{new_version}</string>"
new_info_plist = "#{infoplist[0, start_of_value]}#{new_key}\n#{infoplist[end_of_value+1, infoplist.length - (end_of_value+1)]}"

File.open(plist_filename, 'w') {|f| f.write(new_info_plist) }


After you paste it in, close the window. You might want to rename the run script build phase to something more meaningful. You can do that by right-clicking on it and selecting Rename from the menu that pops up. Also, you need to drag the new build phase up so that it fires before the Copy Bundle Resources phase so that the commit happens before it builds the application. Otherwise, the application will always reflect the previous version number in the Get Info window.

That's all you have to do. Now, whenever you build or do a Release build, Xcode will commit your files to the Subversion repository if there have been changes, then set the bundle version to the value currently in Subversion. Now, this script has not been extensively tested. If you have problems, let me know about them, and I will try to fix any issues that arise.