Well, yes, that's true. But, version control is still worth using even if you're a sole developer. Putting your projects under version control gives you the ability to "undo" past the time you last opened Xcode. It keeps a record of what your code has looked like over time, and gives you an extra level of backup. Accidentally throw your project in the trash and empty it? No worries, just check-out a new version. (Note: version control is not a substitute for a backup plan!)
And, everything you need to use version control is already on your hard drive, and Xcode knows all about version control, so it's not exactly hard to use. Let's walk through putting a project under source control, shall we?
Note: I know a lot of people love git. Although I'm not personally, some of git's features are really great. But, for single-developer projects, git doesn't provide any real advantages, and you lose Xcode integration. As a result, I'm sticking with subversion for this tutorial.
Choosing a Repository Location
All source control systems store their data in something called a "repository". The first decision you must make before using version control is where to put your subversion repository. I choose to put mine on an external hard drive because it gives me an extra level of backup redundancy. My working source code is always on my MacBook Pro's internal hard drive. I have a separate external hard drive for nightly backups, and a second external hard drive that I use for my code repositories and a few other things (like my iTunes & iPhoto libraries). That means my project is on three different physical devices, meaning I'm that much less-likely to suffer a catastrophic loss. I could (and plan to someday) make things even better by backing up to a remote location.
You don't necessarily need to have your repository on a separate hard drive, however. You can put it right on your main, internal hard drive, and you will still get benefits. The best option, in many ways, is to use a remote subversion repository, however setting one of those up is a lot more work than a local one so we're going to stick with local file repositories for this tutorial. There's no difference in using a local or remote repository, other than the format of the URL you use, so after this, you should be able to set up to use Subversion-based services like Google Code.
If you're going to need to access the source code from more than one account, creating a directory at /Users/Shared/subversion is a good choice for holding your repository.
Repositories can hold multiple projects, although many developers prefer to have a separate repository for each project. The choice is yours.
Creating the Repository
Creating the repository is very easy. Open up Terminal.app, navigate to the directory where you want to create the repository, and type svnadmin create [project name]. After you do that, you need to make sure that all people who need access to the repository have read, write, and execute privileges on it. So, if you wanted to create a repository called HelloWorld at /Users/Shared/subversion, you would execute the following commands:
cd /Users/Shared
mkdir subversion
cd subversion
mkdir HelloWorld
svnadmin create HelloWorld
chmod -R 777 HelloWorld
Note, that you could substitute something like chmod -R 770 HelloWorld if you're the only one who's ever going to access the repository.
Setting up the Standard Subversion Directories
Although it's not required or enforced, there is a generally-accepted "right way" of setting up a Subversion repository. By default, a Subversion repository has three directories:
- trunk - where all the source code is stored
- branches - a branch is a specific version of the source code. These are just copies (actually, more like symbolic links or aliases) to specific versions of the source code in trunk. So, you might have two branches representing the current development version and the current release version, or you might have different ones for each dev release.
- tags - Tags are exactly like branches, as far as Subversion is controlled - they're snapshots of a given version of your source code. Tags are often used for specific releases, so you might have a directory under tags called Release-1.0 that holds a copy of the code that was used to create the first shipped version of your application
As a sole developer, you may not use branches or tags when you first start using version control. It's still a good idea to set up these standard directories in case you decide you want that functionality in the future. Also, if you ever decide to open-source your application and make it available through Google Code or SourceForge, other developers are going to expect those standard directories.
To create the directories, you don't use the standard mkdir directory, but you use a similar command issued through the svn commandline tool. To create the tags directory in our HelloWorld project above, you would execute the following command:
svn mkdir file:///Users/Shared/Subversion/HelloWorld/trunk file:///Users/Shared/Subversion/HelloWorld/branch file:///Users/Shared/Subversion/HelloWorld/tagAfter you type that, it's going to prompt you for a comment. You can leave it blank, or type something like "setting up standard subversion directories". By default, subversion t will probably use vi or emacs to solicit the comment from you. Here's a little tip: if you're a Textmate user like me, set the environment variable SVN_EDITOR to the value mate -w in your bash profile (bash users) or .cshrc file (tcsh users) and it will prompt you for the comment using Textmate instead of a command-line editor. You can also set the environment variable EDITOR to the same value and that will cause several other standard unix programs to use Textmate for text editing rather than one of the standard unix editors.
Once you type your comment, save and exit the editor (or close the window if you're in Textmate), it will add the three directories to your repository.
Telling Xcode about the Repository
Next, launch Xcode and select Preferences from the Xcode menu. When the window comes up, scroll the top pane all the way to the right. The second to last item is SCM. SCM stands for "Software Configuration Management", and is a fancier term for version control. Click that icon and you'll get a window that looks like this:
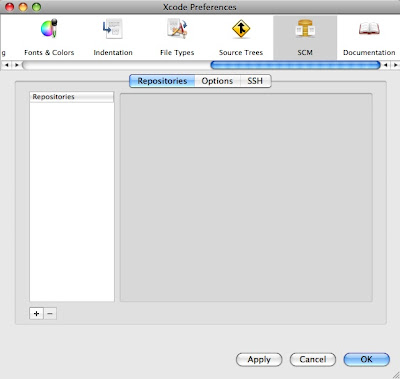
Click the little icon in the lower left corner to add a repository. You will be prompted for a name and to specify what SCM (version control) system you're using. The name here does not have to match the name you used in your repository. Select Subversion as your SCM system, and type "Hello World" for the name.
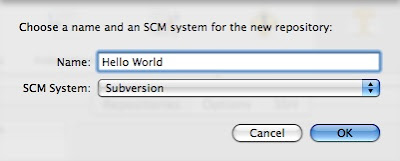
Hit return, and it will create a new repository. Configure this by typing the following URL into the URL field (it will extract the rest of the fields it needs from the URL):
file:///Users/Shared/subversion/HelloWorld
After you do that, your window should look like this:

Make sure you see the little green dot and the word "authenticated" below the text fields. That is your indication that it found the repository. If you don't see that, check the URL to make sure you didn't mistype anything.
You can now hit the OK button and close the preferences window. Let's now import an existing project into version control. If you want to play along at home, create a new iPhone application from the View-Based Application template and call it "Hello World". You don't need to make any changes, but when you're done, do close the Xcode project window.
Importing an Xcode Project into the Repository
Still in Xcode, select Repositories from the SCM menu. It should bring up a window that looks like this:
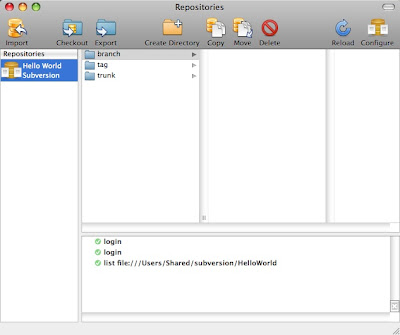
Click on the folder called trunk, then select the Import button from the toolbar. Navigate to and select "Hello World" project Folder.
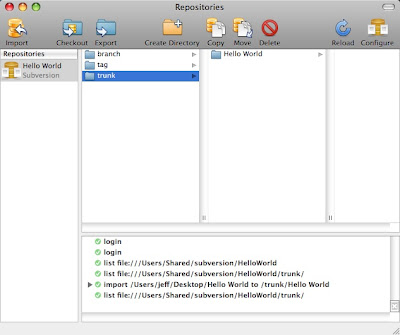
Now your project is under source control, but, the project in its original location doesn't know it. We need what's called a "working copy" of the code. A working copy has invisible files that connect it to the repository. So, go drag the original project to the trash. Yeah, I'm serious. Go throw it away. Once you've done that, select Hello World under trunk in Xcode's repository window, and press the Checkout button in the toolbar. It will prompt you for a location. Select where you want the project and click the Checkout button. After it saves it, it will prompt you to open the project:

Select Open Hello World.xcodeproj and Xcode will open up the project, which is now under source control.
Not Quite Done Yet
From Xcode's Project menu, select Project Settings…. Look for a popup menu near the bottom called SCM Repository. Click on that and select Hello World (Subversion) - Recommended.
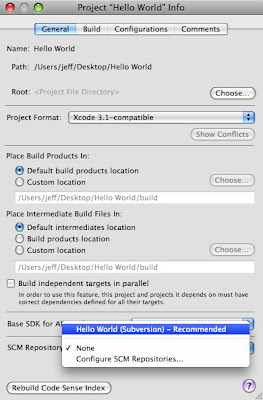
Once you've done that, a new column will appear in your project's Groups & Files Pane, and your project is ready to be worked with. That new column tells you the status of the file it is next to. If that column next to a specific file is empty, then that file has not been changed since it was last checked in. If it has question mark, the file needs to be added to the repository. If it has an M, then the file has been modified since last check-in. If it has an A next to it, it will be added to the repository next time you check in your changes.
When you add files to your project, you can select them and choose Add to Repository from the SCM menu. To commit your changes to the repository (aka "check them in"), select Commit Changes… from the SCM menu. If you decide you don't like the changes you've made, you can select Discard Changes... which will rollback your project to match the last version checked into the repository.
There are also other options in the SCM menu. You can compare different versions, update to a specific version, and look at annotations for different revisions. A full coverage of the capabilities of Subversion is beyond the scope of this article, but there is a great, free book that covers all aspects of using Subversion for version control You can get it here.


No comments:
Post a Comment